


")
If you’ve been on Instagram lately, you’ve probably noticed the conveyor belt post trend. It’s a smooth, sliding effect that makes your photos move across the screen in a single, continuous line.
It looks intimidating to make, but you can actually create it in just a few minutes using Canva.
I’ve tried this trend myself, and it’s one of the easiest ways to grab attention without heavy editing. Here’s how you can make your own.
What is an Instagram conveyor belt post?
An Instagram conveyor belt post is a short video (usually shared as a Reel or Story) that makes it look like your photos are moving together on a belt. As the animation plays, each image slides smoothly across the screen, creating a seamless “rolling” effect.
It’s perfect for:
- Showing off products or outfits
- Sharing a creative photo dump
- Highlighting different angles of one scene
- Adding movement to a static feed
Think of it as a photo carousel brought to life.
How to create an Instagram conveyor belt post
Now that you know what it is, let’s walk through how to create your own step-by-step.
Step 1: Create a design in Canva
The first thing you’ll do is set up your workspace in Canva.
- Open Canva and click “Create” from the left side of the screen.
- Select “Custom size” and enter 5120 × 1080 px.
- This creates a long, horizontal layout that’s ideal for lining up several photos side by side.
Step 2: Add and prepare your photos
Now it’s time to upload your visuals.
- Upload your photos to Canva.
- Use the Background Remover tool if needed to create cutouts of different objects. Select the image, click “Edit,” and then select “BG Remover.”
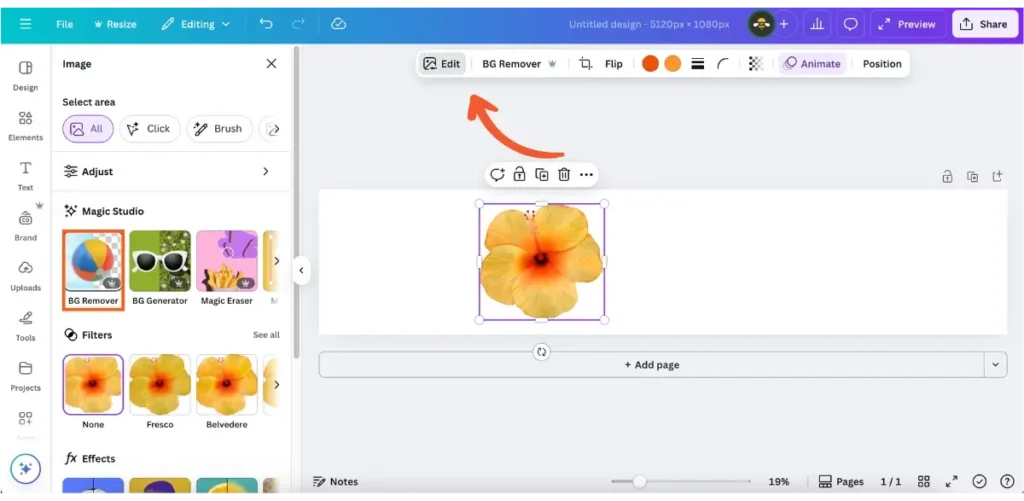
- You can also search for cutouts to use in your post from Canva’s Elements tab, located in the left-side menu.

Step 3: Align and group everything
Now that your photos are in place, the next step is to make sure they move together.
- Position each photo in a straight line across the canvas, and make sure they’re all the same size for a consistent look.
- Keep the spacing even for a balanced layout. Select all the cutouts, click on “Position,” and then click on “Tidy up” to ensure an equal distance between all cutouts.
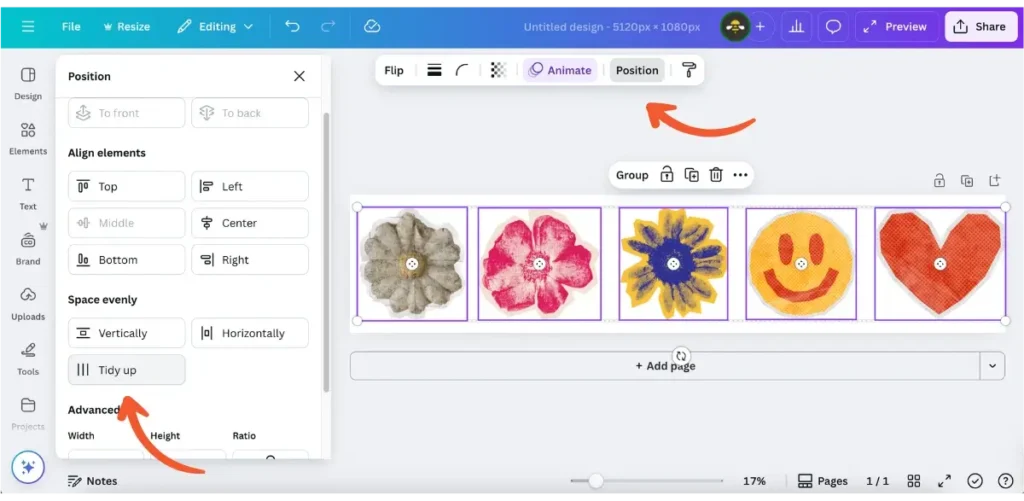
- Select all the photos at once.
- Click “Group” to link them together.
Grouping prevents individual images from drifting separately during the animation. This is the key to keeping the conveyor effect clean and professional-looking.
Step 4: Add the conveyor belt animation
Here’s where the magic happens.
- Make sure you have the group selected and go to the top menu and click “Animate.”
- Choose “Drift” from the list of motion effects.
- Adjust the intensity (I usually set it to maximum) and move the direction slider to the right.
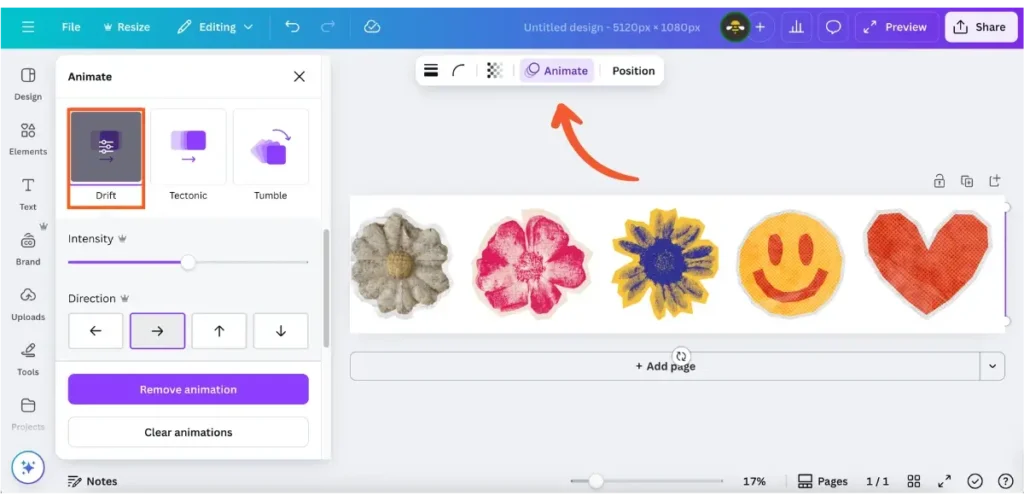
That’s your conveyor belt motion, simple but so satisfying to watch.
Step 4: Increase the duration (optional)
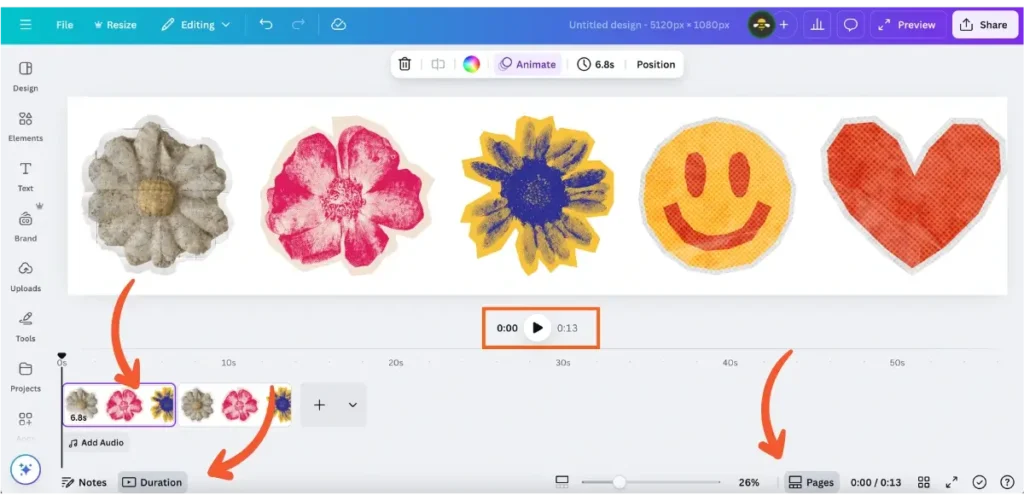
If you save the video now, it will only be 5 seconds long. There’s nothing wrong with that, but if you want your animation to last longer and end more smoothly, you’ll need to get a bit creative.
Here’s how to make your Canva animation longer:
- In the bottom-right corner of the page, click “Pages.” You’ll now see “Durations” appear in the bottom-left corner of the screen.
- Click “Durations” to preview and adjust the length of your animation.
- Hover over the first page thumbnail until you see three dots (⋯). Click them, then select “Duplicate page.” (You can also right-click the thumbnail to access the “Duplicate page” option.)
- You’ll notice a rough transition between the duplicate pages. To smooth it out:
- Move the group of cutouts on the second page slightly to the right so they align with where the first animation ended.
- Drag the playhead along the timeline to preview the transition and make sure the movement looks smooth.
- It might take a bit of tweaking, but once you get it right, the transition will be seamless.
- Repeat this process once or twice, depending on how long you want the video to be.
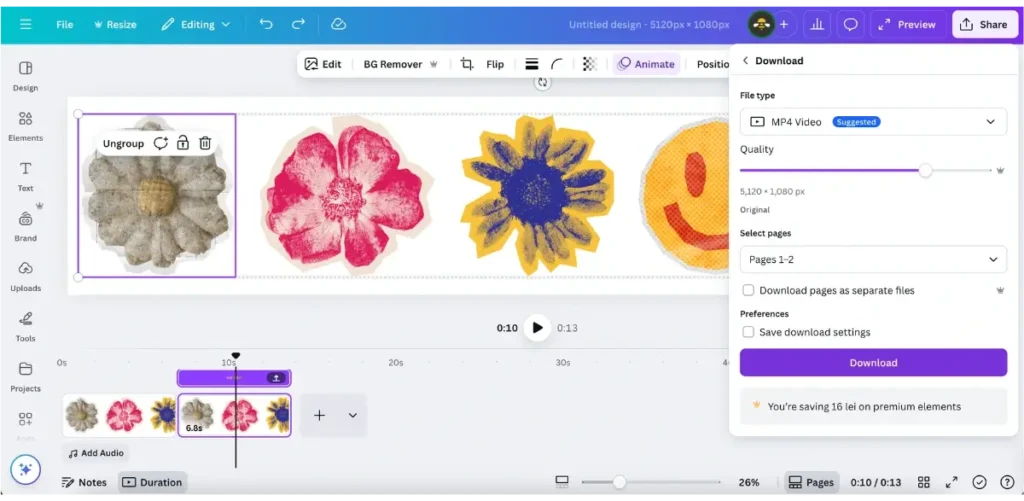
Step 5: Download your video
Once you’re happy with how it looks, it’s time to export it for Instagram.
- Click “Share” from the top-right corner of the screen and then click on “Download.”
- Choose “MP4 Video” as the file type and click on “Download” once more.
- Keep all pages selected.
- Save the animation to your device.
Step 6: Schedule and post with SocialBee
At this point, you can either post your video directly from Instagram or schedule it using SocialBee.
Posting manually works if you want to share it right away, but you’ll need to be online at the exact time you want to post. It’s also harder to maintain consistency if you’re juggling multiple accounts or time zones.
That’s where SocialBee saves time. You can upload, preview, and schedule your Instagram posts in advance.

