


Remember that moment in Everything Everywhere All At Once when Evelyn taps into infinite versions of herself? That’s what AI tools feel like for designers—minus the existential crisis and hot dog fingers.
It’s like having a designer on demand, ready to bring any creative idea to life instantly.
👀 Did You Know? 90% of creative professionals believe GenAI helps them save time and money making art while assisting them to brainstorm new ideas
Canva AI has become a favorite for those tired of spending evenings stuck in a design-induced fog. From generating multiple versions of a social media post to animating static visuals, it makes the design process fast and effortless.
This article helps you understand how to use AI in Canva to make designing faster and more fun.
As a bonus, we’ll also show you how AI can supercharge your creative process.
Ready to get creative? 🎨
How to Use AI in Canva for Creative Professionals
⏰ 60-Second Summary
Want to get the most out of Canva AI?
Here’s how to use Canva AI:
- Open Magic Studio from your Canva homepage.
- Generate visuals instantly with Magic Media—type a detailed prompt to create images, videos, or graphics.
- Edit and enhance designs with Magic Edit and Magic Expand to modify or resize images.
- Create content quickly using Magic Write for blogs, captions, and marketing copy.
But here’s the game-changer— AI is a smarter alternative.
With AI, you’ll get a complete design and workflow solution. It’s perfect for managing creative projects, generating content, and collaborating seamlessly. Whiteboards help you visualize ideas, while Brain refines creative prompts and speeds up your creative process—all in one platform.
Why settle for design-only tools when you can manage everything with AI?
What is Canva AI?
Canva AI is a suite of AI-driven tools integrated into Canva to simplify and enhance the design process.
Unlike other design and creative automation tools that require technical expertise, Canva AI keeps things simple, intuitive, and accessible to everyone.
With its interactive interface and drag-and-drop working style, Canva—and Canva AI— help you create high-quality visuals and refuel your creativity with minimal effort.
It offers 10+ AI tools, from image and video generators to editing features that bring your ideas to life. Its simplicity and powerful AI make creating professional designs quick and easy.
🧠Fun Fact: Melanie Perkins co-founded Canva as a 19-year-old communications and commerce student. The platform was born out of frustration from the complexity of traditional design software while teaching her fellow students basic computer design.
Who Can Use Canva AI?
Canva AI caters to all skill levels. Unlike Adobe Photoshop, which can feel overwhelming for beginners, Canva AI offers an intuitive interface with helpful prompts.
If you’re seasoned, you can enjoy advanced tools like Magic Morph and Magic Eraser for more complex projects.
The free plan allows access to most tools, including AI features. However, the more advanced ones are only limited or reserved for premium users.
For instance, free users get only 50 uses of Magic Write and Magic Media. If you utilize these tools extensively, it may be worth upgrading your plan.
If you don’t, you can still create impressive designs with the free version!
Application across various industries
Whether you’re a design newbie who thinks kerning is a type of breakfast cereal or a seasoned pro who dreams of CMYK, Canva has AI tools for everyone.
- Graphic designers: Save time and generate ideas with AI prompts to spark your creativity and generate initial concepts
- Social media managers: Create eye-catching posts for Instagram, Facebook, and more in minutes and focus more on keeping up with graphic design trends
- Marketers: Design stunning presentations, proposals, ads, and engaging social media campaigns that convert
- Small businesses: Bring your brand to life on a budget with professional-looking logos, AI-powered graphic designs, and marketing materials
- Educators: Craft engaging lesson plans, interactive presentations, and visually appealing learning materials
- Students: Design detailed projects, presentations, and posters for school or university
- Hobbyists: Explore your creativity with different design styles, from minimalist to futuristic, without any prior design experience
To summarize, Canva AI levels the playing field, allowing anyone with an idea to bring their vision to life with stunning visuals.
🧠Fun Fact: Canva’s AI tools have been used over 10 billion times, showcasing the significant adoption and reliance on these features by users worldwide.
How to Use Canva AI: Step-By-Step Guide
All Canva AI tools are found in Magic Studio—simply sign in to Canva and explore the AI menu on the left sidebar.
After generating your content, you can easily fine-tune the results using Canva’s drag-and-drop features and editing options to create designs tailored to your vision.
Here’s a more detailed example of how to use Canva AI to create designs in mere minutes:
1. Magic Media
Magic Media is Canva AI’s all-in-one tool for generating high-quality images, graphics, and videos from text prompts. Just type what you need, and Magic Media brings it to life.
Open a new design and scroll down the sidebar to find the Magic Media tool.


Now, let’s get creating!
Generate images with Magic Media
To create an image, open a new design, scroll down the sidebar, and select Magic Media. Then, type a description of what you want and choose from 15+ styles like “Anime” or “Color Pencil.”
Need help coming up with something? Canva will even suggest a few ideas to get you started.
Let’s use an AI-generated prompt with no added styles for this example. Here’s the prompt: a minimalistic house with trees.
Here are the results.


Since the prompt isn’t detailed, the generated image is generic.
Now, let’s try adding some details. After changing the prompt to “A realistic minimalist single-family home with trees and a small pond with a sunset,” what Canva AI can generate is here.


You’ll get better results by adding more detail. Choose your style, refine the prompt, and regenerate until it looks right.
Create graphics with Magic Media
Want some vector graphics but don’t want to download stock images? Magic Media does it for you in seconds!
We used the prompt to create a graphic: “Cat on a scooter.”
Even with a simple prompt, the results are pretty impressive. See for yourself!


The tool produces four different versions of the prompt, and they’re pretty good ones at that. Imagine what you can create with a detailed prompt.
Create a video with Magic Media
Again, provide a detailed prompt describing precisely what you are looking for.
For this example, our prompt was, “Tiny astronaut exploring a colorful alien planet with glowing plants. The astronaut is moving forward.”
Here’s what the AI video generator created in less than a minute.


This tool saves hours of video generation, giving you a solid foundation in minutes. You can later add audio, effects, and other elements to customize your video further.
💡Pro Tip: Remember to specify motion in your prompts! In the given example, “the astronaut is moving forward was crucial for the AI to understand the desired movement. Use phrases like “spinning” and ”bouncing” to guide the AI.
2. Dream Lab
Dream Lab is a more advanced generative AI tool that utilizes Leonardo.ai’s Phoenix model to transform text descriptions into dynamic images.
It produces high-quality renditions and is ideal for professionals creating complex multi-subject images or photorealistic portraits.
For this example, we used different versions of the prompt, “Create a surreal landscape with floating islands.”


Notice how every little change in the prompt creates a different image? Make sure you experiment with a few things before picking your favorite image.
Dream Lab also allows for greater customization by offering 15+ different styles, letting you add reference images, and choosing from six image layouts to improve the precision of the design.


Here’s an example of a 3D-rendered image.


3. Magic Edit
The Magic Edit is a photo editor that allows you to add, remove, and edit existing elements of images and even adjust colors.
Want to see how efficient the tool really is? Say you want to add a blazer to a photo—here’s how you’d do it:
- Click Edit on your image and go to the Magic Edit tool in Magic Studio
- Use the brush tool for precise selection, mainly to target intricate areas like shirts


- Pay close attention to the selection boundaries to minimize unintended edits to other parts of the image
- Adjust the brush size for accuracy.
- Use a concise prompt like “Add a black blazer over the shirt.” Here are the results:


4. Magic Design
If you are a Canva user, you have used Magic Design before! Let’s jog your memory.
The design tool in the sidebar gives you templates full of ideas. Just describe your requirements and access hundreds of pre-made AI templates ready to be yours.
Plus, you can also add filters to customize colors and languages as well!
Here’s the result for the prompt, “Gaming YouTube thumbnail.”


With Magic Design, you can create everything from social posts to presentations and have complete control over customizing every detail.
5. Magic Expand
Do you wish the tree hadn’t gotten cut in that beautiful beach photo? Fix it with Magic Expand. Select the picture you want, go to Edit, and find the Magic Expand tool in the Magic Studio.
Now, choose the size of the image and hit expand. This is what it would look like.


However, the tool might generate inaccurate results if the image is complex and has significant elements that must be expanded.
6. Magic Eraser
Remove unwanted objects or people from your almost-perfect photos in seconds.
Click Edit, choose Magic Erase, highlight the object you want to remove, and hit Erase. That’s it—your image is good as new! Here’s a quick look.


If you think the image could be refined further, adjust the brush size, select it, and erase it again.
7. Magic Grab
Want to take that perfect image of your model and add it to a new background? You can with Magic Grab.
Simply select the picture from which you want to grab the object, click on edit Edit, and then Magic Grab.


Select the object with the Brush or Click tool and select Grab. You can also select multiple objects using the Click tool. Click Grab and witness the magic!


8. Background Remover
If you’re a graphic designer, background removal is a regular task. Canva’s AI background remover handles it in seconds—no need to switch between apps.
You can find it on the toolbar or by going to the Media Studio section and clicking BG Remover.


9. Magic Animate
Use Magic Animate from the toolbar to animate any text or element in your design. With 20+ animation styles and adjustable timing, it’s perfect for quick, impactful updates.
Canva has more animation options than Microsoft PowerPoint, which can help with social media, marketing images, and presentation slides.

10. Magic Morph
The Magic Morph tool lets you play around and add fun elements to your designs and shapes. Choose any element or text you wish to morph and select the Magic Morph tool from the Apps section.
Let’s run a quick demo using the text prompt: “Happy Birthday.”
The tool lets you choose from existing morph options or request a specific one for a custom effect.
So, we tried both! The prompt was “Shiny deep pink balloon with soft edges,” and the existing option chosen was Balloons. Here’s the result:

Although the tool is effective here, it sometimes generates inaccurate designs.
11. Magic Write
Don’t want to go back and forth between ChatGPT and Canva? Right from ideation to writing blog posts, Magic Write does it all for you here in Canva. Here’s how you can start.
Navigate to the Magic Write tool on the home page and click Try Magic Write. You can also use it while designing a project. Just click on the text box you wish to edit with AI, click Magic Write, and get editing.


For example, we used the prompt “Marketing strategy for a tote bag business in 300 words” in a new document. Here is the result:


Even with a short prompt, the AI delivers solid results. You can explore more by clicking “More like this” or fine-tune with “This, but…”
Once satisfied, click insert, and the text will be pasted into the document or the text box perfectly aligned.


12. Magic Switch
Do you or your team spend hours repurposing content for different platforms? With the Magic Switch tool, you can do it in minutes.
Select the design you wish to switch and go to Resize at the top left side of the Canva workspace. Choose the post type and switch!


Let’s convert a YouTube thumbnail for a brown coffee recipe video into an Instagram post.


💡Pro Tip: Experiment with as many combinations of keywords and features as possible to see what unique results you can achieve with AI.
Limitations of Canva AI
While Canva AI is a fantastic tool for improving your creative projects, it does come with certain limitations.
Export limitations
Canva AI’s free users face file types and quality restrictions when exporting designs. For instance, high-resolution downloads and specific formats, like transparent PNGs, are reserved for Pro users.
Generic outputs
AI-generated content works best with detailed prompts and brand-specific personalization. The better your input, the better the output.
Daily usage limit
Use limits are in place if you’re using AI features like Magic Write or Magic Media. These can be frustrating when working on larger projects that require extensive content generation or multiple image outputs in a single day.
Customization constraints
Although Canva is an ideal AI image generator, customization options can sometimes feel restrictive, whereas other Canva alternatives might perform better. The limited resizing options can be a frustrating issue when editing images.
📮 Insight: Low-performing teams are 4 times more likely to juggle 15+ tools, while high-performing teams maintain efficiency by limiting their toolkit to 9 or fewer platforms. But how about using one platform?
As the everything app for work, brings your tasks, projects, docs, wikis, chat, and calls under a single platform, complete with AI-powered workflows. Ready to work smarter? works for every team, makes work visible, and allows you to focus on what matters while AI handles the rest.
Leveraging Canva AI with
If you love how Canva AI speeds up your designs, wait until you pair it with .
Sure, is the everything app for work, but it works excellently to bring the project management aspect to your Canva AI design masterpieces.
’s AI tool, Brain, complements Canva AI by helping you efficiently ideate, refine, and expand creative prompts.


Need content ideas or project outlines? Brain dishes out brilliant prompts tailored to your goals. Brain also picks up team conversations from Chat or comments to ensure all the nitty-gritty is covered.
Do you need to visualize your design concepts before implementing them? Whiteboards can help you brainstorm and create idea boards alongside your team in real time.
You can pull design references or old Canva designs directly onto the board, making collaboration smoother and more dynamic.


Sometimes, it’s easier to show than tell—especially when you’re working through early design ideas with your team. That’s where Whiteboards, powered by Brain, step in.
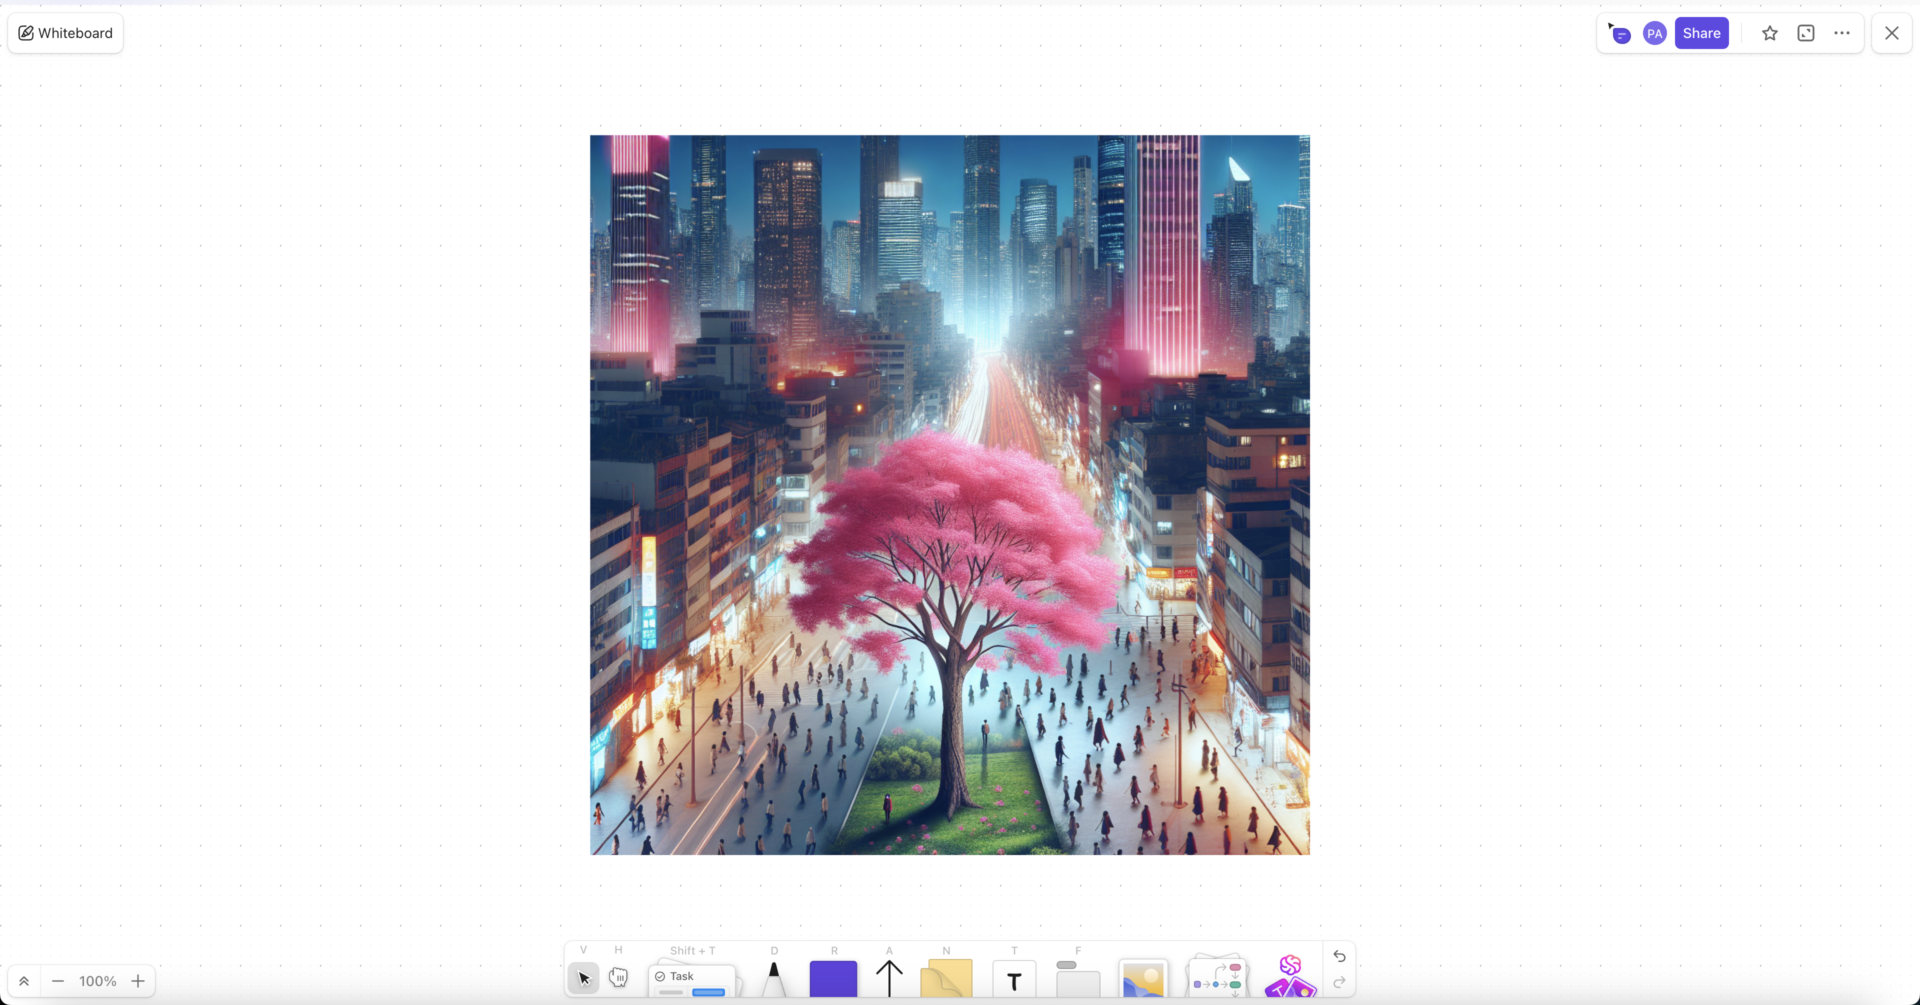
Instead of switching between tools or writing lengthy explanations, you can quickly turn ideas into visuals right where your brainstorming happens. Just type in a simple prompt—like “a glowing lightbulb illustration for a campaign concept”—and Brain will instantly generate an image for you.
From there, drag it onto your Whiteboard, add notes, connect it to tasks, or get feedback—all in one place. It’s perfect for when your team needs a creative kickstart without slowing down.
Here is an example: With a simple prompt, “Create an image of a simple tree with pink leaves in a bustling city,” the result is quite neat.


Meanwhile, Docs is an excellent tool for documenting creative prompts, sharing design goals, and collaborating with team members. Real-time editing keeps your team in sync, and you get instant feedback without delays.


You can even paste Canva links directly on your Docs—and even embed them as a view inside your spaces for faster access.


Do you want to share your designs and folders with specific team members? lets you create tasks, assign them, and add Canva links directly for the right person—a must-have for teams handling a high volume of design outputs daily.


With large design projects, it’s easy to lose track of progress. That’s where ’s Custom Fields and customizable views like List View, Board View, or Gantt Chart View let you manage projects the way that makes sense for you.
While doesn’t have a full-fledged Canva plugin (yet!), you can integrate both platforms through third-party tools like Zapier. This allows you to trigger custom actions and create automated tasks for particular improvements in both platforms.
For example, when you create a new task in with the tag ‘Design Request,’ a new Canva design is automatically created and assigned to the relevant team member in with a Design Review subtask.
Plus, Automations handles repetitive tasks, creating triggers for notifications or subtasks so nothing gets left out. It saves you time and eliminates manual errors.


A jewel in the crown is ’s built-in time tracking that helps you stay on top of how long tasks take. Top it off with custom dashboards, and you get an overview of your projects, deadlines, and team workloads.
The bottom line is that Canva and for Design Teams create your dream workflow together. Focus on crafting amazing designs while keeps everything else running smoothly.
Turn Pixels into Productive Perfection with
With Canva AI, you can turn your ideas into stunning visuals while staying focused on what matters most—your creative vision. However, the AI generator tool becomes even more effective when tied in with , which is the perfect way to manage your entire workflow simultaneously.
From tracking projects, deadlines, and endless feedback loops to proactively assigning tasks, is the perfect partner for Canva.
Ready to try this killer combo? Sign up for a free account now! ✨


Everything you need to stay organized and get work done.


