


Nothing kills a room’s aesthetic faster than TV cables snaking down your wall and across the floor. Sure, streaming eliminated some wires, but you still need power, HDMI, and Ethernet connections that look terrible. Hiring professionals to conceal cables costs over $300 and requires waiting weeks for availability.
After finishing my basement, I faced this exact problem across four TV locations. That’s when I found a simple workaround using three specific products: the Legrand 9 Inch In-Wall Enclosure, HDMI Ethernet Wall Plates, and VCE Low Voltage Mounting Brackets. Each location took 30 minutes and cost approximately $50, delivering results that match those of expensive custom work. Here’s the exact process I used to get perfect cable management on a budget.
The problem with traditional cable management
Why standard solutions fall short
Cable raceways, zip ties, and routing cables behind furniture create their own visual problems. Plastic raceways look cheap and collect dust. Zip ties create lumpy cable bundles that are still visible. The fundamental issue with surface-mounted solutions is that they’re still visible—your eye naturally follows cable lines, drawing attention to the very thing you’re trying to hide.
When you route cables through walls instead, they vanish completely from sight. Contractors typically charge $200-$400 per TV for this work, but buying the parts yourself cuts that cost by 80%.
What you need for professional-looking results
Essential components and power considerations

Three specific products make this system work:
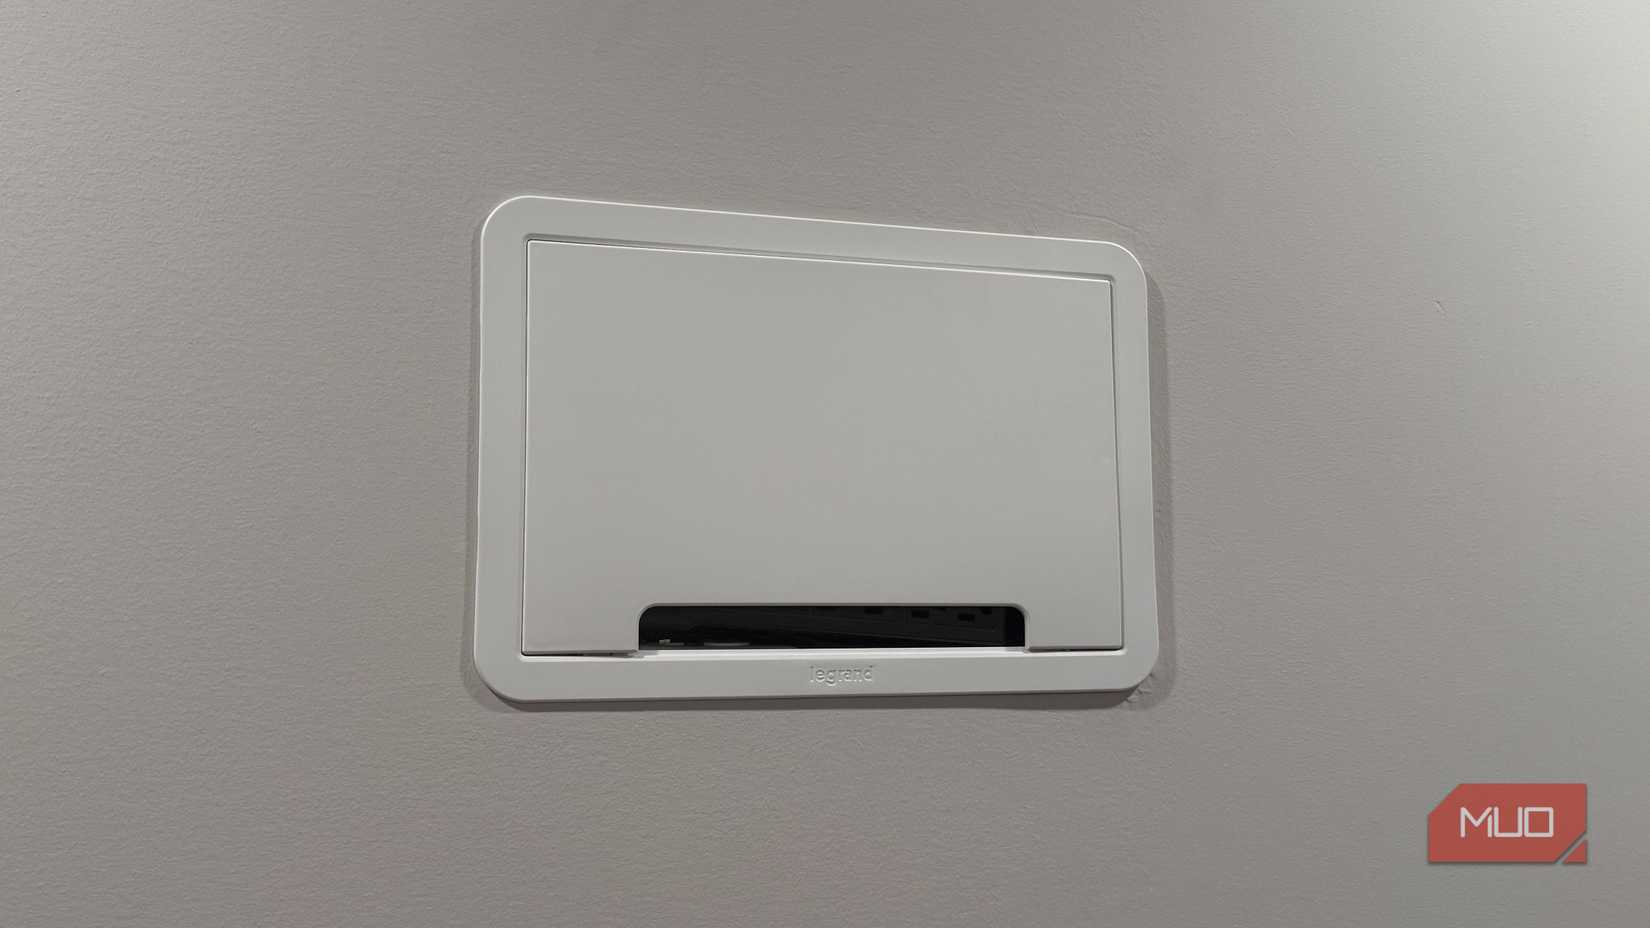
The Legrand 9 Inch In-Wall Enclosure becomes your central hub behind the TV. This recessed unit holds power outlets and creates pass-through openings for HDMI and Ethernet cables. The included trim ring gives it a polished, built-in look.
HDMI Ethernet wall plates create clean connection points wherever you need to plug in devices. These plates mount flush to the wall and provide connections without any visible cables.
VCE Low Voltage Mounting Brackets secure the wall plates properly to drywall, providing a solid foundation that prevents them from pushing into the wall when you plug and unplug cables.
I got lucky because my basement renovation included outlets at TV height. Without existing outlets up there, you’ll need extra materials and electrical knowledge for safety. Anyone uncomfortable with electrical work should hire an electrician for power while tackling the low-voltage stuff themselves.
Basic tools you’ll need: oscillating multi-tool for drywall cuts, level, stud finder, screwdriver, and measuring tape. If you’re looking for a new smart TV for your setup, here’s the best time to buy one.
Planning your cable routes
Location selection and preparation

Use a stud finder to locate wall studs and plan your cable routes through the open cavities between them. Mark the locations for your main enclosure behind the TV and your connection points where devices will plug in.
The Legrand enclosure comes with a paper template that makes marking your cut easy. Tape the template to the wall, trace around it, and then measure twice before cutting once. Run cables vertically whenever possible, as horizontal runs require more complex routing around obstacles in the wall.
Installation process
Cutting and mounting components

Use the oscillating tool to cut along the traced lines. The enclosure slides into place and locks down with its spring-loaded tabs. Take your time with the cuts—clean edges make the trim ring fit properly. I found that scoring the drywall paper first prevents cracking or chipping.
Since I already had outlets at the proper height, the enclosure installation was straightforward. The VCE mounting brackets are installed between studs at device height. Run your HDMI and Ethernet cables from the main enclosure down through the wall cavity to the wall plate locations. Fish tape or a coat hanger works well for pulling cables through the cavity.
The wall plates snap into the mounting brackets and provide clean connections that look completely integrated into the wall.
Four real-world applications in my basement
Versatile solutions across different spaces

I installed this system in four distinct areas: my home gym with a high-mounted TV, a guest bedroom office featuring a Samsung Frame TV serving dual purposes, a sitting area pre-wired for future TV installation, and a multi-purpose guest space.
Each installation took under 30 minutes and addressed unique challenges—from preventing workout interference in the gym to maintaining the Frame TV’s artwork aesthetic in the office space. Having electrical outlets already installed at TV height from my basement finishing project made each installation particularly clean and straightforward.
Results that rival professional installation
Cost savings and long-term benefits

Here’s what I spent per location: Legrand In-Wall Enclosure ($45), HDMI Ethernet Wall Plate ($10), VCE Mounting Bracket ($10 for 5-pack), plus HDMI cables ($15). Professional installation quotes ranged from $200-$400 per location. Completing all four areas myself saved me over $1,000 while achieving identical results.
The visual transformation is dramatic. Rooms look cleaner and more intentionally designed without cable clutter. Beyond aesthetics, you eliminate tripping hazards from floor cables. Cleaning becomes simpler too—no more wrestling with tangled cable nests behind your entertainment center.
Future flexibility is another major advantage. Adding new devices only requires plugging into the existing wall connections. Moving or upgrading TVs is simple because the infrastructure stays in place. If you’re adding a smart TV to your home, don’t skip these features.
Transform your space in one afternoon without professional prices
Installing in-wall cable management transformed four chaotic cable situations into clean, professional-looking setups in a single afternoon. The 30-minute installation time per location made it feasible to tackle all four areas quickly.
The key is using quality components designed to work together. The Legrand enclosure, HDMI wall plates, and proper mounting brackets create a system that looks and functions like professional work at a fraction of the cost. Your rooms will look more intentional, cleaner, and safer—all while maintaining easy access for future changes.
Stop living with cable chaos. This DIY approach delivers professional-quality results without the professional price tag, and your perfectly clean walls will thank you. Once you have your TV up and running, check out these binge-able thrillers on Netflix.


