


Quick and easy CI/CD pipelines with semantic versioning for any language or tool.
Releasing a new version of a tool should be boring. No ceremony, no planning meetings, not even a discussion. It should be transparent, effortless, reliable, and even informative – more on that later.
However, as a software consultant who helps teams implement DevOps solutions, I often find that this is not the case. What I do find varies wildly in quality, so instead of telling you what I don’t like, let’s focus on how I like to structure my pipelines in order to onboard new repositories quickly and easily.
To understand my perspective, I’d like to share how my views on the topic have evolved over the years. Currently, I apply a process that involves arranging “LEGO blocks” of modular workflows with minor tweaks, such as parameter changes. Ideally, I aim for defaults that allow me to simply copy and paste the same building blocks from one project to another when they share the same type.
For example, the build process for Rust library X is probably about the same as Rust library Y, and Node server foo is probably just about the same as Node server bar. Etc.
Over the years, I attempted to assemble open-source components to achieve this, but I never found quite the right combination. I built my own solutions finally, and I’ll share those with you soon.
But first…
I realize versioning and releasing aren’t the most exciting topics; however, it’s a problem that every project faces, even when vibe-coded (probably especially!). So, let’s talk about how to do it right. In my opinion, of course.
Doing it right will make your project look much more professional and communicate changes to its users. This establishes more trust in your projects by helping developers understand and adopt new changes in a clear and consistent way.
In the Beginning…
Back at the beginning of my software engineering career, releases were quite the event. They were the byproduct of milestones, achieved through a series of sprints, planned, to the best of everyone’s ability, in a series of planning meetings where the backlog was scoured through, and tasks that were worthy were chosen.
We’d do our best to write out a spec of a plan, and estimate a Fibonacci number or T-Shirt size, or in worst cases, a number of days. Of course, there were always some bug fixes to be included to fix the previous releases as well.
The release was the culmination of this process. The deliverable of deliverables, shipped to the real users. As the culmination of this process, and high stakes for getting it right, the release was an emotional moment.
Exciting?
Scary?
Maybe a few you’ve triggered have got your heart racing as they set the machines in motion.
There’s also the detail and drama of deciding a version number.
Is this a major release? A whole new version?? Minor? Patch?
Sometimes marketing dictated the version… 2.0!
At this point in my career, it was largely not my opinion that mattered on this topic of version numbers, and looking back, it probably should have been no one’s (you’ll see what I mean later).
I was not responsible for releases in the beginning… However… that would not last forever.
Into Open Source
At some point in my career, I became interested in contributing to open source. Generally, in the form of npm modules, as I was very into Node at the time.
It was my turn to be in charge of releases.
I can’t remember how, maybe through some newsletter or maybe part of the NYC NodeJS meetup that Matt Walters and I used to run together – I came across the library semantic-release. Semantic Release implemented a principle, which I vibed with as a web developer, of a separation of concerns based on semantics.
Before you go run off and start using semantic-release, there are some limitations I encountered with it… And I’ll get to those in a moment.
First, at a high level, the basic idea that semantic-release preached was that you’d follow a specific format for your commit messages, and based on the messages, the version could be calculated.
It spoke of removing the emotion from releases, making them robotic, based on what has actually changed. This had the benefit of allowing the version number change to communicate what had changed.
If there was a new major version release – v2 to v3, for example, that meant there was a breaking change.
To signify this in your commit message, you’d include BREAKING CHANGE: in the body of the commit.
feat: revamp user auth flow

BREAKING CHANGE: Per Chad's "game-changer" vision in the 3am Slack rant, we've ditched the old auth system for a blockchain-based solution because "passwords are so 2024." Update your clients or enjoy the 500 errors!
Minor version bumps, like v2.0.0 to v2.1.0, signified there was a new feature added.
feat: add dark mode toggle

Per the 47-comment thread in the "urgent" ticket, users can now save their retinas. Dark mode added, but brace for the inevitable "make it darker" feedback.
Patch versions signaled fixes, or refactors, or basically most anything else that should trigger a new release.
fix: revert "fix" by AI that skipped the breaking tests to avoid the failure
And finally, some commits should not trigger a release at all. “Chores” as they were introduced to me. No-ops, as I call them.
chore: update release pipeline version from v3.1.0 to v3.1.1
This specific format of commit messages was known as Conventional Commits, though there are others. You can check out their page for the full spec, but I wanted to share the gist of it.
Furthermore, this information contained in the commits could also be surfaced as a change log — such as highlighting a breaking change. For example:
What's new in v2.0.0

* feat: remove deprecated API

  BREAKING CHANGE: the FooBar API that was deprecated. To upgrade, you can use the new BazBar API.
So, for a while, semantic-release was great for me. For Node projects, it still is… However…
Into DevOps
I was always interested in the idea of how to build scalable distributed systems, and so it was something I pursued for quite some time in my career. Long story short, I eventually learned how to do it well, but had a new problem: how to deploy all the pieces.
These weren’t npm modules; they were applications, services, databases, and queues!
I loved the simplicity of semantic-release, but it only worked well for Node.js projects. Sure, you could, and I did a few times, add a package.json file to non-node projects, but that was messy and hacky at best.
Around this time, I became deeply involved in DevOps, during the Jenkins era, as Docker was starting to gain traction. I wrote about my early DevOps journey and discovery of Docker for deployment. I learned to write pipelines with Jenkins and deploy everything with Docker Swarm!
I was also embracing trunk based development at that time, and committing to master. My more recent and still relevant and accurate Guide to Git with Trunk Based Development article explains the why and how of that if you’re interested.
I always wanted these projects that I worked with to be versioned and released like semantic-release projects were, but I never found a solution that worked as well. Many wouldn’t be able to handle generating changelogs correctly, and some would sporadically bump the version wrong.
It wasn’t the most important thing on my list, so I generally called it good enough and lived with the flaws.
Over time, as a DevOps consultant, I have encountered and released various projects in multiple languages and frameworks, and every single one has required versioning, releases, and changelogs.
Another headache I often encountered was large, monolithic pipelines. Coming from the Jenkins era, I get it, this is how I used to write pipelines too. I‘d try to have the whole release flow in a big series of steps, starting with a push to main. If you pushed to main, various quality checks would run, and a new version would be built, published, tagged, and released.
This isn’t terrible per se and also probably “good enough” in most cases; however, as a DevOps consultant, I have to do it repeatedly. Breaking things down to smaller, more modular pieces allows those pieces to serve more projects. I first heard this described by the infamous James Halliday, AKA Substack, as the coverage of ideas, an idea that comes from embracing UNIX philosophies.
For example, a Node Quality pipeline can be the same in every Node project, assuming you follow the standard npm script conventions, and so a generic pipeline for running linting, building, and unit testing can be shared across most, if not all, Node.js projects. The pipeline steps are simply calling npm run lint --if-present and etc., and the scripts section of the package.json file determines what happens when that lint command is run.
High-Level Pipelines For Versioning and Releasing
At a high level, every project that needs to be released will first be tagged with a new version number. Then, a release can be created that is linked to that version number, and artifacts will be produced as part of its associated pipelines.
I use GitHub Actions most frequently, as I think pipelines are commodities, and it’s a simple one to get started with. I’ve used many, but they are all essentially the same — perform a series of steps with a shared volume. That shared volume generally contains the checked-out source code.
Versioning itself, if we are following the standard of conventional commits being tied to a semantic version increase, is not a language-specific thing. It has no dependencies on the contents of the code; instead, it’s concerned with the history of versions and commits.
For a long time, I tied releases to versions, thinking they were part of the same thing, when in reality, they are two distinct entities joined together. A tag and a release.
Splitting them apart made the versioning part of the pipeline its own modular piece, which then triggered a build of that version and subsequent release.
Let me break it down… For each project, in GitHub Actions, I have two pipelines:
-
On commit to the trunk branch, version, and tag n When a commit occurs in the trunk branch (usually
mainormaster), trigger a pipeline that runs quality checks, and, if they pass, calculates a new version number. It then creates and pushes a tag with that new version number. We can also use this opportunity to update that version number in the code base if necessary, and generate a change log from the commit data that was used to calculate the new version number. -
When a tag is created, build new versions and release them. This step is simplified by the previous step of doing the version bump. Everything’s already been bumped to the new version. We can just run build and release using the tag as the base.
As I mentioned earlier, after trying many times to piece together open-source components from the GitHub Actions Marketplace, I eventually gave in and wrote my own tool that handles step one. I also wrote some workflows, which I’ll share with you as well.
Introducing vnext
vnext is a fast Rust CLI tool that uses conventional commit messages to compute your next semantic version, automating major, minor, or patch bumps for streamlined releases.
Here’s how to use it.
NEXT_VERSION=v`vnext`

vnext --changelog > CHANGELOG.md
I think it’s pretty straightforward! Let me know what you think.
It is entirely based on the project’s git history.
It does not matter what language or tool you are releasing; the versioning process is basically the same. Get a new version, update it in some files, create a changelog, tag, and push. The only difference is which files need to be updated — this is accounted for in the workflow I’ll share in a moment.
vnext is quick and easy to install via ubi — the “Universal Binary Installer”. Once configured, you can run:
ubi --project unbounded-tech/vnext
I’ve also created a shared GitHub Actions workflow that you can call, which handles all those details.
Here’s how to use the shared workflow:
name: On Push Main, Version and Tag

on:
  push:
    branches:
      - main
      - master

permissions:
  packages: write
  contents: write

jobs:

  version-and-tag:
    uses: unbounded-tech/workflow-vnext-tag/.github/workflows/workflow.yaml@v1
    with:
      useDeployKey: true
      changelog: true
Most projects will also need to configure how and which files to update with the new version number.
Currently, vnext supports two generic methods (yqPatches and regexPatches) and a few language-specific options.
The language-specific options are the simplest to use. For example, setting with.node to true uses npm to update the project’s package files.
yqPatches uses the tool yq to patch specific fields in a YAML file. I often use this for updating version numbers in Helm charts:
  version-and-tag:
    uses: unbounded-tech/workflow-vnext-tag/.github/workflows/workflow.yaml@v1.13.0
    secrets:
      GH_PAT: ${{ secrets.YOUR_ORG_SECRET_PAT }}
    with:
      usePAT: true
      changelog: true
      yqPatches: |
        patches:
          - filePath: helm/values.yaml
            selector: .image.tag
            valuePrefix: "v"
          - filePath: helm/Chart.yaml
            selector: .version
            valuePrefix: "v"
I also took this opportunity to share how to use a Personal Access Token instead of a Deploy Key.
regexPatches uses sed to find and replace a string with the new version number inserted. For example:
regexPatches: |
  patches:
    - filePath: package/composition.yaml
      regex: /ghcr.io/org-name/package-name:(.*)/g
      valuePrefix: ghcr.io/org-name/package-name:v
    - filePath: README.md
      regex: /Current version: v[0-9]+.[0-9]+.[0-9]+/g
      valuePrefix: Current version: v
You can use a combination of options as well.
A Nuance About GitHub Actions
When you run an action on GitHub Actions, by default, the worker generates a temporary GitHub authentication token. This token has permission to perform a few basic tasks; however, it is never allowed to trigger other pipelines.
But our next step after tagging a new version was to trigger another pipeline with that tag!
Do not fret, this is by design — simply a measure by GitHub to prevent unintentionally spinning up a bunch of runners. You are allowed to do so, but you need to be intentional about it.
There are a few ways to be intentional about it — I’ve already shown an example of two:
- Using a Deploy Key and corresponding GitHub Actions Secret
- Using a Personal Access Token as a GitHub Actions Secret
- Creating a GitHub Application (theoretically — I haven’t had a need for this option)
Using a Personal Access Token is convenient if you are a paying customer in the GitHub ecosystem, as organization-wide secrets are available.
On the free tier, that’s not an option, so I’ll show you how to set up a deploy key instead.
In fact, I made it very simple by building it into the vnext CLI. It is a great option, as when configured this way, no human needs to know it, and it can easily be rotated by rerunning the same command.
For each repository you want to set up vnext to release with a deploy key, in the directory of the project…
First, get an auth token using gh with permission to manage keys:
gh auth refresh -h github.com -s admin:public_key -s admin:ssh_signing_key

export GITHUB_TOKEN=$(gh auth token)
And then run:
vnext generate-deploy-key
You may be wondering, can’t this go into a pipeline itself? Unfortunately, I can’t find a way to automate this step in Github Actions without creating a Personal Access Token, as the default token can not modify Secrets. This defeats the pupose of using a Deploy Key instead in the free tier, as you’d need to create it in every repo. This requires some sort of secret management to make it easy, and thus makes it more work than using a deploy key. I have thought of it. 🙂
With your Deploy Key, or Personal Access Token (PAT), in place, and the version and tag workflow running on pushes to your trunk branch, the next step is to release!
This will vary per project, but they are all triggered by the version being tagged from the previous step. These pipelines will generally look something like this:
name: On Version Tag, Trigger GitHub Release

on:
  push:
    tags:
      - 'v*.*.*'

permissions:
  contents: write

jobs:
  release:
    uses: unbounded-tech/workflow-simple-release/.github/workflows/workflow.yaml@v1
    with:
      tag: ${{ github.ref_name }}
      name: ${{ github.ref_name }}
Or, if it were a Rust project, maybe something like this:
name: On Version Tagged, Build and Publish Rust Binaries
on:
  push:
    tags:
    - "v*.*.*"

permissions:
  contents: write

jobs:
  build-and-release:
    uses: unbounded-tech/workflows-rust/.github/workflows/release.yaml@v1
    with:
      binary_name: ${{ github.event.repository.name }}
      build_args: "--release --features vendored"
Or if it were an application with a Dockerfile, and k8s resource definitions for Gitops deployments, maybe something like this:
name: promote
on:
  push:
    tags:
    - v*.*.*

permissions:
  contents: write
  packages: write
  issues: write
  pull-requests: write

jobs:

  publish:
    uses: unbounded-tech/workflows-containers/.github/workflows/publish.yaml@v1.1.1

  release:
    needs: publish
    uses: unbounded-tech/workflow-simple-release/.github/workflows/workflow.yaml@v1
    with:
      tag: ${{ github.ref_name }}
      name: ${{ github.ref_name }}

  promote:
    needs: release
    uses: unbounded-tech/workflows-gitops/.github/workflows/helm-promote.yaml@v1
    secrets:
      GH_PAT: ${{ secrets.GH_PAT }}
    with:
      environment_repository: your-org/staging-env
      path: .gitops/deploy
      project: staging
Note: A deploy key can’t push to other repos, such as in the gitops promote step, so you might consider using a PAT everywhere for this repository. If you have lots of workloads like this, upgrading to a paid org might be worth it for organizational wide secrets rather than configuring every repo separately.
Generally, every release is a combination of some pieces of these similar modules, which do pretty much the same things but for their specific tools or languages.
Usually, organizations at least try to follow many of the same patterns across applications and services they build, and so breaking down the workflows into shared modular pieces allows devs to pretty much just copy and paste their flavor of these shared workflow calls to each project of that type.
Consistent Releases With Changelogs
You may have noticed I kind of glanced over the with.changelog flag in the Version step. I wanted to circle back to that, as it’s a significant part of a mature release process. The changelog is how you can communicate the ways in which your project has changed to other developers.
Along with bumping versions, vnext also uses the commit messages to construct this changelog and saves it into a file named CHANGELOG.md, which is committed along with the version tag and version bumps.
Hidden in those release workflows I shared above, this file is used as the body of the GitHub Release. For example, from the vnext project itself:
This release was a patch version, as it contained a fix, in the form of a dependency version bump, and a number of other chores.
These release notes are then surfaced in other tools, such as Renovate, a tool that makes PRs to keep your dependencies up to date.
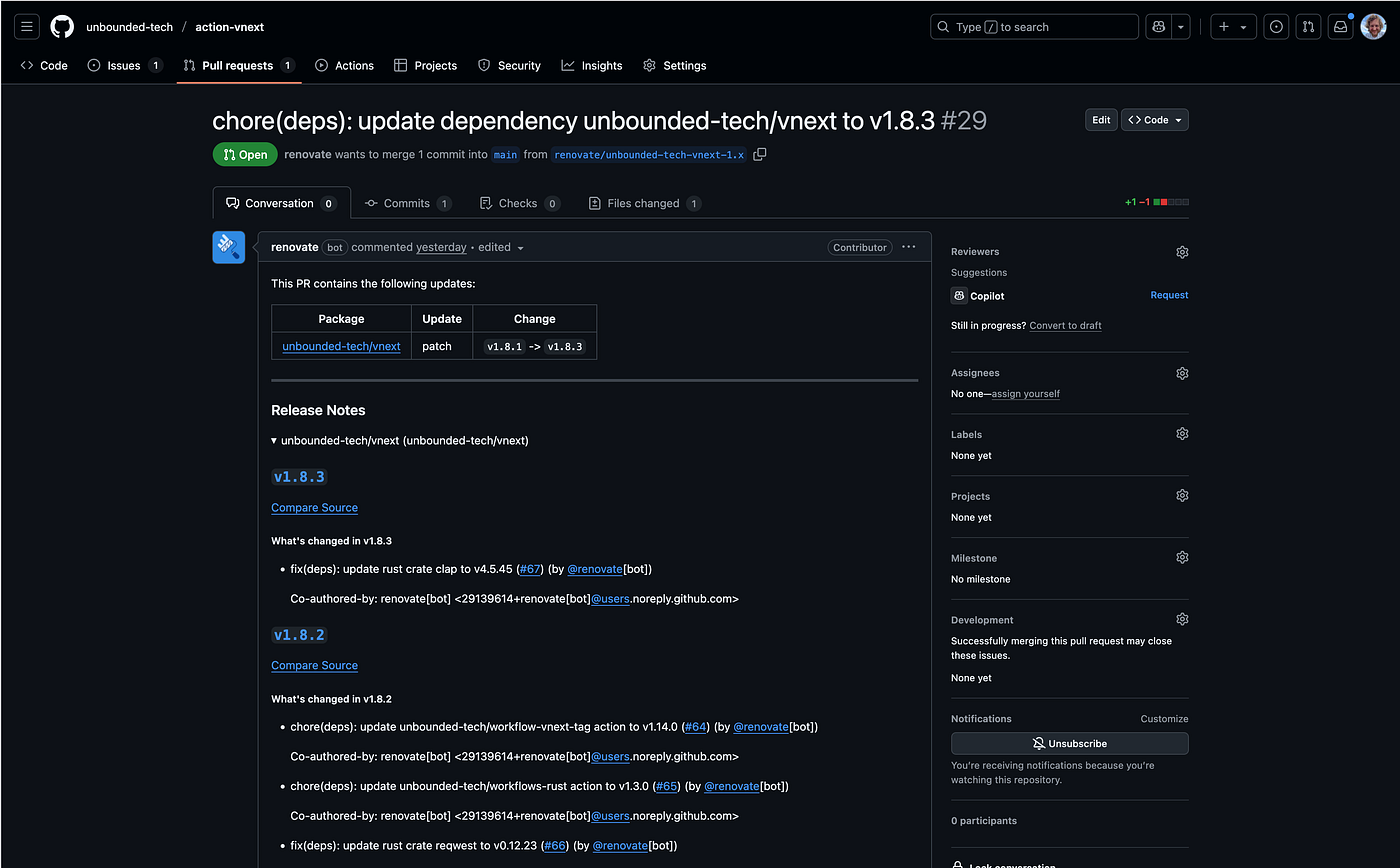

When merging Pull Requests, I like to use the Squash and Merge feature of GitHub in order to have the opportunity to write a nice final commit message title and body that will be used in the changelog.
For example:
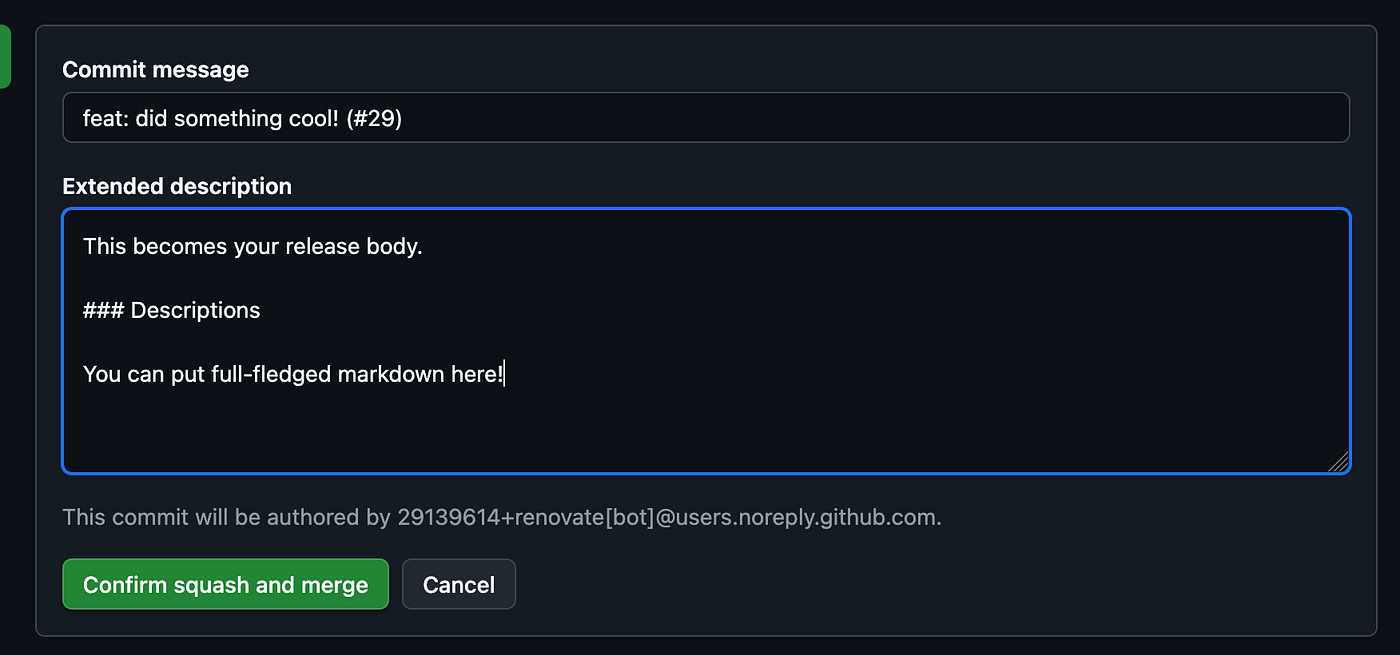

As shown in the example, you can put full-fledged Markdown as the commit body. It will be rendered appropriately in the Release Notes!
Conclusion
I know versioning and releasing isn’t the sexiest topic; it’s rather boring — or rather, it should be!
However, this isn’t always the case. That’s why I created vnext and a bunch of shared workflows! Now, I can easily onboard most projects very quickly!
Hopefully, it’s helpful for you too!
Please let me know if you give vnext and some shared workflows a try! I’d appreciate some stars on GitHub and a share if you find them useful!

