


The use of DNS blocking has gradually established itself as one of the tools favored by the authorities to restrict access to certain websites targeted by court decisions. Whether it is illegal download sites, IPTV streaming platforms illegally broadcasting sports or copyright-protected content, or even adult sites, more and more platforms are affected by this type of measures.
To implement these blocks, Internet service providers (ISPs) can rely on several technical devices. DNS filtering is one of them. As a reminder, the DNS (for Domain Name System) acts as a directory responsible for translating the domain names that you enter in the address bar of your browser into IP addresses, that is to say the address of the server hosting the site that you wish to consult.
By default, Orange, SFR, Bouygues Telecom and Free offer all their subscribers their own DNS resolvers. In practice, this means that DNS requests made on your connection generally pass through your operator’s infrastructure. However, when a block is ordered, it can alter the resolution of certain domains in order to prevent access. An effective mechanism, but which also raises more and more questions about the control exercised over access to the Web.
Changing DNS, a useful reflex for your confidentiality
Using your carrier’s default DNS resolver may not be ideal from a privacy perspective. Because when DNS queries are not encrypted, your ISP can know the domains you are querying. A situation which, in terms of confidentiality, deserves at least to be taken into account.
To limit this exposure, it is possible to opt for a third-party DNS resolver. But here again, it is better to pay particular attention to the service to choose.
It is indeed strongly recommended to choose a service that supports DoH (DNS-over-HTTPS) or DoT (DNS-over-TLS), two technologies that allow DNS exchanges between your device and the resolver used to be encrypted. By opting for an encrypted DNS, you will be able to protect these requests from your ISP’s observation, while reinforcing the confidentiality of your browsing.
However, the benefit of a third-party DNS is not limited only to this aspect. Many providers also offer filtering mechanisms capable of blocking known threats, such as malware, fraudulent domains, trackers or advertisements. Some even allow you to enable additional protections against adult content. An interesting asset, in particular to secure the use of a station which would be used by young Internet users under your roof.
Which DNS resolver to choose?
There are today a plethora of free public DNS providers, with sometimes different approaches to speed, filtering or confidentiality. Quad9, Cloudflare and Google are among the best known, but there is not necessarily a universal solution.
The best choice will often depend on your needs and will, in many cases, require a few trials. Depending on the resolver you select, performance may vary, as may certain filtering policies that may affect access to certain services.
You will easily find lists of alternative DNS resolvers on the Web, notably on the Sebsauvage site, on PrivacyGuides or even on GitHub, where several free public DNS servers are listed. Testing several solutions is often the best way to identify the one that best meets your expectations.
However, keep in mind that a change of DNS, as useful as it may be to improve confidentiality or bypass certain blocks, does not make you anonymous online. This is an additional tool, not an absolute solution.
On an iPhone, changing the DNS resolver will need to be done at two levels: on your iPhone’s Wi-Fi connection (which therefore uses your ISP’s DNS resolver), and on the 4G/5G cellular connection (which uses your mobile operator’s DNS resolver).
How to change DNS to Wi-Fi on iPhone?
1. Access the settings
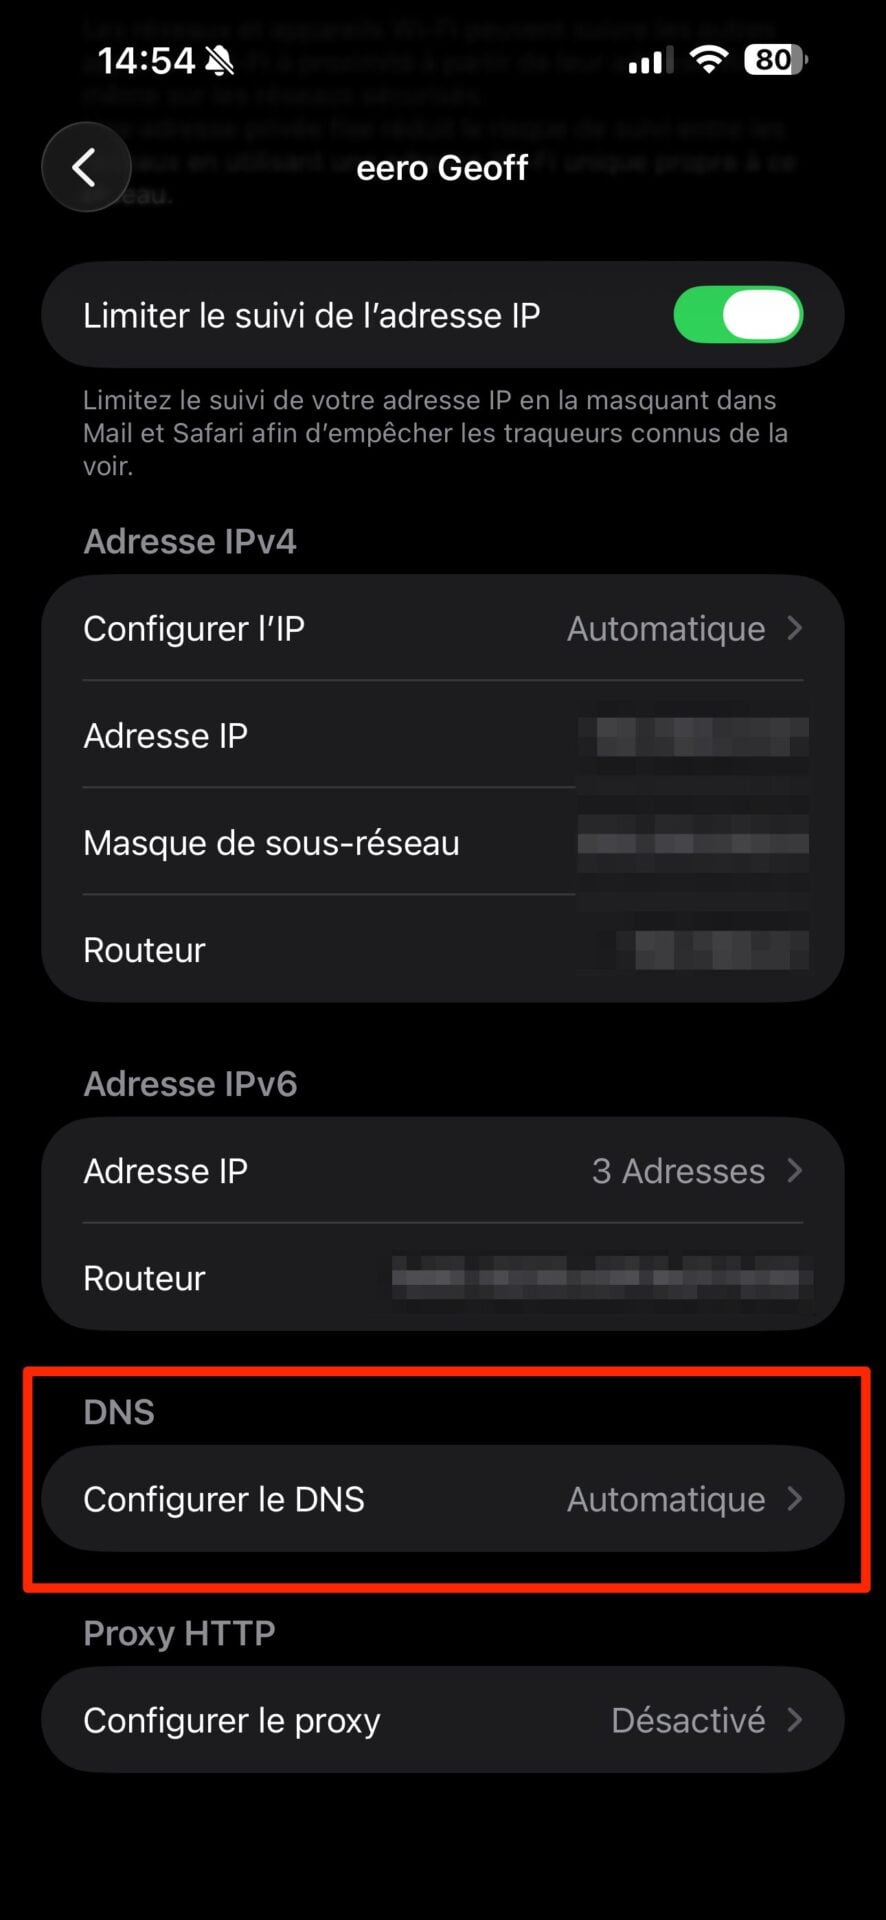
To change the DNS on your iPhone’s Wi-Fi connection, go to the Settings of iOS and enter the section Wi-Fi. Then press the bouton “i” associated with the Wi-Fi connection you are connected to to access detailed options.


2. Configure your DNS
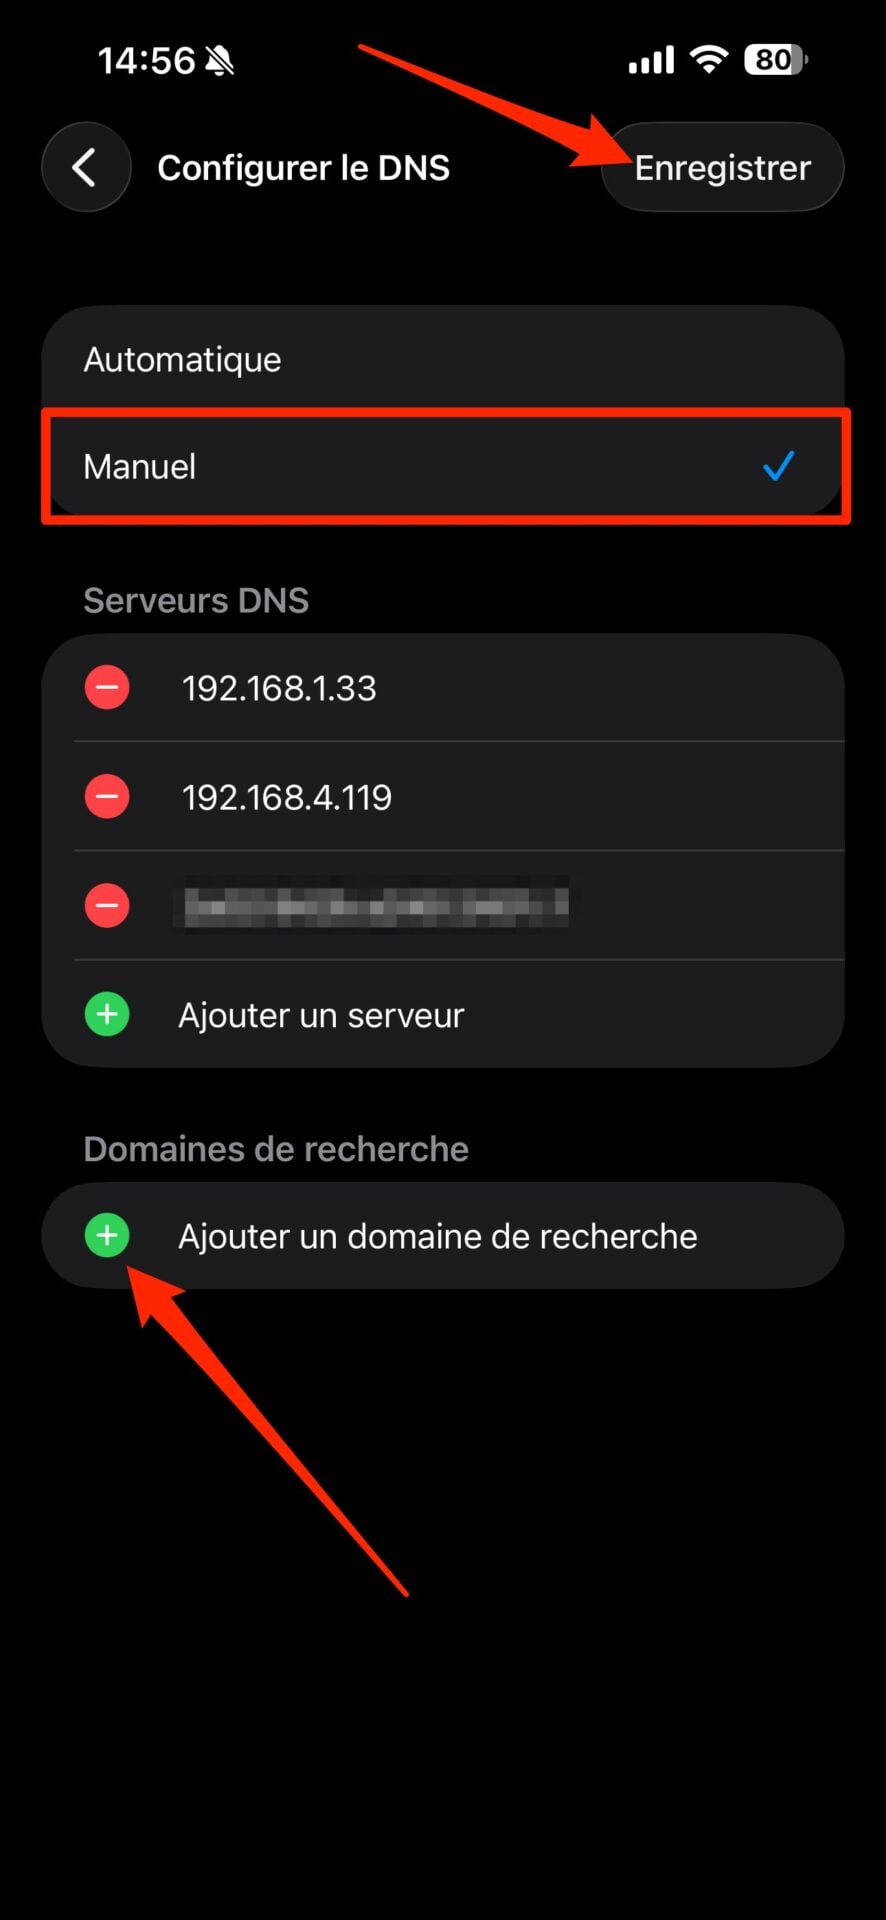
Scroll through the options displayed and then to the section DNSenter the menu Configure DNS. Change the Automatic setting to Manueland press Add a server. Enter the DNS address(es) you want to set up for the Wi-Fi connection and press Save.
How to change DNS to 4G/5G on iPhone?
Changing DNS when surfing on 4G or 5G is a little more complicated. Because iOS obviously does not offer any settings allowing you to customize the DNS resolver. The only existing solution is to use configuration profiles. This is a small configuration file to download to your device and which you will then need to activate in the iOS Settings. While there are applications like DNSecure that allow you to generate this small configuration file, you can also generate it using a free and open source online tool.
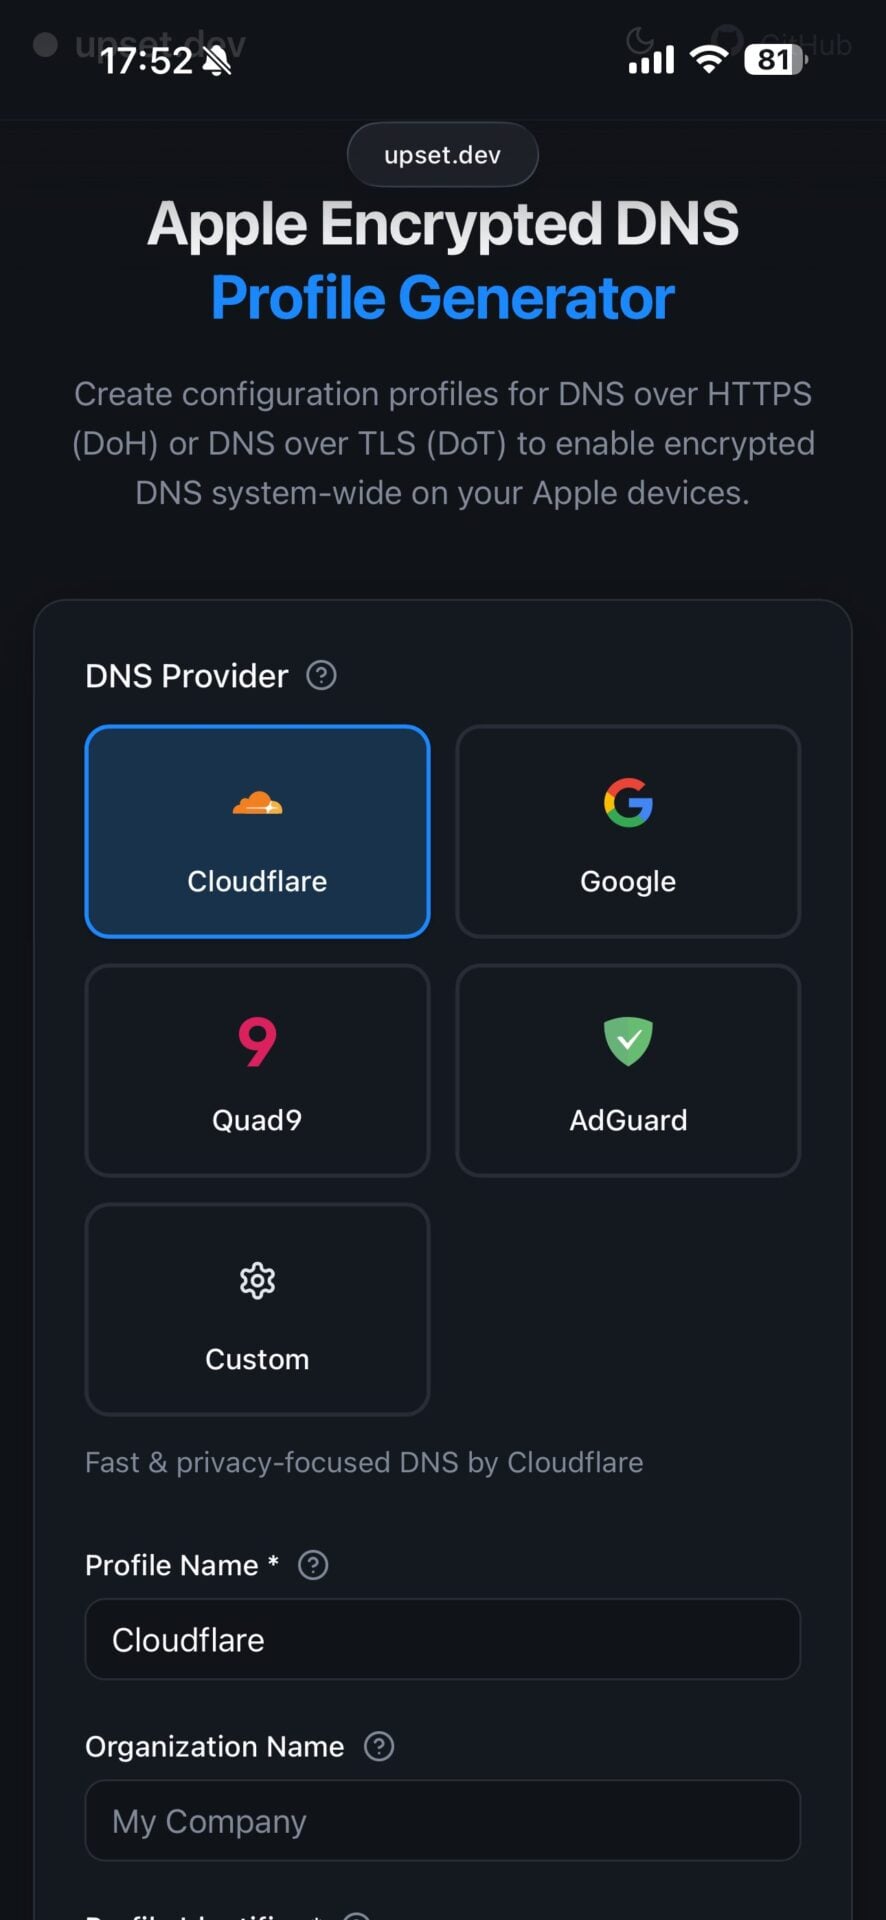
1. Go to the Apple Encrypted DNS Profile Generator platform
Open your favorite web browser on iPhone and go to the Apple Encrypted DNS Profile Generator site. This online service offers to generate encrypted DNS configuration profiles specifically for Apple devices.
2. Generate your configuration profile
Apple Encrypted DNS Profile Generator offers several predefined DNS resolvers. You are free to select one, or choose Customto create a custom DNS configuration profile. Depending on your choice, you will therefore have different parameters to configure. In the case of predefined profiles, you will only have to choose DNS encryption protocol (DoH or DoT). If you opt for a profile Custom (personalized), you will also need to enter the name and identifier of the DNS provider, as well as the server URL and its IP addresses.

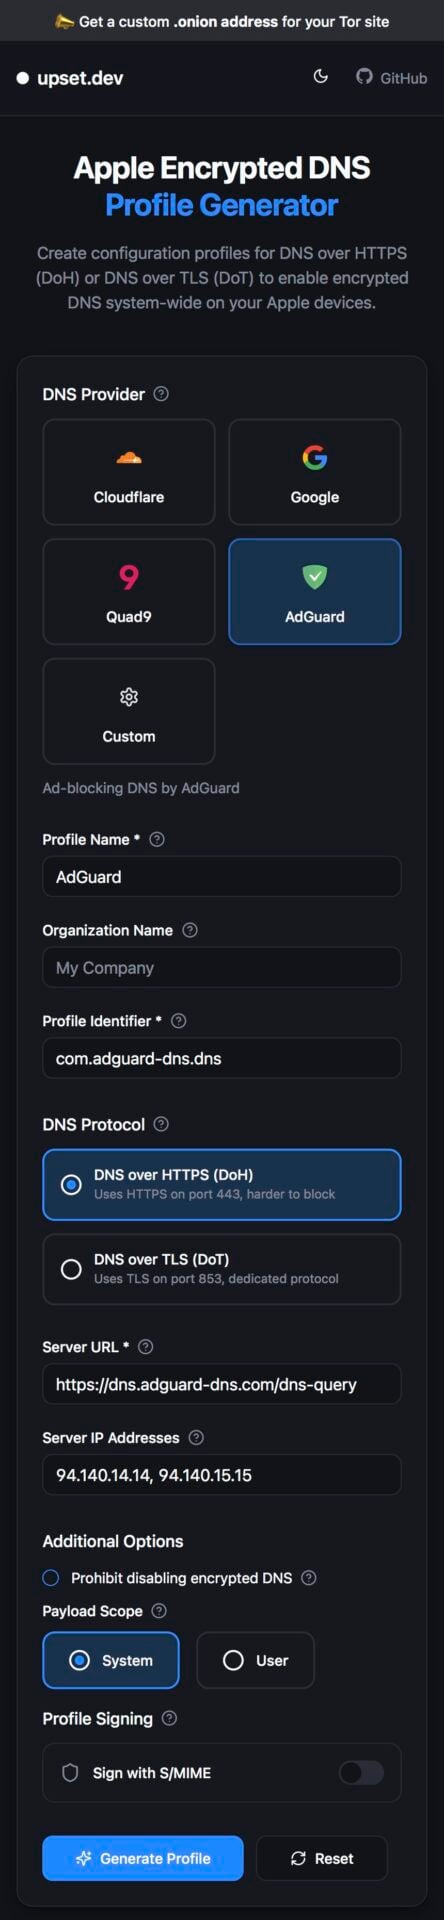

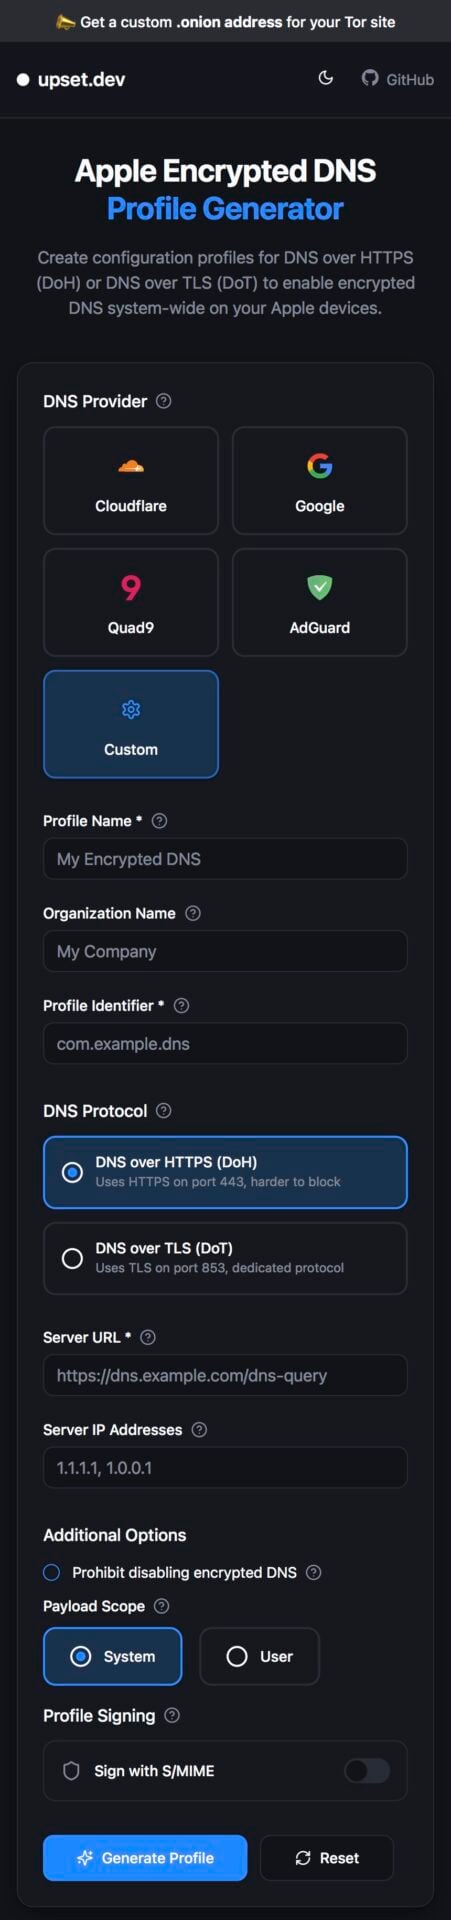
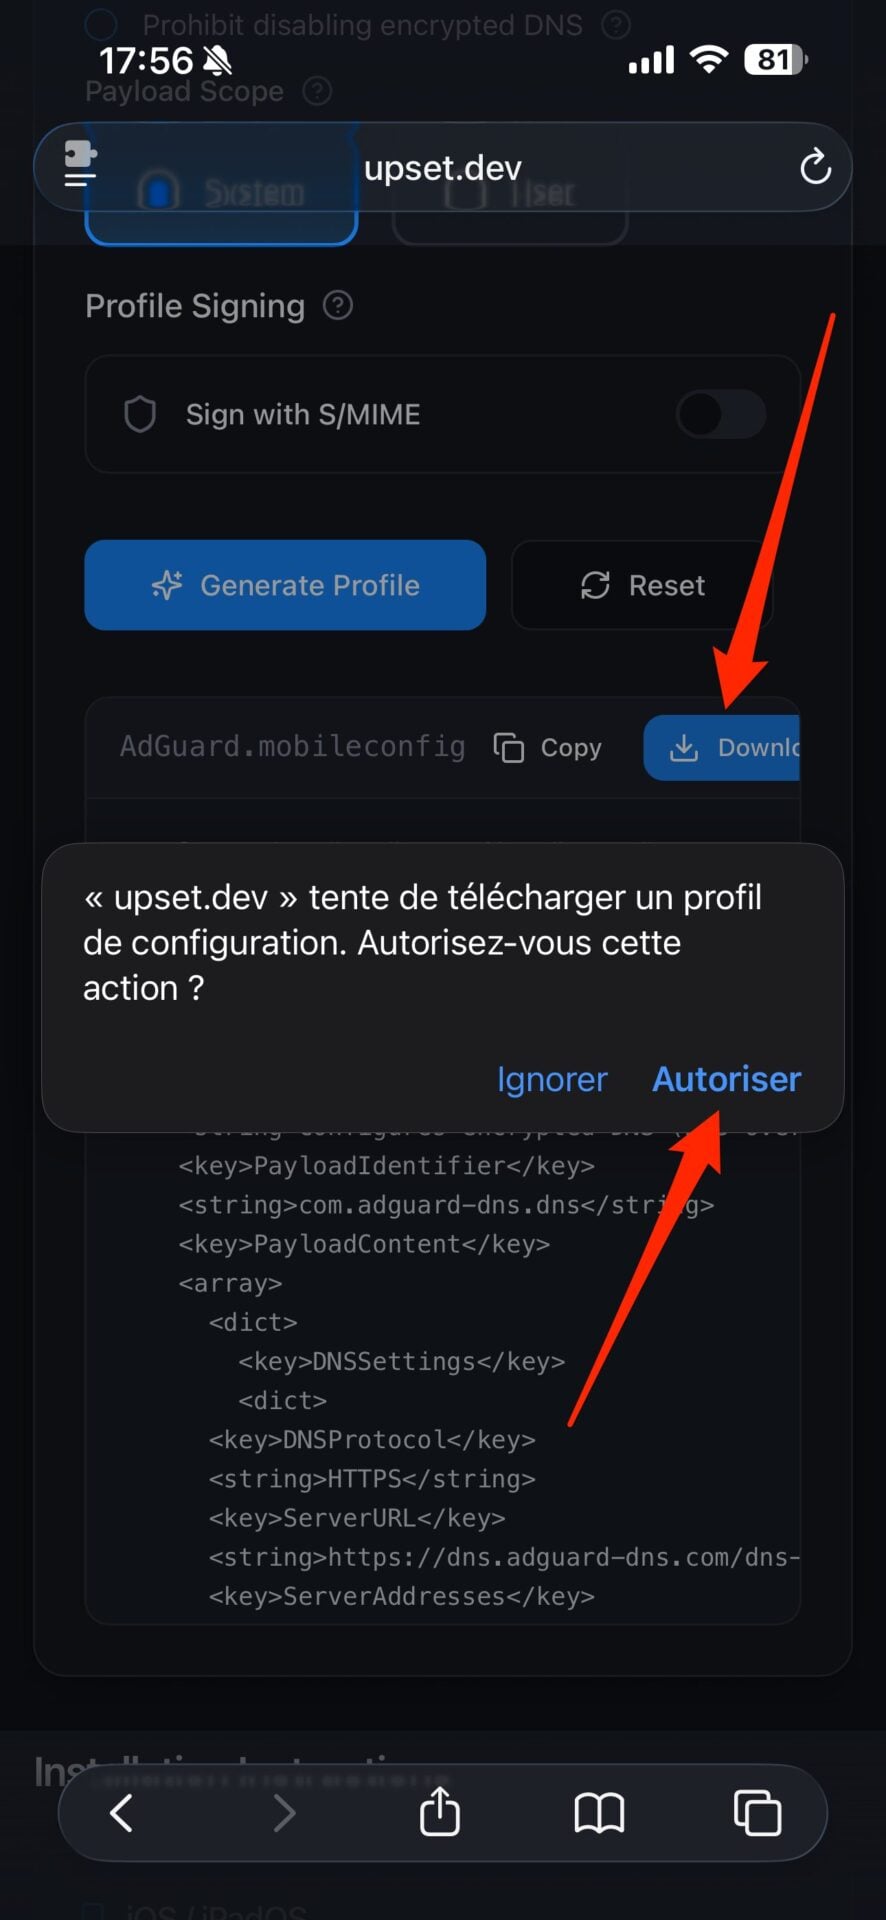
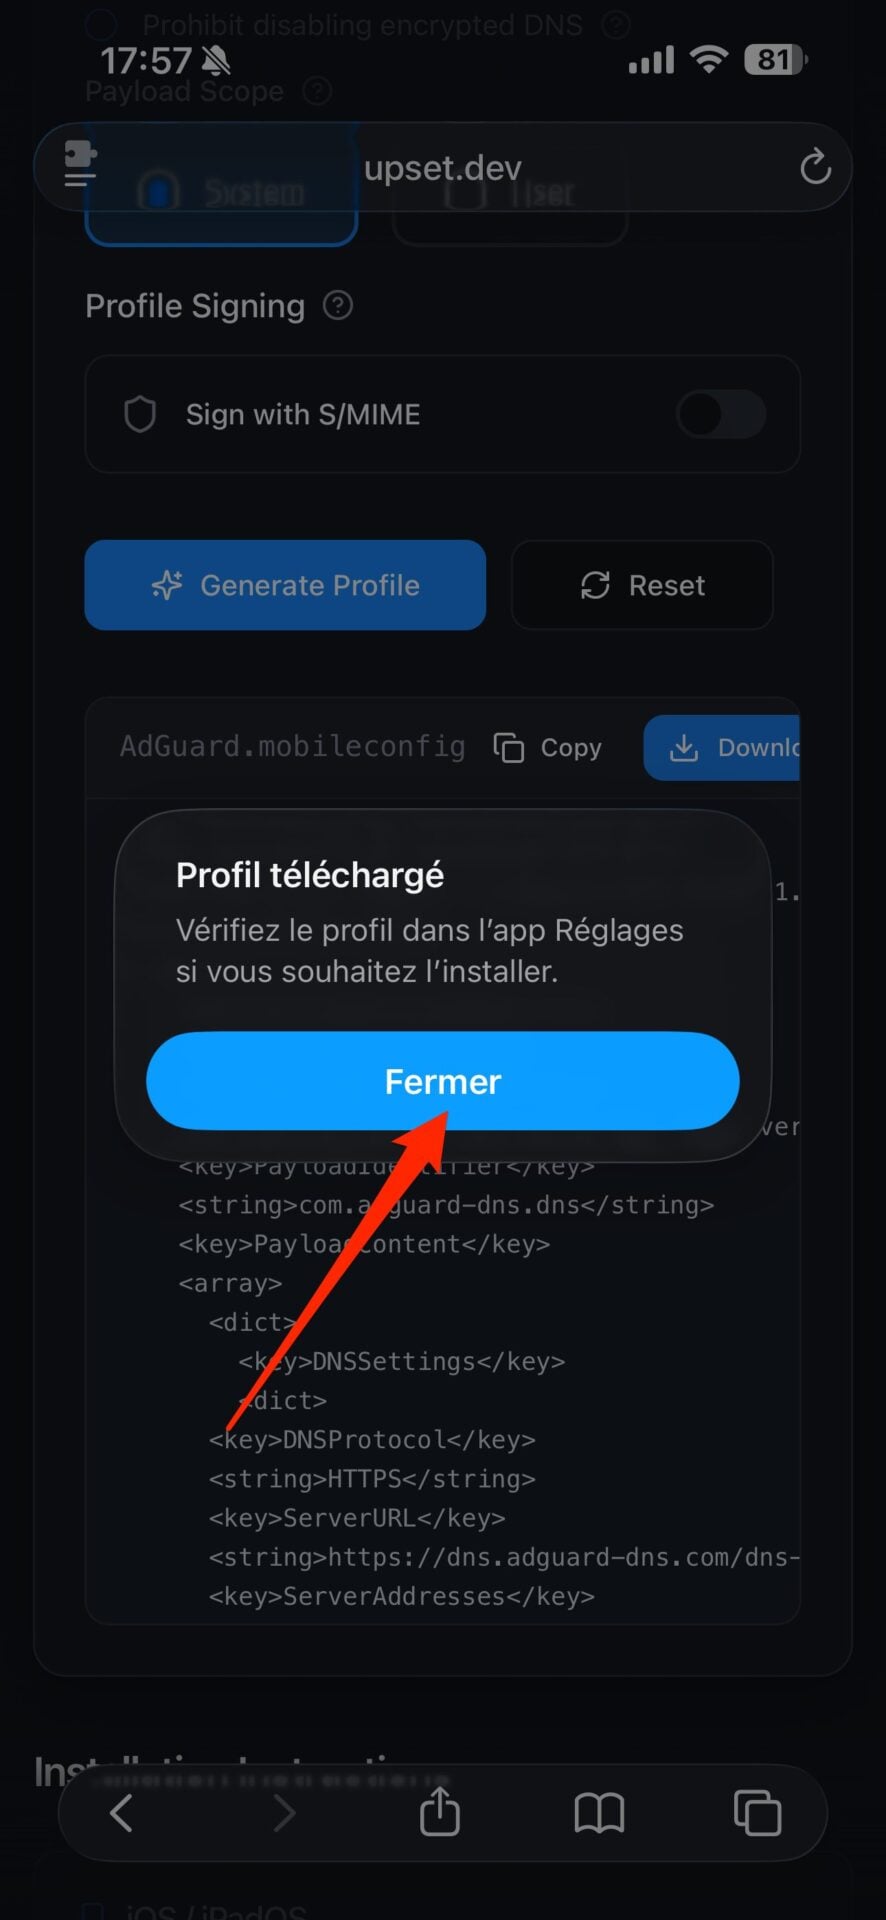
Once your configuration profile settings are defined, click the button Generate Profile. The generated profile is displayed in a preview window just below. Tap the Download button to download it, then in the pop-up that appears, select Authorize. A confirmation pop-up should then appear, tap Close.
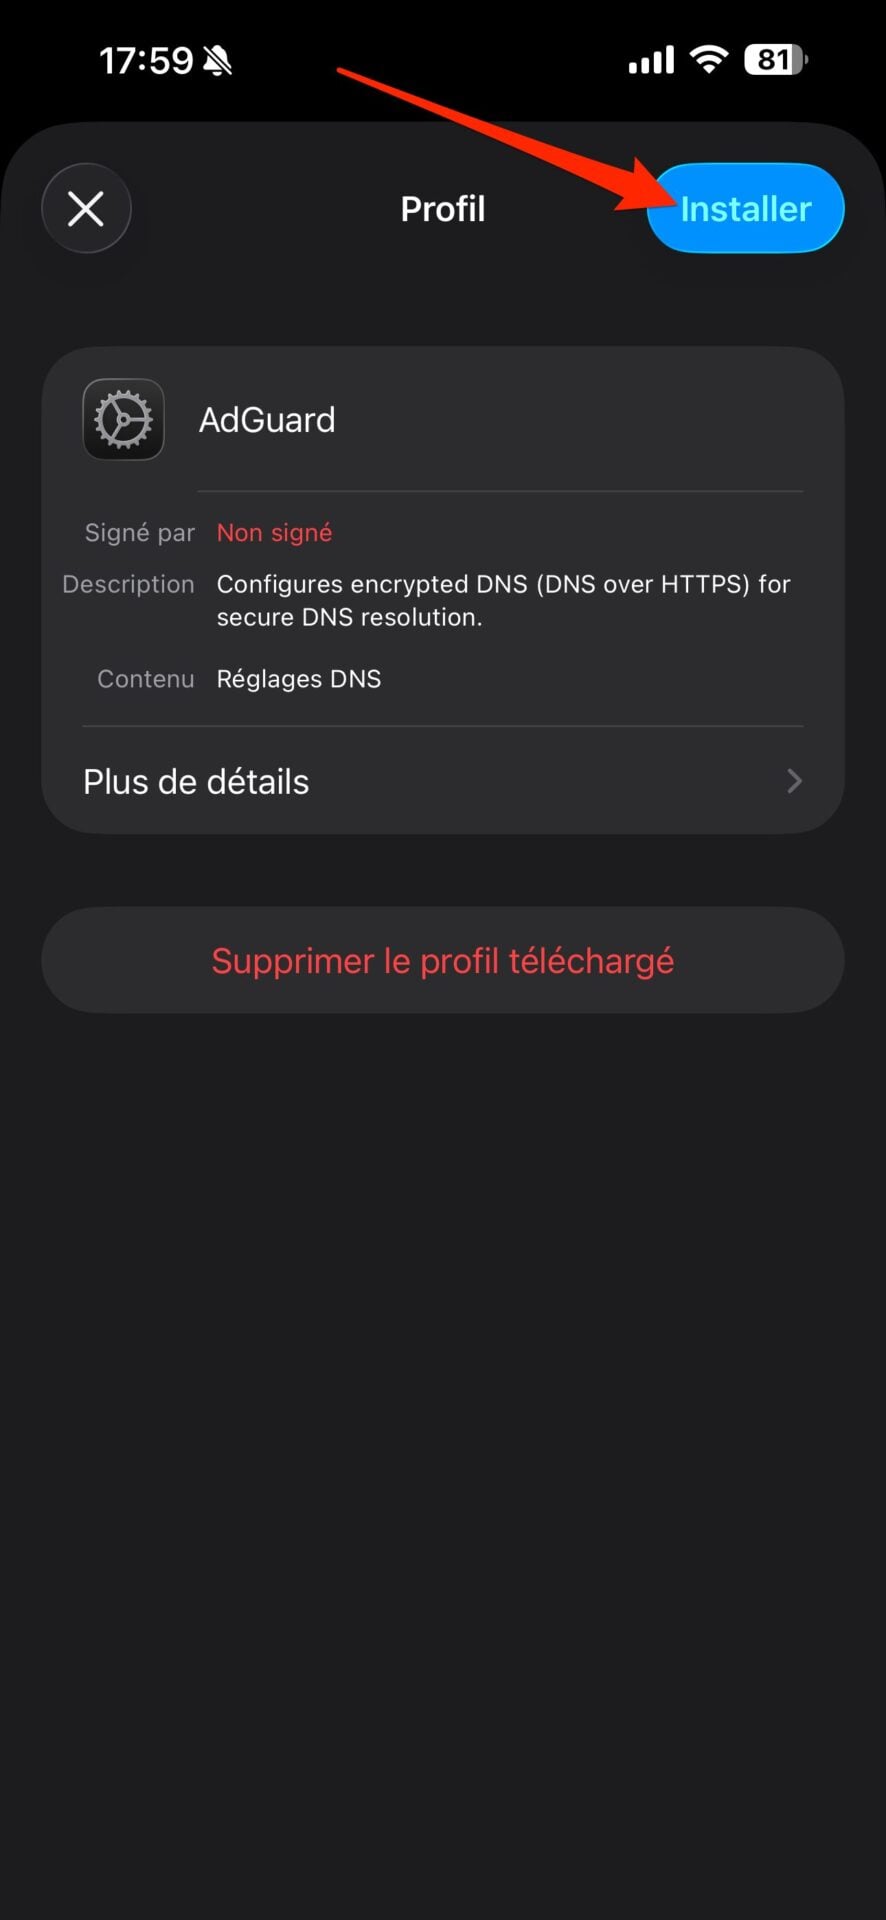
3. Install the configuration profile
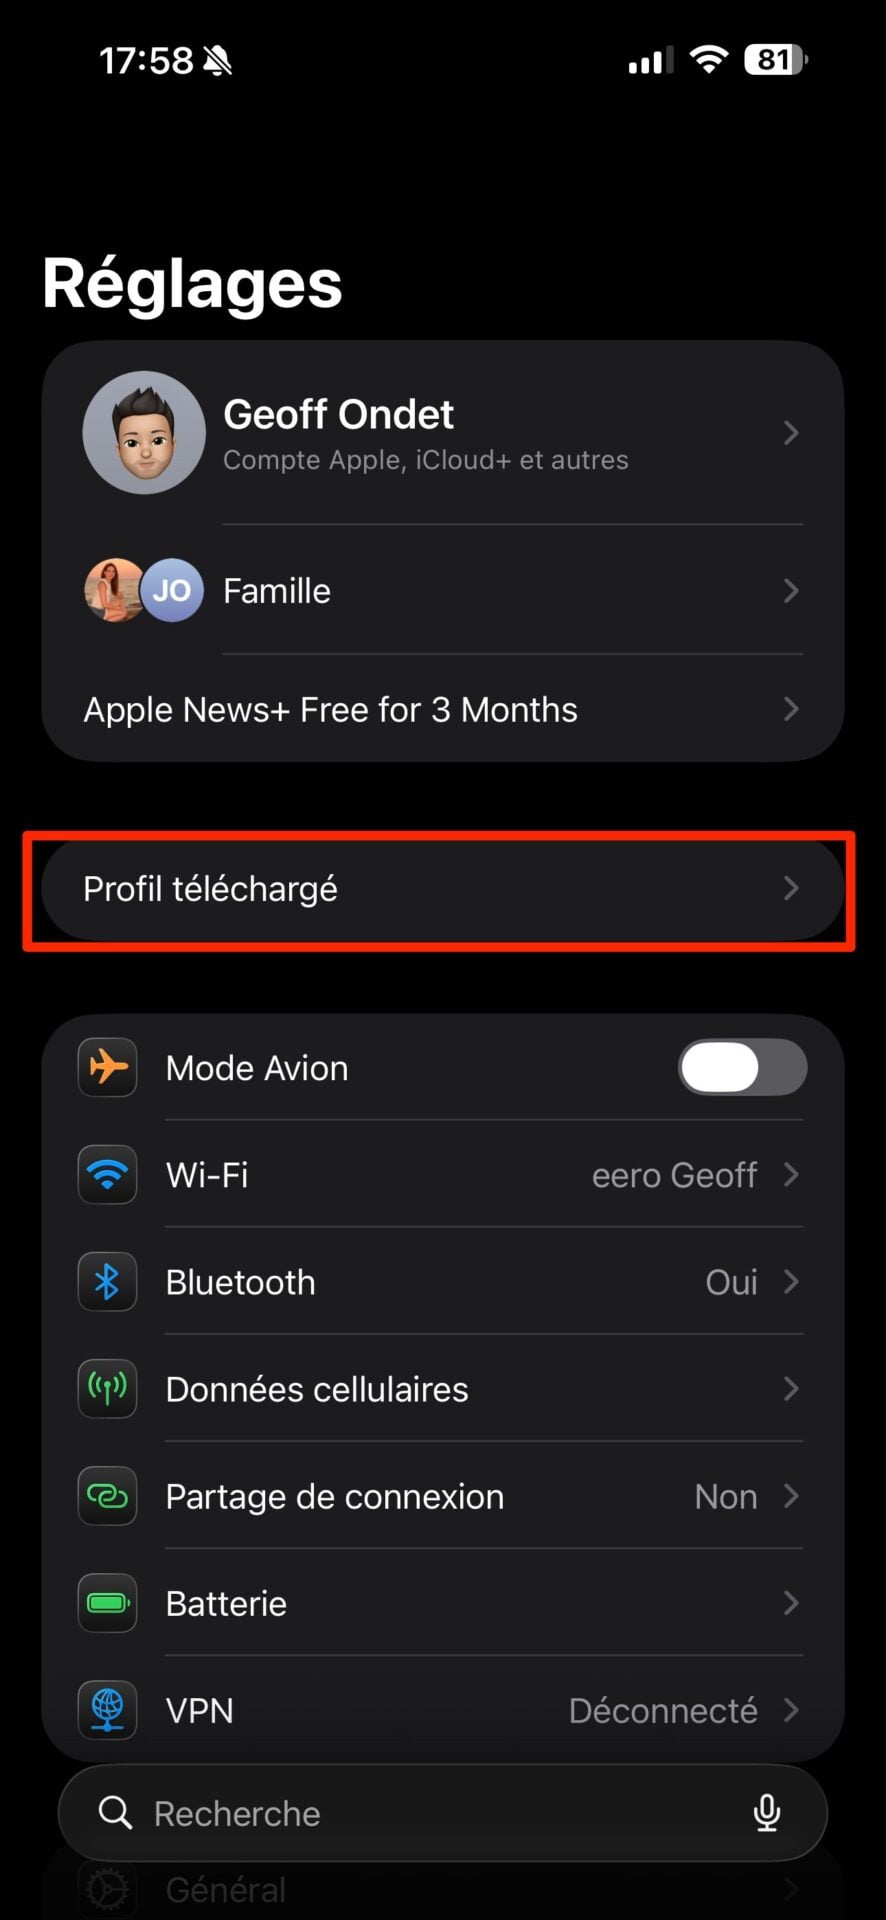
For your configuration profile to be activated and functional on your iPhone in 4G/5G, you must first install it. To do this, open the Settings from the iPhone, and tap the new menu Profile downloaded which appears just below the iCloud block. A pop-up displaying the details of the configuration profile is then displayed. Press the button Installer at the top right to install this configuration profile on your device. You will be prompted to enter your unlock code to authenticate and confirm the installation of the configuration profile.
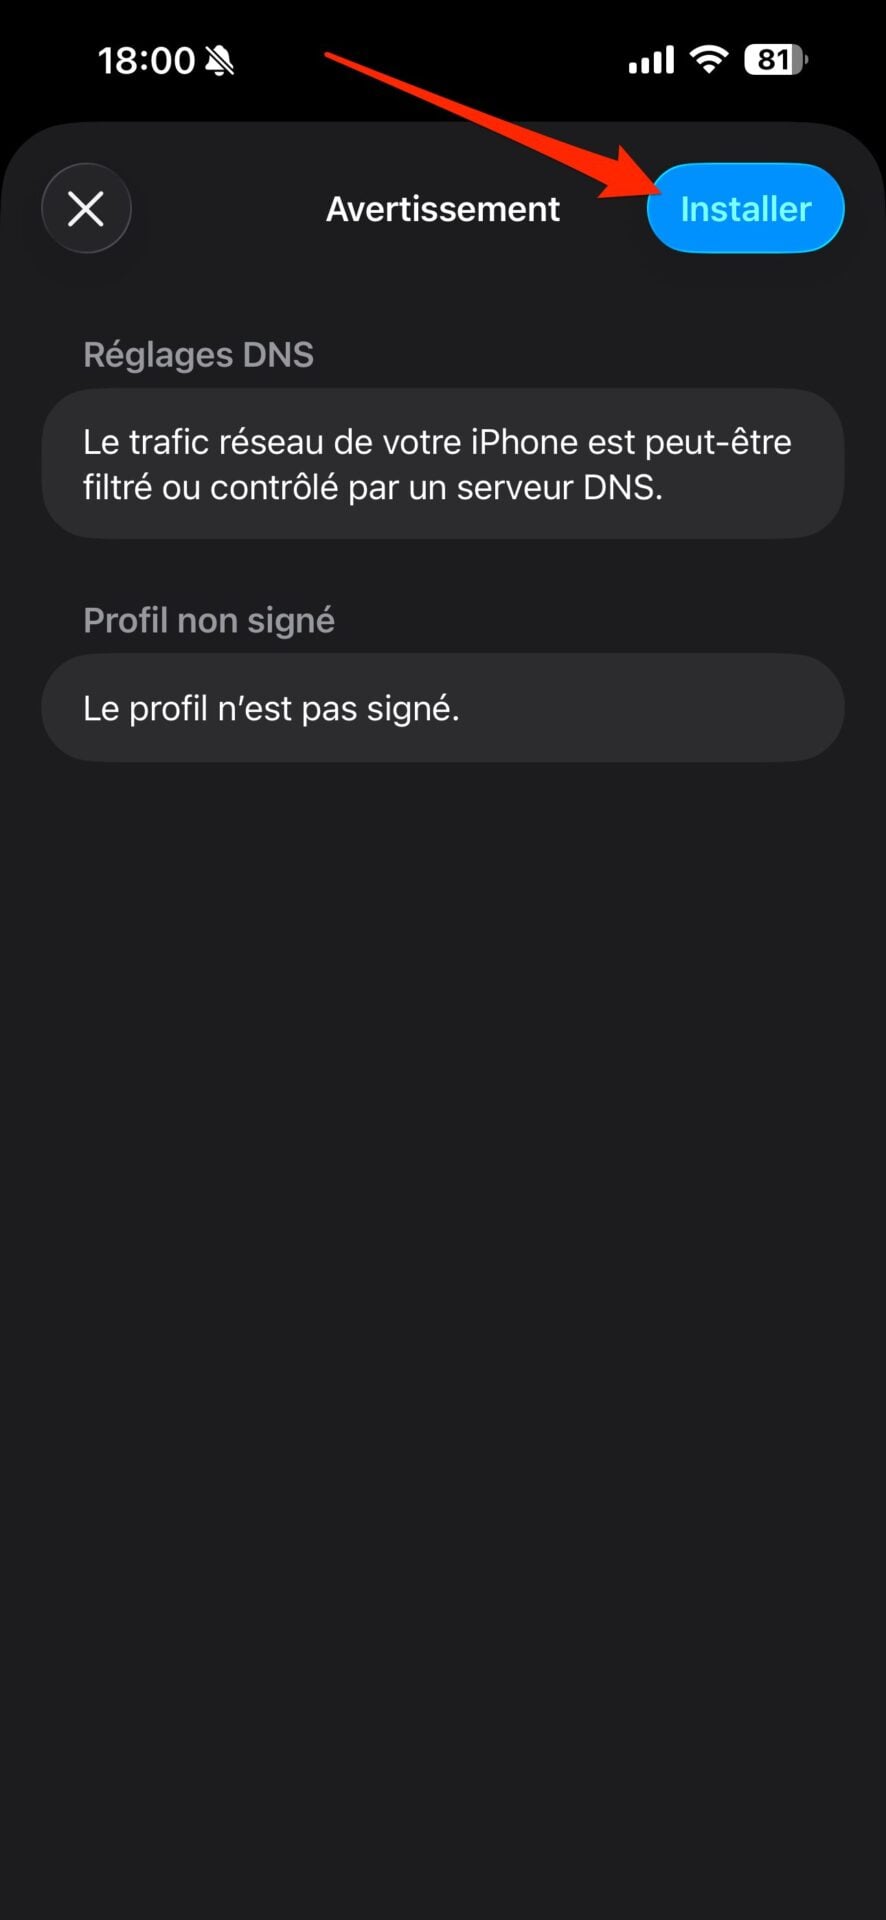
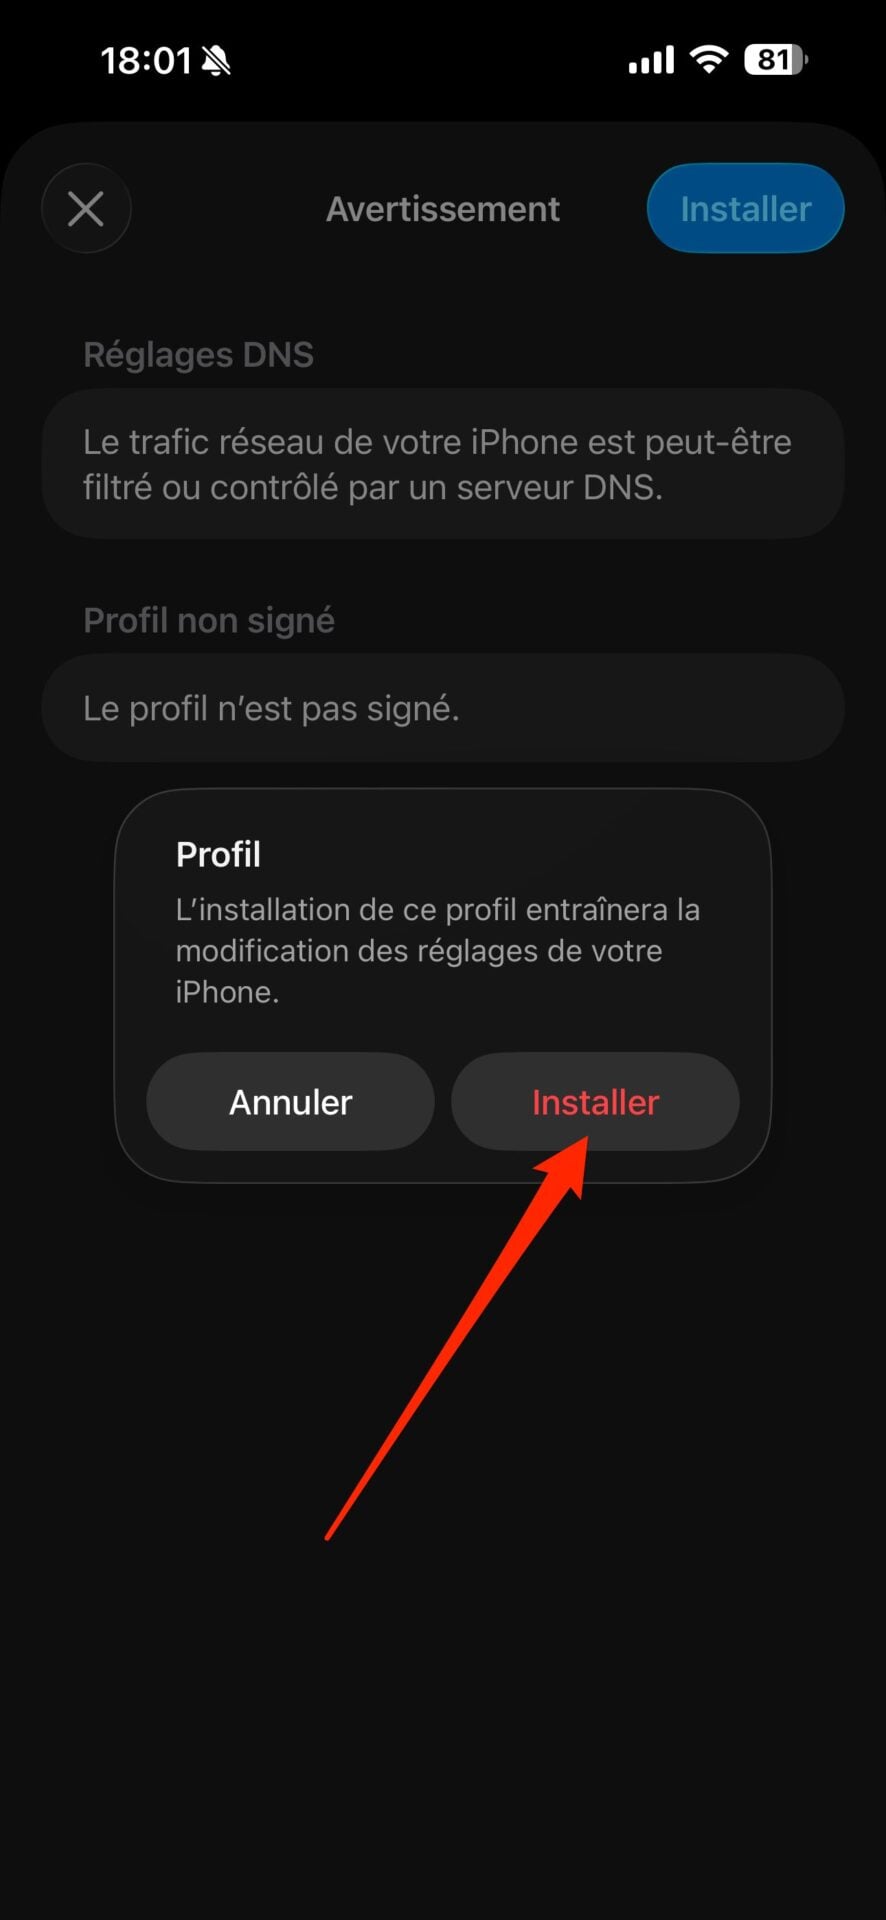
A warning screen about what DNS Settings entails appears and states that “ Your iPhone’s network traffic may be filtered or controlled by a DNS server “. Press Installerthen again on Installer in the pop-up that appears to validate. Finally press the check mark to close the configuration window.
4. Uninstall the configuration profile
If, however, you are not satisfied with navigation with this new DNS resolver, it is entirely possible to deactivate it to use that of your default operator again.
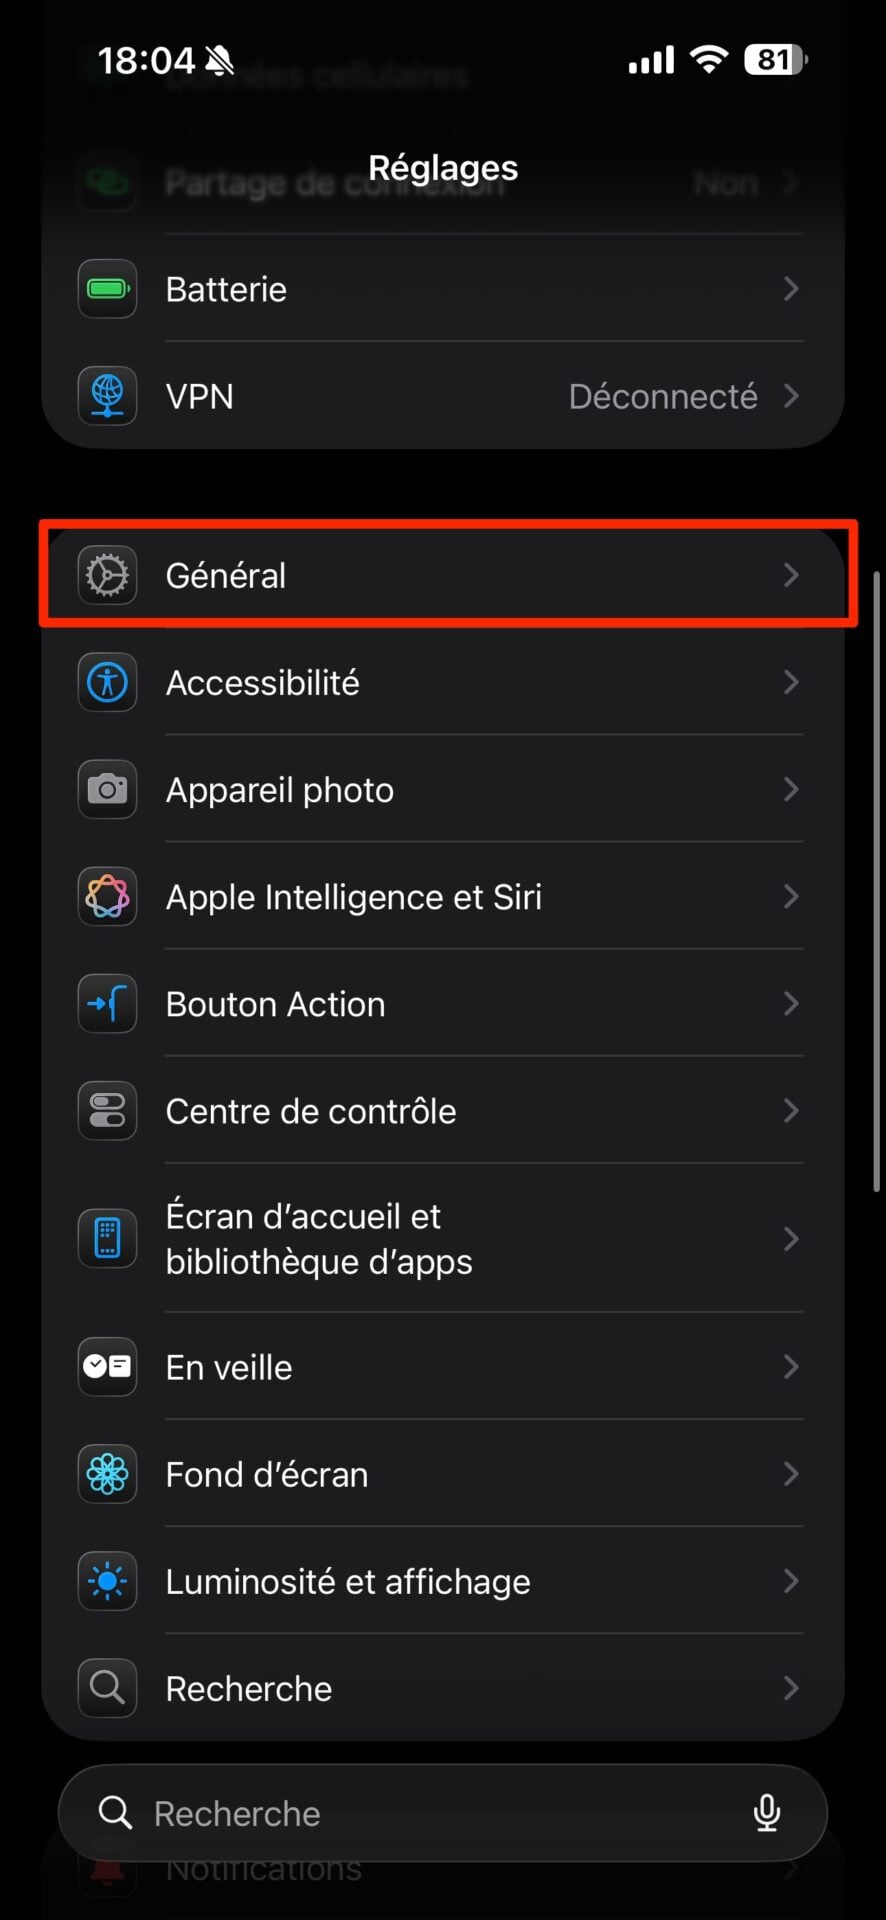
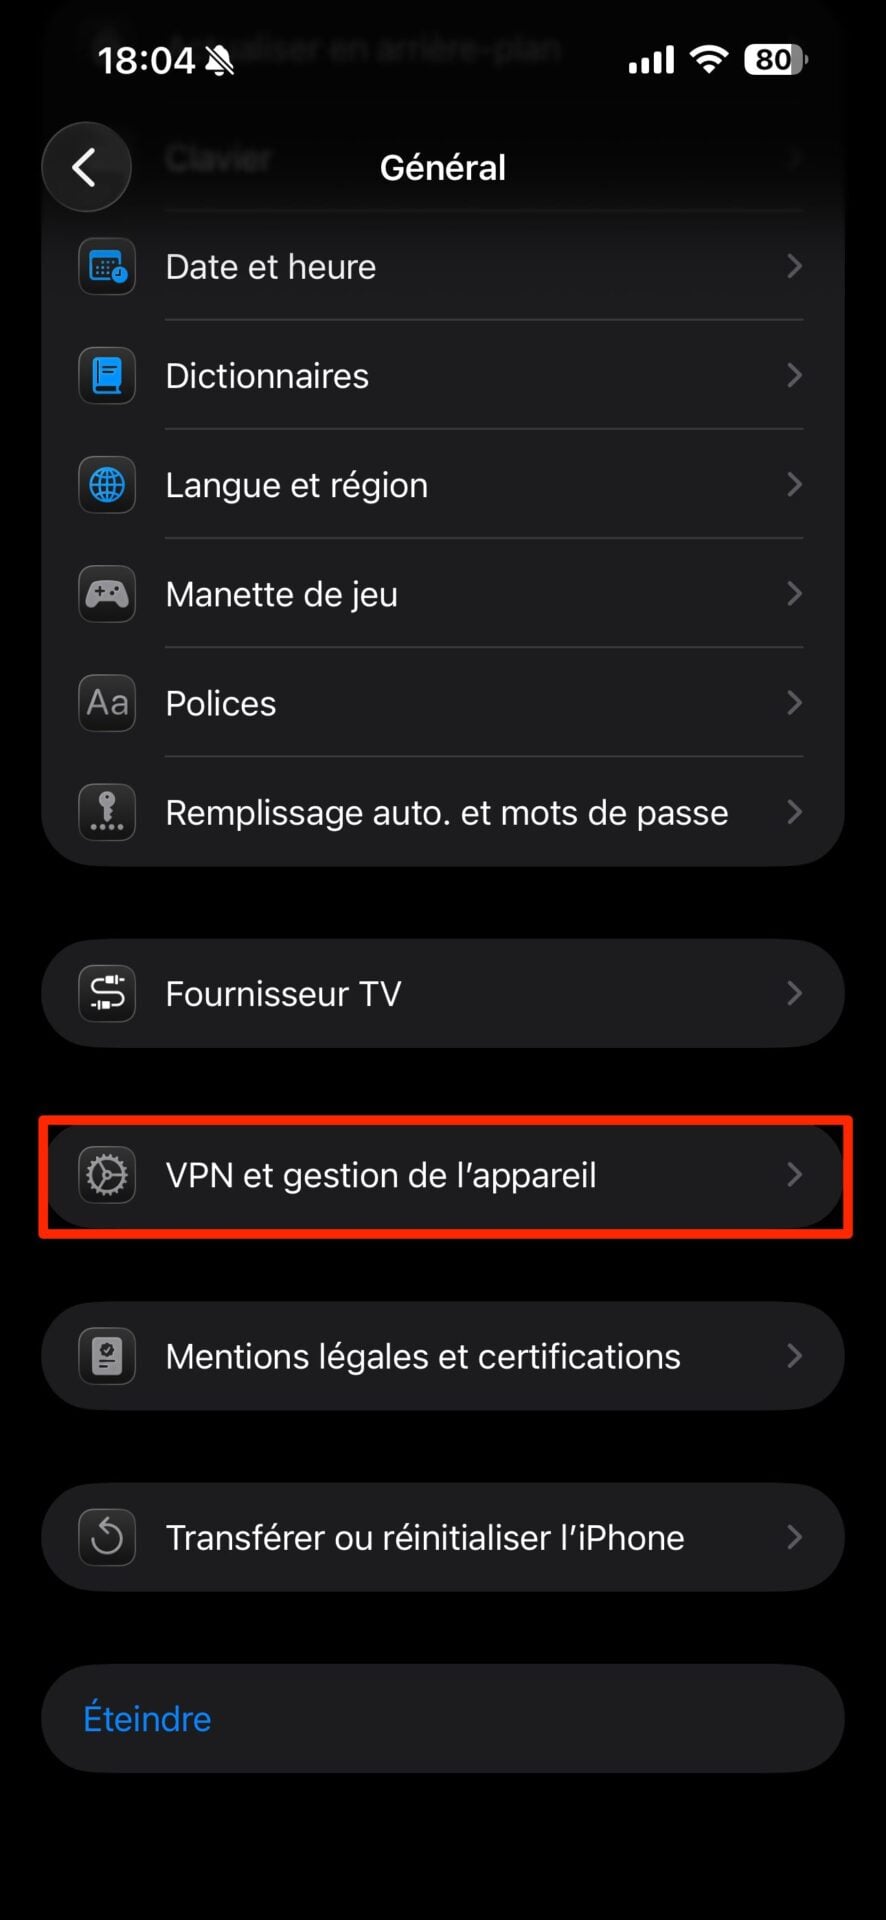
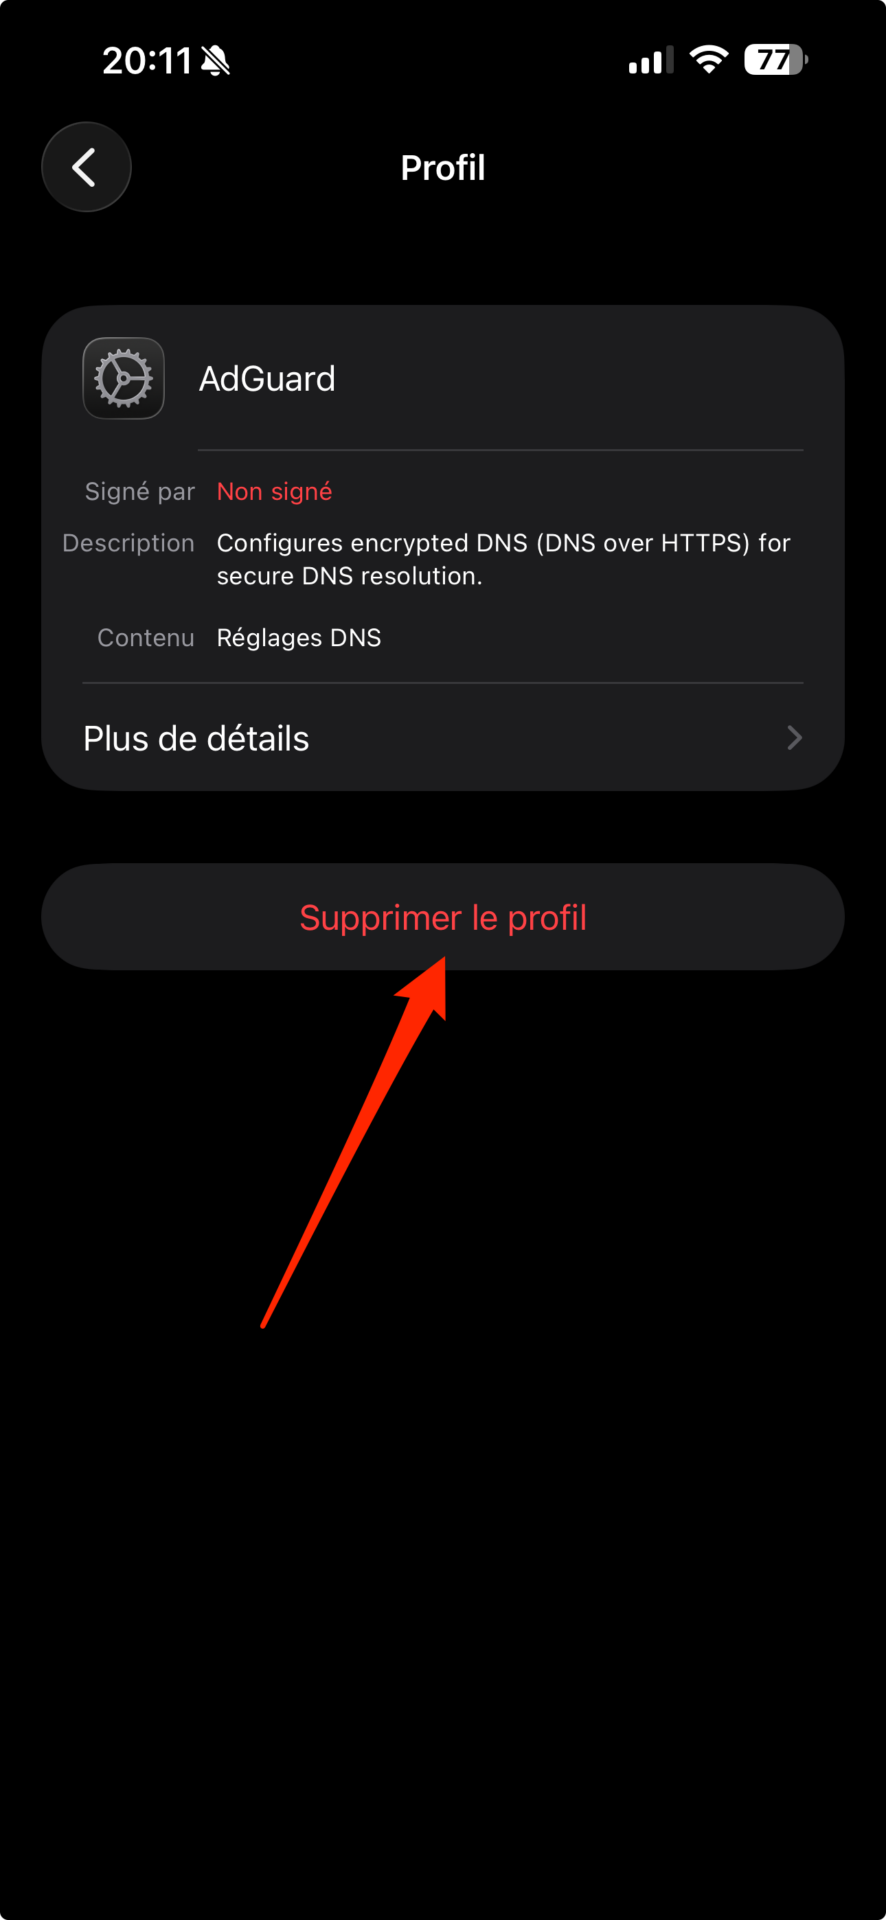
To deactivate it, go to the Settingsthen in the menu Generalenter the section VPN and device management. Select your configuration profileat the bottom of the screen, and choose to Delete profile.
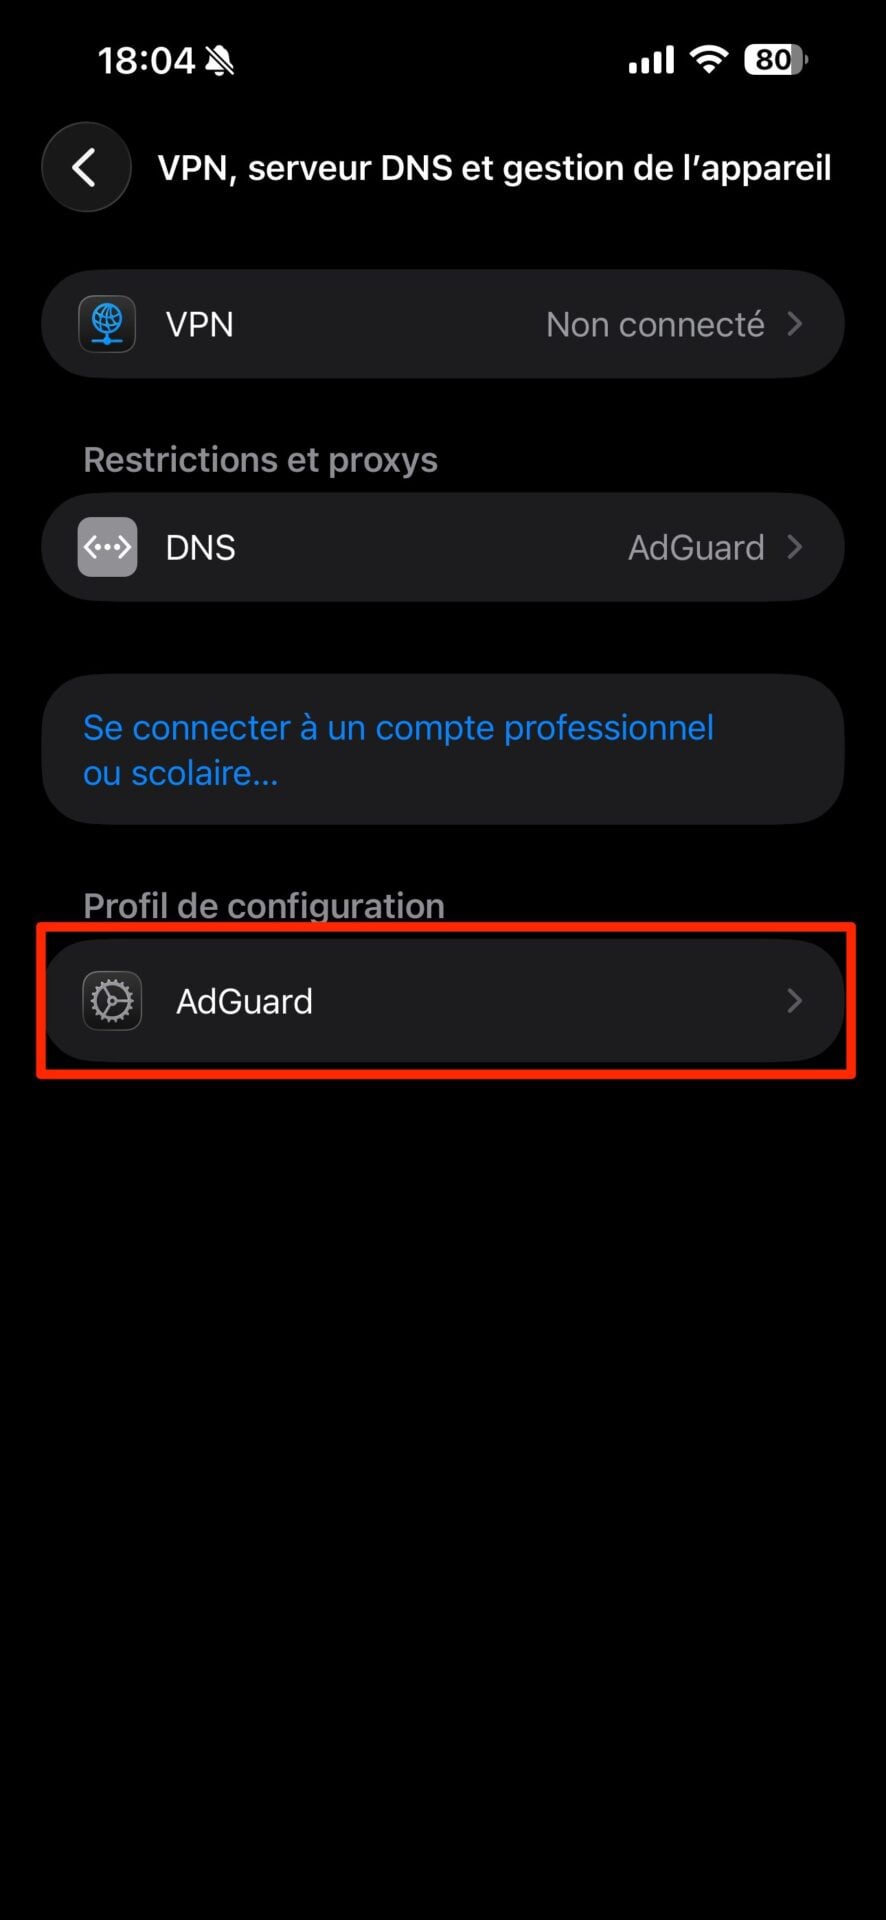
Note that it is also possible to juggle between several DNS providers. To do this, in the previous menu, select the section DNS displayed under the heading Restrictions et proxys.
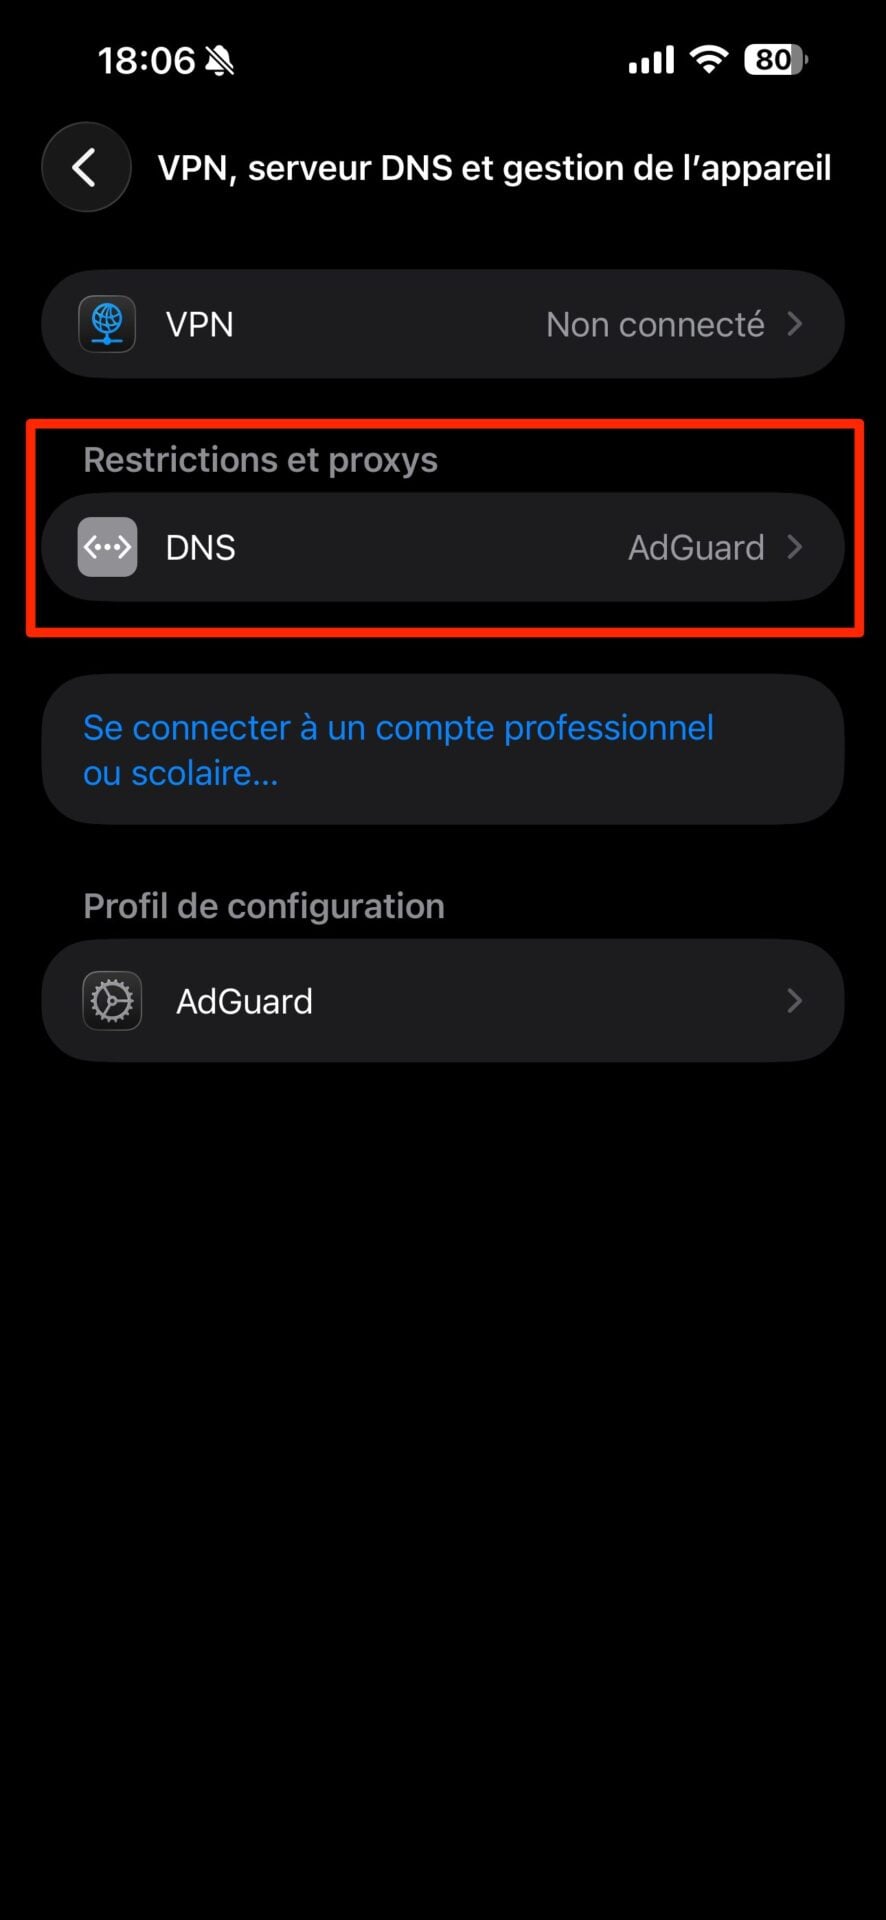
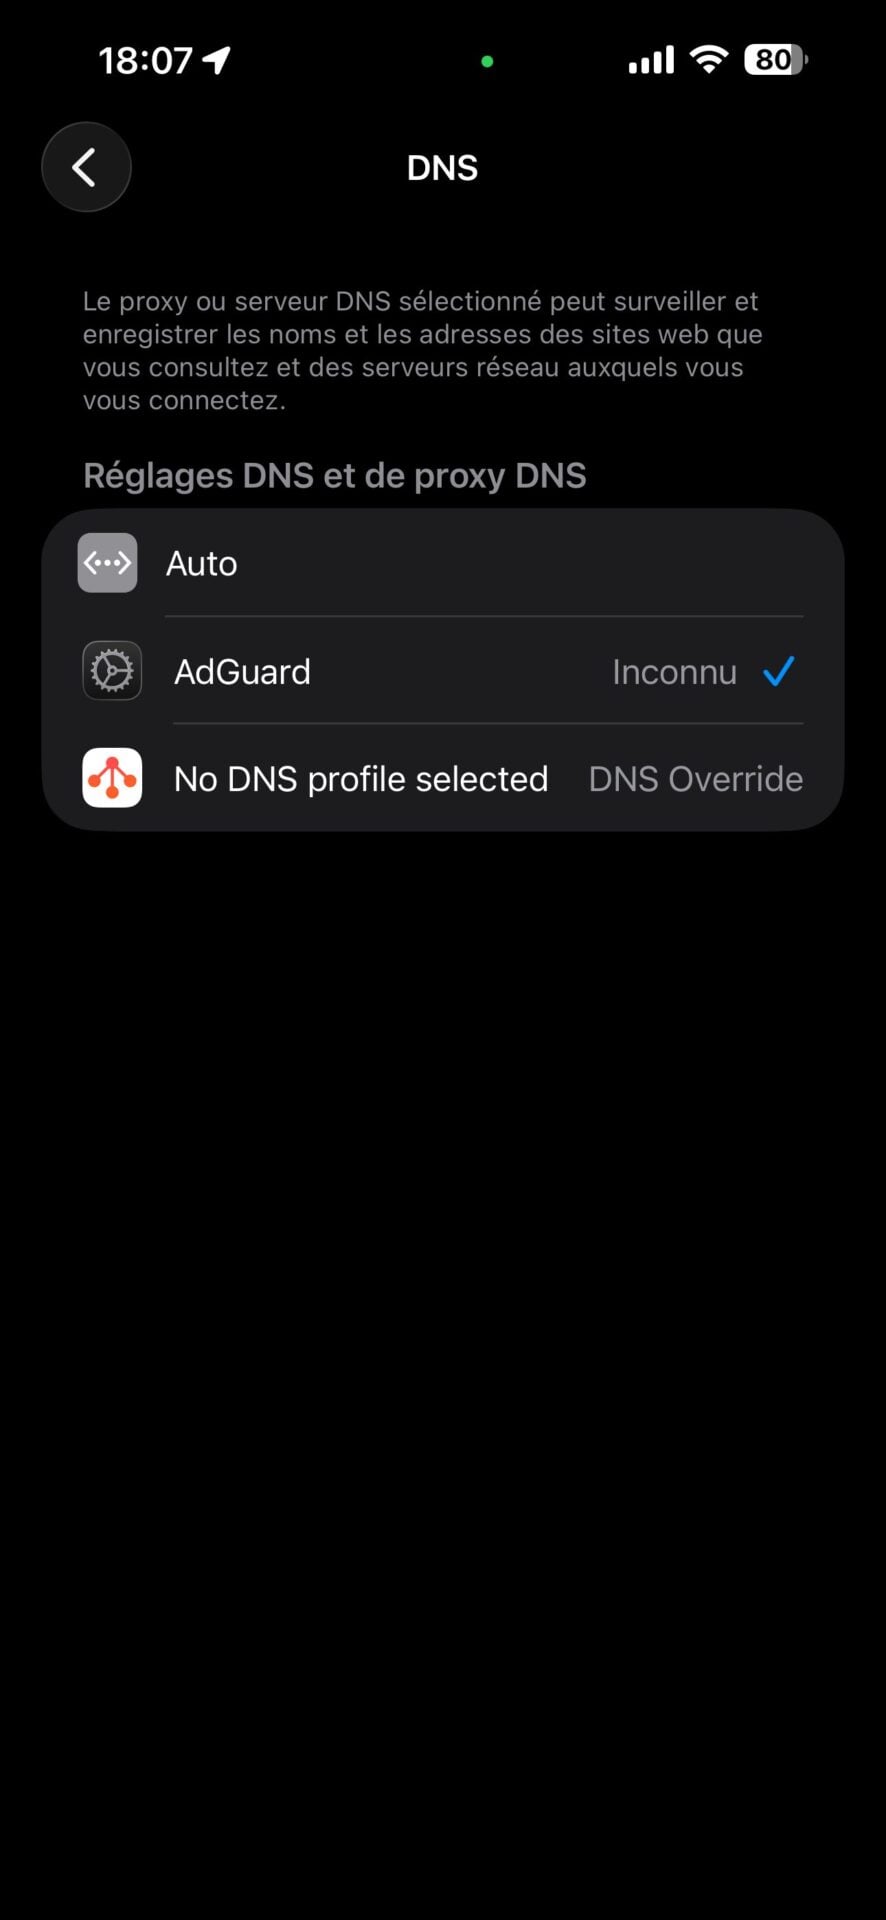
You can then choose Auto (the default DNS of your mobile operator), or other DNS resolvers that you could have set up via a dedicated application or a configuration profile.
👉🏻 Follow tech news in real time: add 01net to your sources on Google, and subscribe to our WhatsApp channel.


