Can you schedule Instagram Reels?
Yes, you can schedule Instagram Reels. Instagram now allows scheduling directly from the mobile app if you have a professional account (these are either business accounts or creator accounts). You can also use Meta Business Suite on desktop or mobile to plan Reels alongside your Facebook posts.
If you want more flexibility, such as scheduling Reels on Personal profiles, planning Stories, or managing multiple accounts, tools like SocialBee give you those options. With SocialBee, you can schedule Reels, Stories, and posts across Instagram and more than 10 other platforms from one dashboard. This makes it easier to schedule posts well in advance, instead of being limited to Instagram’s 75-day window.
Benefits of scheduling Instagram Reels
The main benefit of scheduling Instagram Reels is that it helps you stay consistent and reach your audience at the right time without extra effort.
Consistency matters because Instagram rewards accounts that post regularly. Posting on a consistent schedule also helps you grow Instagram followers over time. Scheduling makes it easier to keep that steady rhythm.
Accounts with over 50,000 followers, for instance, publish about one Reel every two days (0.5 per day), while mid-sized accounts average 0.3 per day. Smaller accounts post much less frequently, roughly one every five days.
Timing matters too: if your target audience is most active in the evening, you can set your Reel to publish then, even if you’re busy.
It’s also a smarter way to plan campaigns. Whether you’re promoting a new product, running a seasonal sale, or collaborating with a partner, scheduling ensures your Reels line up with the rest of your marketing.
How to schedule Reels on Instagram using the native Instagram app
You can schedule Reels natively in the Instagram mobile app if you have a professional account. It’s free, and you can schedule up to 25 posts per day and 75 days in advance.
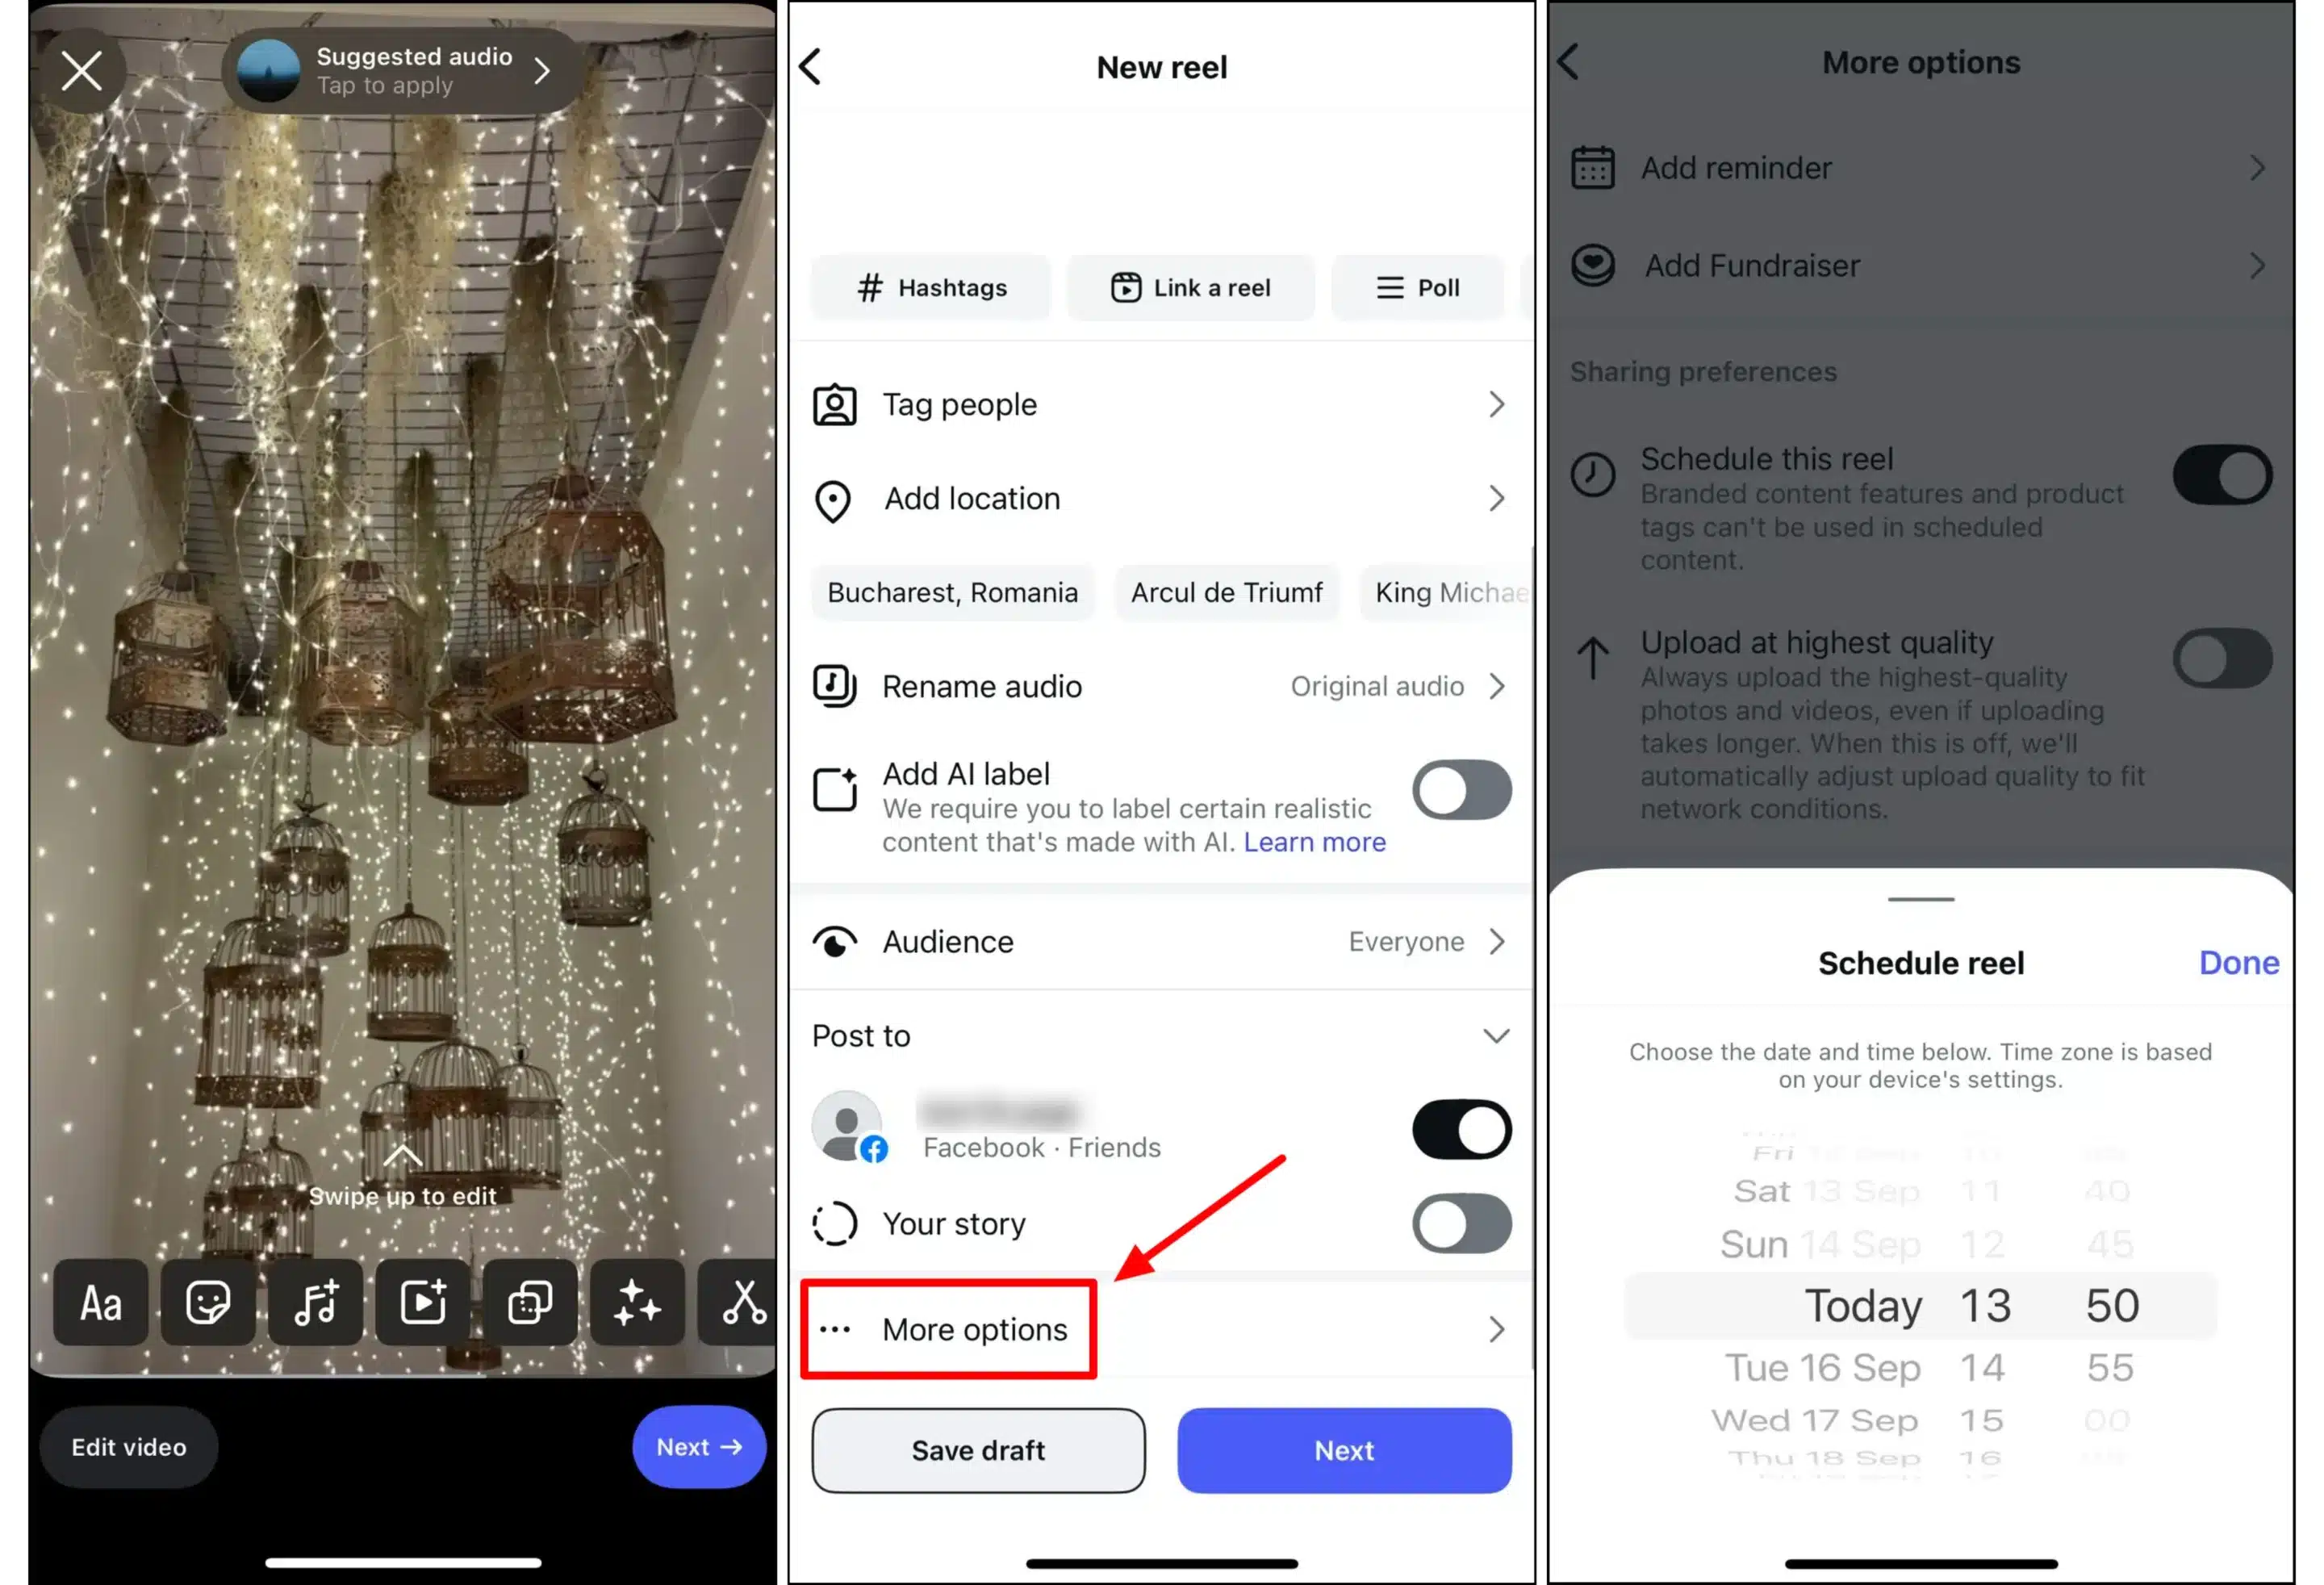
How to schedule a Reel in the Instagram app
- Open the Instagram app, tap Create, then tap Post or Reel.
- Upload your video, add a caption, effects, or filters.
- Tap More options
- Toggle Schedule this post and set your date and time.
- Tap Done, go back, and hit Schedule to confirm.
How to manage scheduled Instagram Reels
Instagram gives you two ways to manage your scheduled Reels.
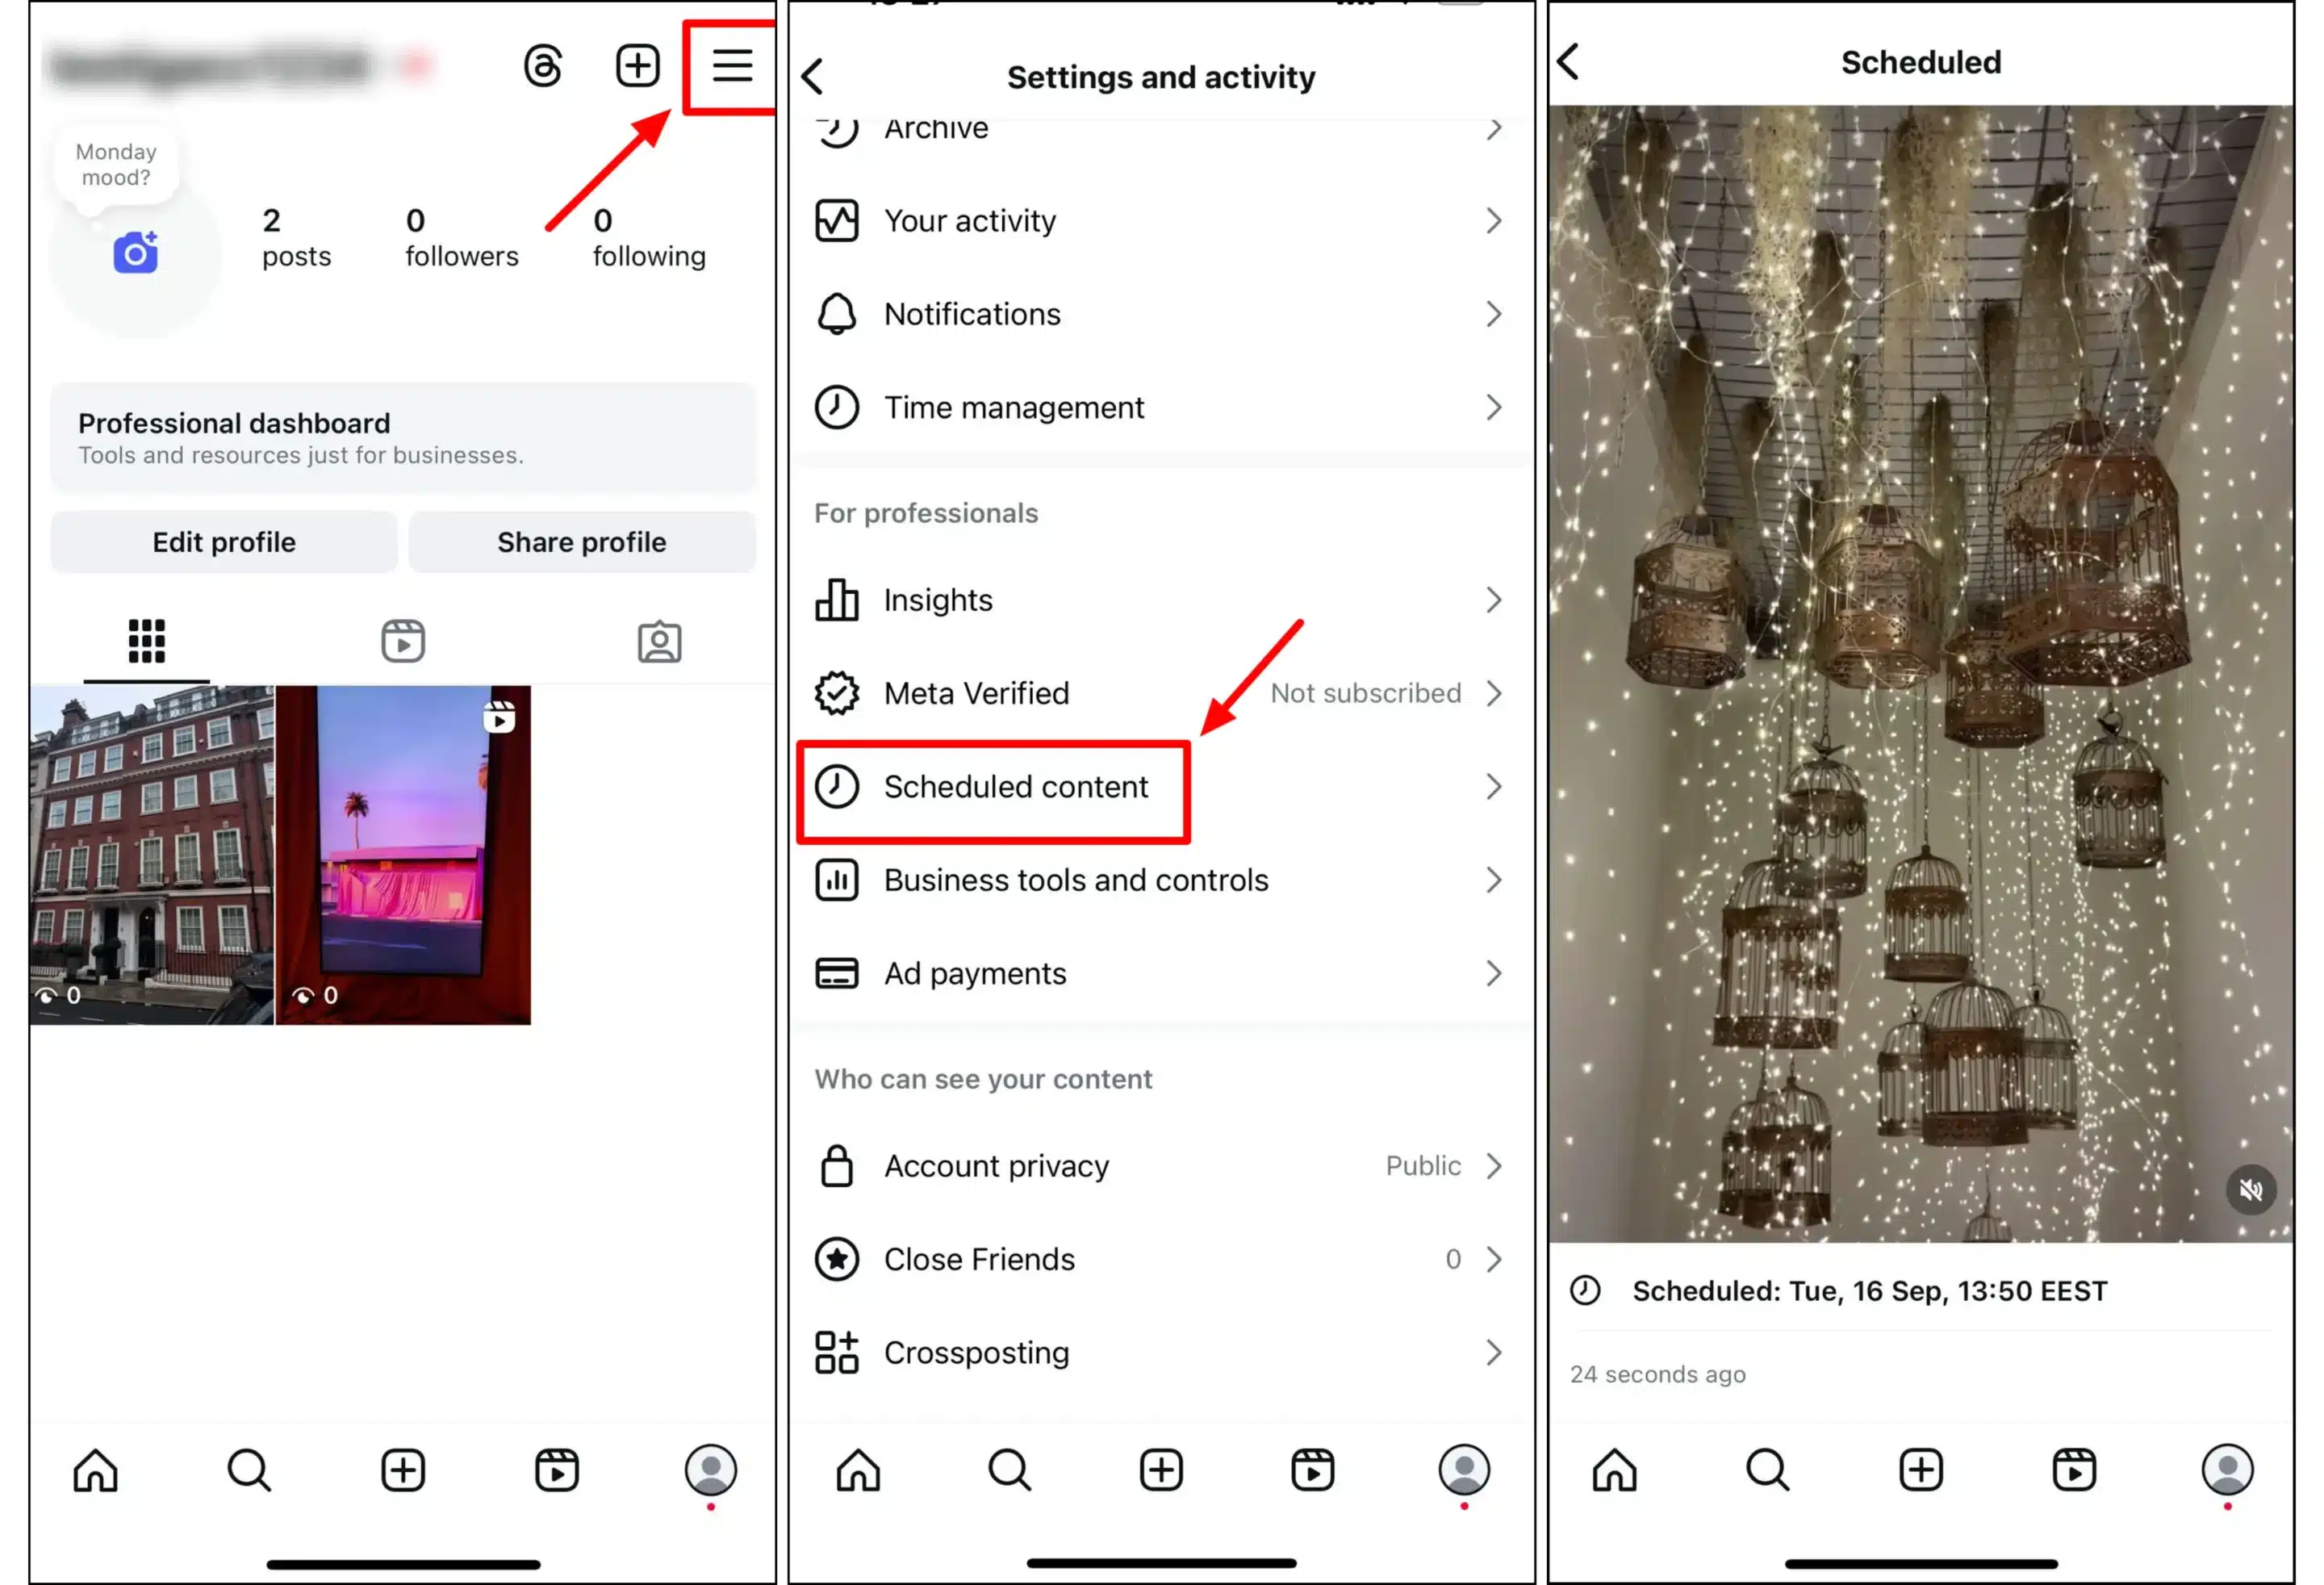
The first way is through your profile. Instagram makes it easy to delete scheduled Reels, edit scheduled Reels, and access them from the Scheduled content tab in your business dashboard.
Open your Instagram profile, tap the Menu in the top right corner, and tap Scheduled content. Find the Reel you want to change, tap the three dots on the top right of the post, and then choose Edit post, opt to reschedule at your desired date, publish it immediately with Share now, or delete it.
The second way is through the Create menu. Open the Instagram app, tap Create, and select Post or Reel. Then tap Scheduled to see all of your upcoming posts.
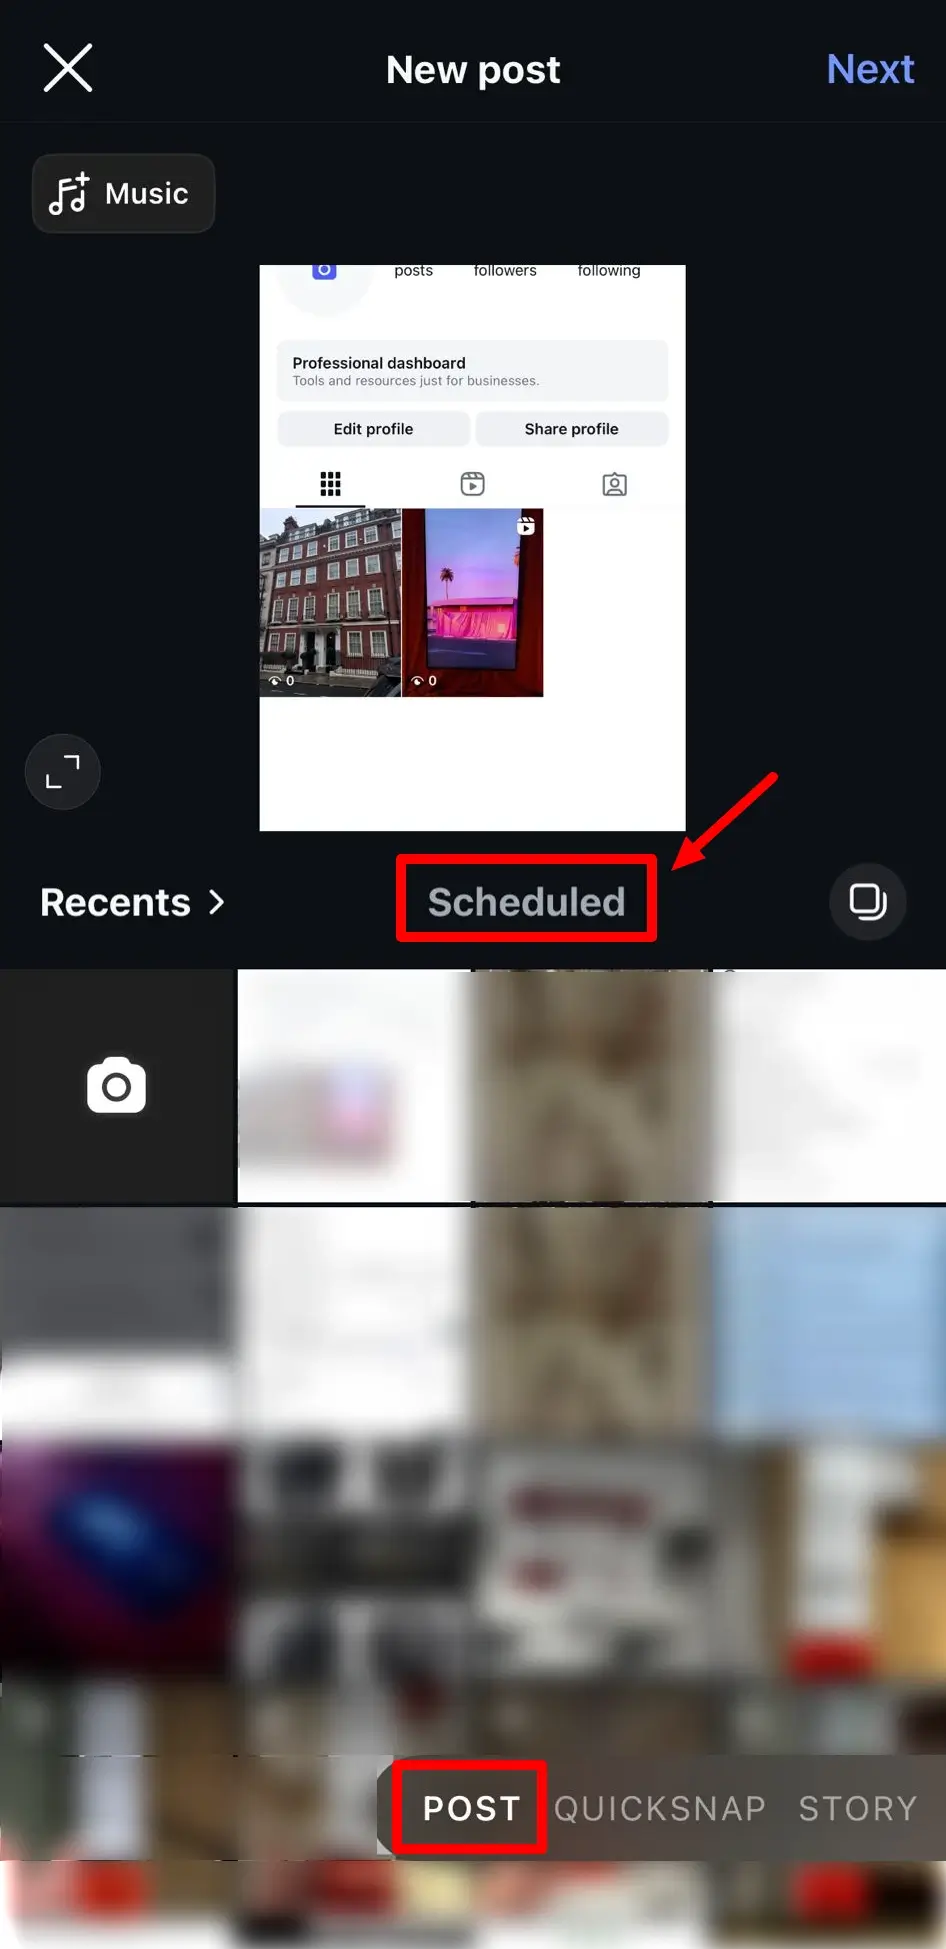
Choose the Reel you want to edit. On Android, tap the post directly, and on iOS, tap Next. From there, open Options and select whether you want to reschedule, share it early, or delete it.
Important things to know about scheduling Instagram Reels
There are a few rules to keep in mind:
- You must have a professional account to use Instagram’s scheduling feature.
- Certain post types, including product tags, collaborations, sponsored posts, and fundraisers, are not supported.
- Any privacy or audience settings you apply at the time of scheduling will stay in place when the Reel publishes, so double-check those settings before confirming.
Bottom line: Native scheduling is great if you just need a straightforward way to plan posts ahead. But if you’re managing multiple accounts, or want advanced settings like AI posting suggestions or cross-platform scheduling, you’ll likely need Meta Business Suite or a third-party tool.
How to schedule Instagram Reels with Meta Business Suite
Meta Business Suite lets you plan Instagram and Facebook content from your computer in one place. It is a good option if you manage both platforms or prefer scheduling from a desktop rather than a phone.
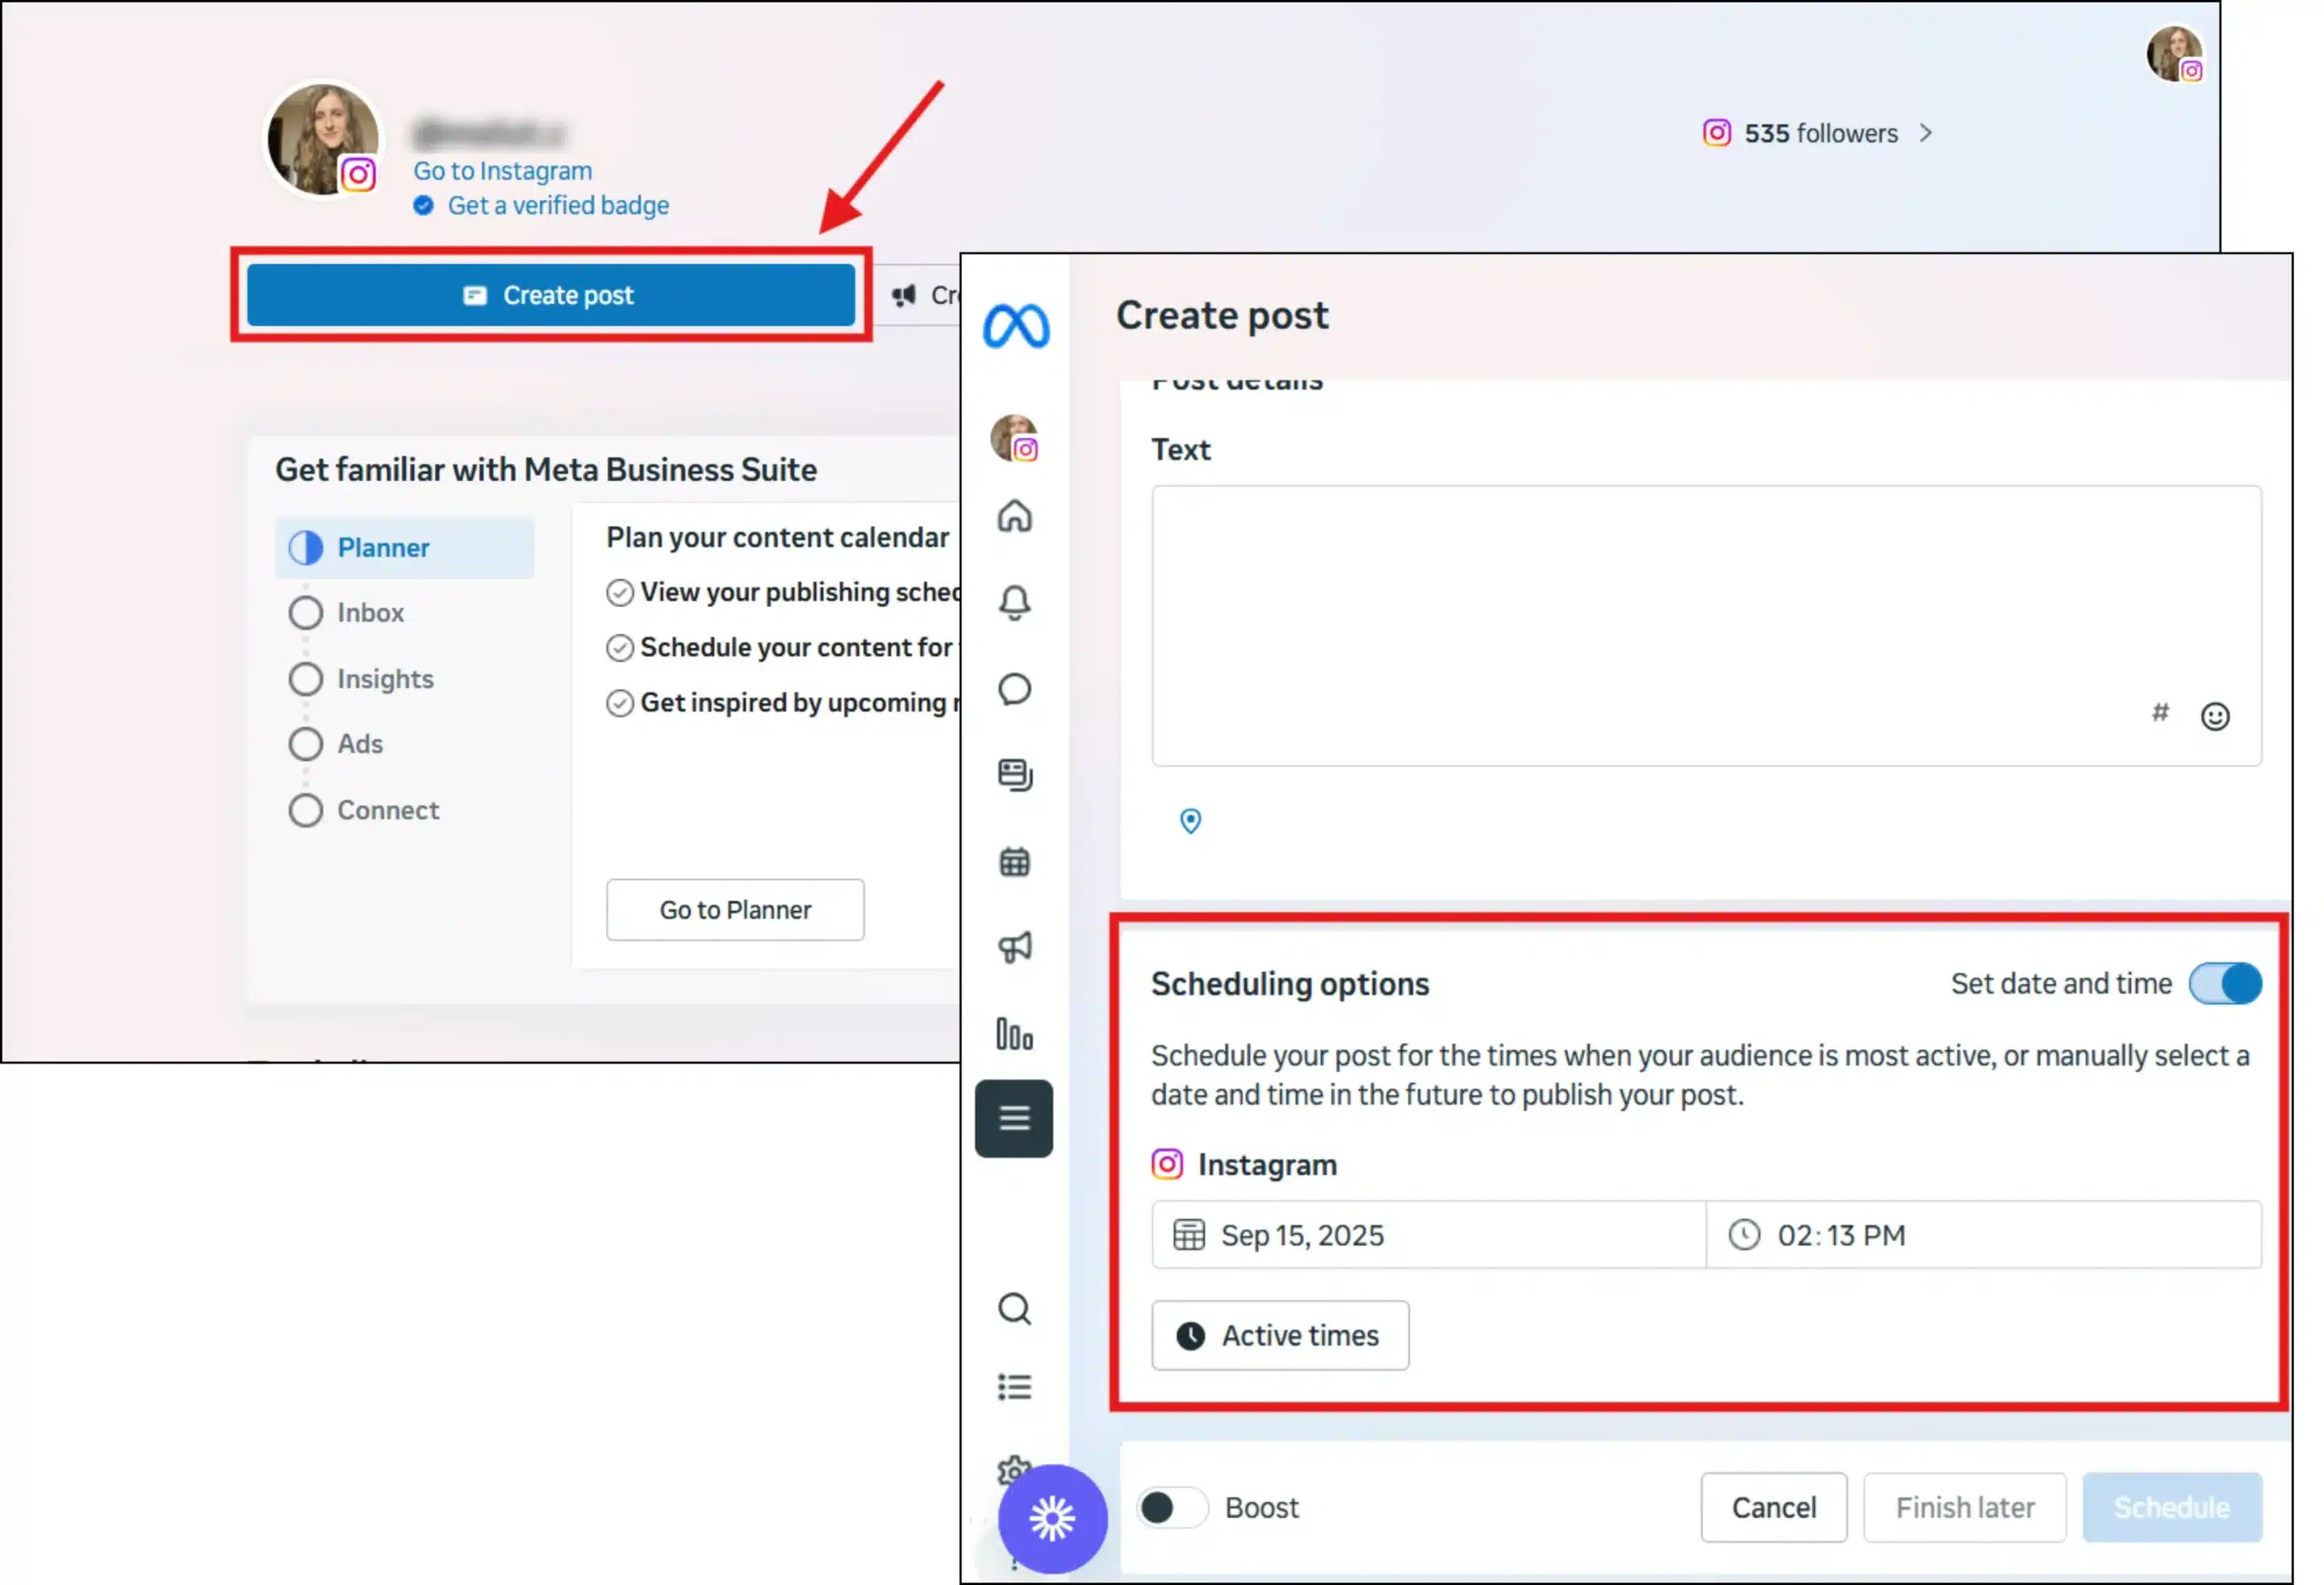
How to schedule an Instagram Reel in Meta Business Suite (desktop)
- Go to the Meta Business Suite homepage on your computer.
- In the left-hand menu, choose the correct business portfolio, which connects your Facebook Page and Instagram account.
- Select Content or Planner, then click Create post and click Create reel. You can also choose to create a post from the Home page of your Instagram tab.
- Pick where you want to publish: Instagram, Facebook, or both. (If it is your first time, you may need to reconnect your Instagram account.)
- Upload your Reel and enter details such as your caption, relevant hashtags, or location.
- Click Schedule, choose the publication date and time, and confirm.
How to manage scheduled Reels in Meta Business Suite
Go back to the Planner tab to see your calendar view. From here, you can preview how the Reel will look, tap reschedule, edit details, or publish it immediately.
Things to keep in mind
- You must select the correct business portfolio before scheduling.
- Some options, like product tags, boosted posts, or advanced ad settings, may not be available for Reels.
- You can preview how your Reel will look on Instagram versus Facebook before confirming.
How to schedule Instagram Reels with SocialBee
SocialBee allows you to schedule and publish Instagram Reels directly, but there are a few requirements to know up front.
Direct publishing is available only for Instagram Business Profiles, and the video must be under 15 minutes long with a 9:16 aspect ratio. If these conditions are not met, SocialBee will send you a mobile reminder notification so you can publish manually from the SocialBee mobile app.
How to schedule a Reel with SocialBee
- Connect your Instagram Business Profile to SocialBee.
- Upload your video (make sure your Reel file is in MP4 or MOV format for best results, 1080×1920 resolution or higher). Add your caption, hashtags, and links.
- In the posting options, select Reel as the placement.
- Choose the date and time for publishing. If your post meets the requirements, SocialBee will automatically publish it. If not, you’ll receive a reminder to post from the mobile app.
- Confirm and save. Your Reel will appear in your content calendar so you can keep track of it.


