The other day, I met my friend for coffee, and we were talking about her WooCommerce business. She told me that sometimes, she hits a wall and ends up reusing the same adjectives for her product descriptions—sleek, nice, stylish—across multiple products.
The worst part? She often doesn’t notice until much later, when her store pages already sound repetitive.
As an AI enthusiast, I immediately suggested using AI to automate the process. But my friend was hesitant because she thought connecting AI to her WooCommerce store would be too complicated.
That’s when I told her to leave it to me. Within one day, I had her WooCommerce store connected to OpenAI.
Now, all her product descriptions are unique, fresh, and written automatically.✨
If you’ve ever felt stuck writing the same product descriptions over and over, don’t worry. In this guide, I’ll show you my AI tricks to generate WooCommerce descriptions automatically.
⚡ Quick Answer: Best AI Tools to Auto-Generate WooCommerce Product Descriptions
In a hurry? Here’s a quick overview of the best tools to create product descriptions with AI:
- Uncanny Automator – Ideal for larger stores that need full automation. Connects with OpenAI to automatically generate product descriptions whenever you add new products.
- StoreAgent – Perfect for beginners or smaller shops. Generates an AI-powered description for each individual product.
I’ll walk you through both methods so you can pick the one that fits your store.
Why Auto-Generate WooCommerce Product Descriptions With AI?
Auto-generating your WooCommerce product descriptions can help you save time, improve consistency, boost SEO, and make scaling your online store much easier.
Here’s how it helps:
- Save hours on manual writing: Quickly create product descriptions without staring at a blank screen.
- Keep descriptions consistent: Every product sounds polished and professional.
- Boost SEO: Automatically include relevant keywords to rank higher in search results.
- Reduce repetitive content: Avoid using the same words and phrases across your entire store.
- Scale easily: Generate descriptions efficiently, whether you have a few products or hundreds.
When I set this up for my friend, she saw the difference right away—her WooCommerce store looked sharper, her descriptions were consistent, and she saved hours every week.
Uncanny Automator vs StoreAgent: Which One Should You Pick?
I’m going to cover two methods in this tutorial. Here’s a quick side-by-side comparison to help you decide:
| Uncanny Automator | StoreAgent | |
|---|---|---|
| Best For | Larger stores that need full automation | Beginners or smaller shops looking for a simple solution |
| Setup | Moderate – requires connecting an OpenAI API key | Easy – guided setup, account creation, and plugin connection |
| Workflow | Fully automated recipes run in the background whenever you add products | Product Description AI lets you generate descriptions for each product individually |
| Flexibility | Highly customizable – tweak triggers, actions, prompts, and more | Limited options but very simple to use |
| Cost | Free version available; Pro upgrade recommended for frequent use | Free version works for most small stores |
Both tools have their strengths, so I suggest choosing the one that matches your store size and workflow. It can also depend on how much control you want over your product descriptions.
What You’ll Need to Get Started
Before I jump into the tutorials, let’s make sure you have everything ready. Since each method works a little differently, I’ve broken down the requirements for each.
Method 1: Uncanny Automator (Best for Large Stores)
| Requirement | Why You Need It |
|---|---|
| WooCommerce store | The base platform where your products live. 🛒 |
| Premium OpenAI account & API key | It lets the AI generate product descriptions automatically. 🤖 |
| Uncanny Automator plugin (Free or Pro) | The free version connects WooCommerce and OpenAI. Pro unlocks more credits and advanced features. ⚡ |
👉 If you haven’t set up your WooCommerce store yet, don’t worry – I’ve got you covered. Follow our step-by-step WooCommerce setup guide to get your store ready.
Method 2: StoreAgent (Beginner-Friendly Option for Small Shops)
| Requirement | Why You Need It |
|---|---|
| WooCommerce store | Your store where AI descriptions will appear. |
| StoreAgent plugin | Comes with Product Description AI agent. It lets you generate AI-powered descriptions for each product ✨ |
| StoreAgent account | To connect your store and access the AI tools. |
And if you’re not sure how to get an OpenAI API key or a StoreAgent account, don’t worry—I cover those steps in detail in each tutorial.
You can now use the links below to jump straight to the method of your choice:
Method 1: Automate AI Descriptions with Uncanny Automator (Best for Large Stores)
If you’re running a WooCommerce store with dozens—or even hundreds—of products, then manually generating and updating descriptions isn’t realistic. That’s where Uncanny Automator is ideal.
It is the best WordPress automation plugin that connects your WooCommerce store with OpenAI so that product descriptions can be generated automatically. This can save you hours of repetitive work.

It is actually the solution my friend ended up choosing for her store, and I’ve thoroughly tested it too. Think of it like Zapier for WordPress—it connects your store to other apps and services so workflows run on autopilot.
If you want to dive deeper into its features, then I recommend checking out our complete Uncanny Automator review.
Step 1: Install and Activate Uncanny Automator
The first thing you need to do is install and activate the free Uncanny Automator plugin. This acts as the base plugin, so even if you go with a premium plan, you’ll still need the free version installed.
If you haven’t done this before, you can follow our beginner’s guide on how to install a WordPress plugin.
📌Important Note: Uncanny Automator’s free plan lets you connect WooCommerce and OpenAI, but it comes with a small number of free app credits.
Think of a credit as one pass to run an automation. Each time Uncanny Automator generates a product description for you, it uses one credit.
Once your credits run out, the automation will pause until you upgrade or purchase more.
That’s why I recommend a premium plan. It gives you more credits so that you can actually use the automation on a regular basis and unlock advanced features.
Upon activation, head over to the Automator » Settings » General page in your WordPress dashboard to enter your license key.
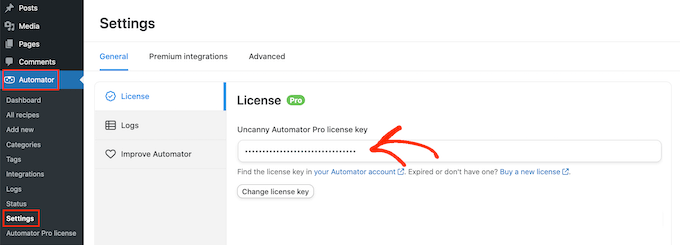

You can find this information in your Uncanny Automator account.
Step 2: Connect OpenAI to WordPress
Next, head over to the Automator » App Integrations page from the WordPress admin sidebar.
Here, you’ll see a list of all the third-party apps that Uncanny Automator can connect with. Scroll through until you find ‘OpenAI’ and click on it.


At this point, the plugin will ask you for a secret key (commonly known as an API key) to connect your OpenAI account with WordPress.
This secret key is a unique code that works like a password for apps. Instead of logging into your OpenAI account every time, the key securely allows WordPress to communicate with OpenAI in the background.
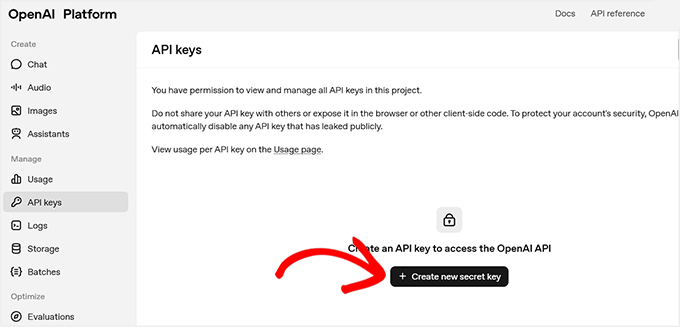
To create one, log in to your OpenAI account and switch to the ‘API Keys’ tab from the left column.
Then click the ‘+ Create new secret key’ button.

💡 Important Note on OpenAI Costs
To use the OpenAI API, you must have a paid account and add a payment method. API usage is pay-as-you-go, which is different from a monthly ChatGPT Plus subscription.
You are charged only for the tokens you use.
Tokens are small pieces of text—about 4 characters or one short word. Even though each token costs very little, generating many product descriptions can add up quickly.
To avoid surprises, go to Settings » Limits in your OpenAI account and set a monthly spending limit.
This gives you full control over your costs and ensures your automation stays within budget..
This will open a prompt, where you need to add a name for the key.
I recommend choosing a title that’s clear and memorable, like ‘Uncanny Automator connection.’ It makes it easier to find if you ever want to edit or delete it later.
Then, go ahead and click the ‘Create secret key’ button.
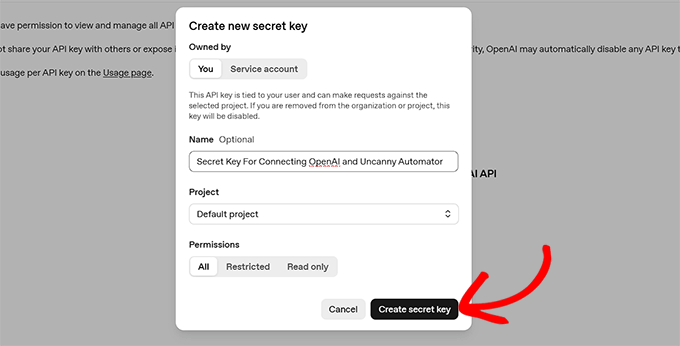

OpenAI will now generate the key for you.
From here, simply copy it into your clipboard.
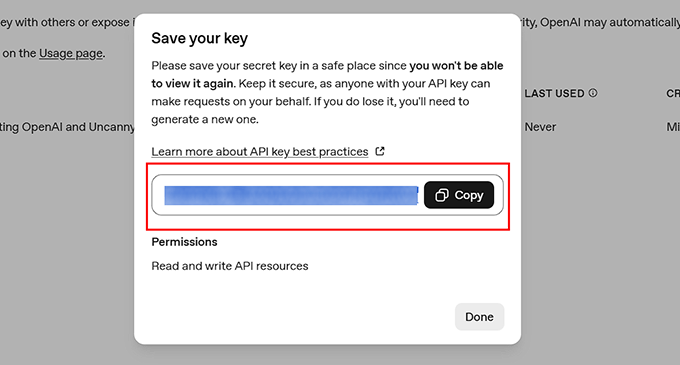

Then go back to your WordPress dashboard and paste it into the ‘Secret key’ field in the Uncanny Automator settings.
Finally, click the ‘Connect OpenAI account’ button.
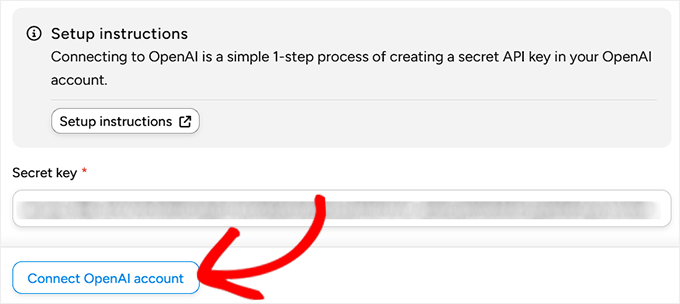

If everything works correctly, you’ll see a success message confirming the connection.
Step 3: Create a Recipe in Uncanny Automator
Now that your accounts are connected, it’s time to create a recipe.
In Uncanny Automator, a recipe is simply a rule that says, “when something happens, do this next.” That ‘something’ is called a trigger, and the ‘do this’ is called an action.
In our case, the trigger will be adding a new WooCommerce product, and the action will be generating a product description with OpenAI.
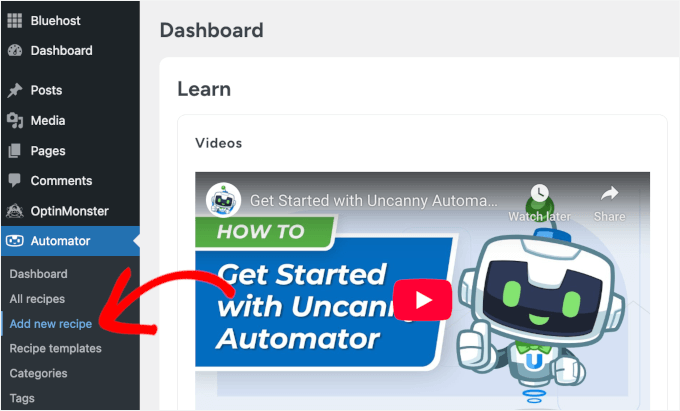
To start, go to the Automator » Add new recipe page from your WordPress dashboard.

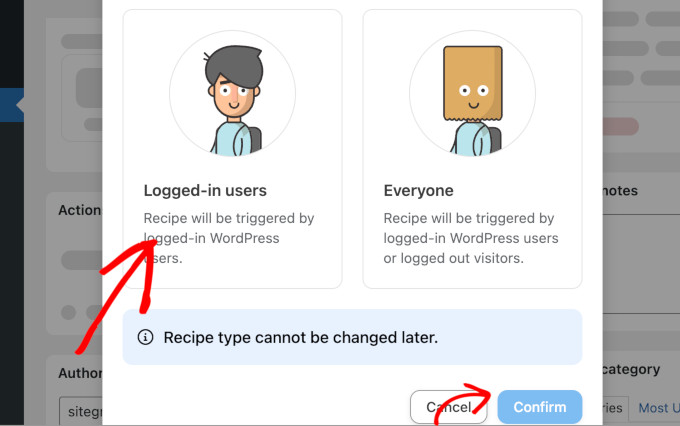
This will open the recipe editor, where the first choice you’ll see is the recipe type: Logged-in users or Everyone.
I recommend choosing Logged-in users. This means only you or your team members (who are logged into WordPress) can trigger the recipe.

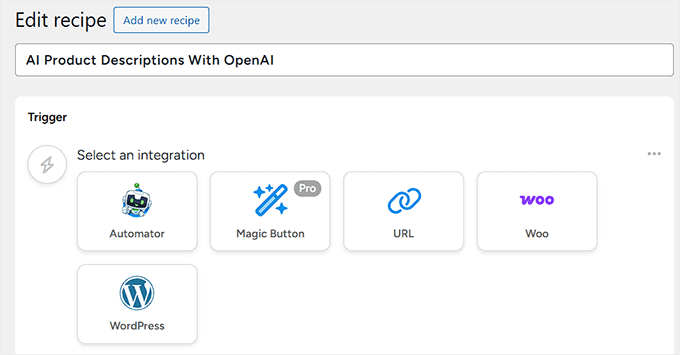
Next, add a clear name for your recipe so you can easily recognize it later if you want to edit or delete it. Something like ‘AI product descriptions’ works well.
Step 4: Set Trigger for Automatic WooCommerce Product Descriptions
Once your recipe is named, it’s time to set the trigger. To do this, select ‘WordPress’ from the Trigger panel.
Now, you might be wondering why I am choosing WordPress instead of WooCommerce.
That’s because WooCommerce products are actually stored as WordPress “posts” in the backend, so Automator uses WordPress triggers here.

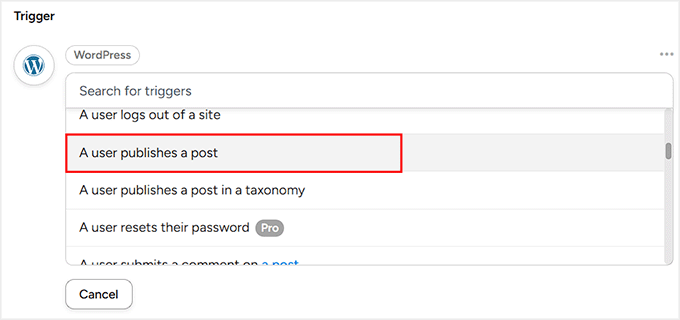
When you select WordPress, you’ll see a list of possible triggers.
From here, choose ‘A user publishes a post.’

Then, from the dropdown menu that appears, select ‘Product’ as the post type.
This tells Automator that the trigger should fire whenever a logged-in user publishes a new WooCommerce product.
After this, simply click the ‘Save’ button to confirm your trigger.


Step 5: Set the Action with OpenAI to Auto-Generate Product Descriptions
Now it’s time to decide what happens after the trigger. For this, scroll down to the ‘Actions’ panel and click the ‘Add action’ button.
This will open a list of integrations, where you can select OpenAI.


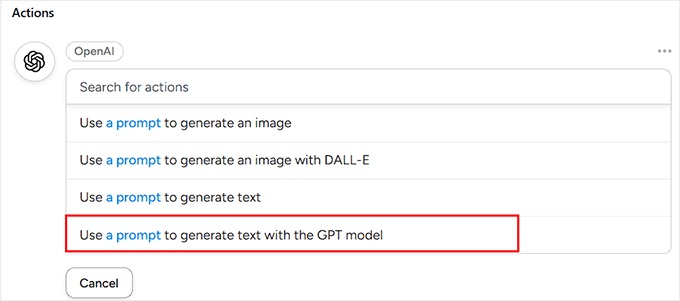
You’ll now see a list of actions available with this tool. From here, choose ‘Use a prompt to generate text with the GPT model.’
This option allows you to write your own AI prompt for how OpenAI should generate the product description.

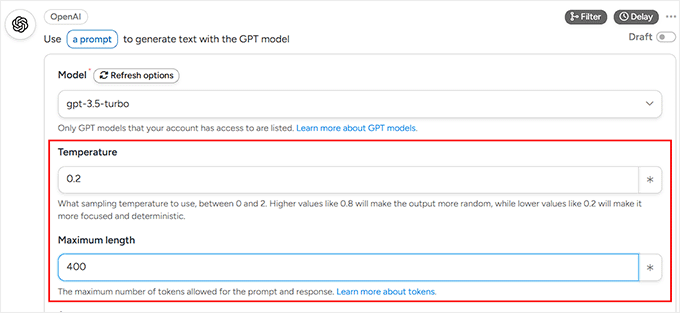
Automator will now show you a form where you can configure some settings.
This part might look a little technical at first, but don’t worry—I’ll break it down step by step.
The first option you’ll see is the ‘Model’. This is just the version of GPT (the AI engine) that Automator will use. I recommend leaving it on the default setting, because that’s always the latest and most reliable model.


Next is the ‘Temperature’ field. Think of this as a “creativity dial.”
A higher number (like 0.8) makes the AI more playful and creative with its wording, while a lower number (like 0.2) makes it stick to safe, predictable phrases.
For product descriptions, I recommend setting the temperature in the middle (between 0.2 and 0.5). This keeps text fresh, engaging, and professional.
After that, you’ll need to choose the ‘Maximum Length.’ This tells the AI how long the product description should be, measured in tokens.
As I covered earlier, your OpenAI API costs are based on how many tokens you use. Most WooCommerce product descriptions work best at around 250–300 characters.
To make sure the AI doesn’t cut off mid-sentence, I recommend setting your maximum length to 400 tokens. This gives the AI enough space to write naturally.

Note: Token counts can be slightly different in other languages, so it’s worth checking OpenAI’s documentation if you have a multilingual store.
Step 6: Write the System Message and Prompt
Now that the technical settings are out of the way, it’s time for the fun part—telling the AI how to actually write your product descriptions. You’ll do this using the System Message and the Prompt.
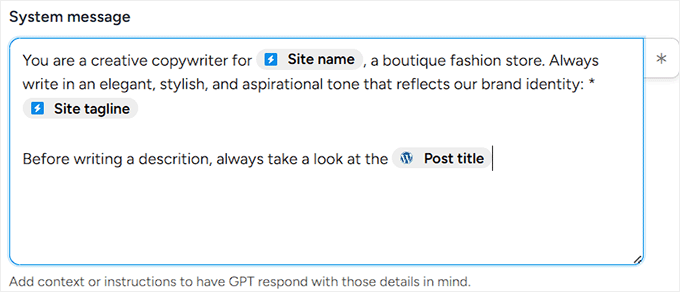
The ‘System Message’ is like giving the AI a job description. It sets the rules for how the AI should act when it’s writing.
For example:
You are a copywriter for [Site name], a store that sells eco-friendly lifestyle products. Always write in a friendly, approachable tone that matches our brand.
This way, the AI knows to stay on-brand every single time.
To make this easier, Automator lets you insert dynamic placeholders (or tags) like ‘Site name’ and ‘Site tagline.’
These are different from the OpenAI tokens I mentioned earlier; think of them as shortcuts that automatically pull information from your website.
To add one, just click the little asterisk icon next to the field.

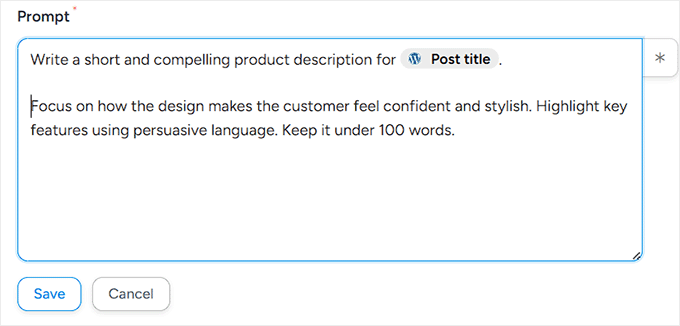
Next, you’ll write your prompt. This is your direct instruction for the AI about what to generate.
For example:
Write a short, engaging product description for {{Post title}}. Use details like {{Post excerpt}} and {{Post content (raw)}} to highlight the product’s main features. Keep the tone persuasive but friendly.
Here, the post tokens (like Post title and Post excerpt) will automatically grab the right details from each product you add to WooCommerce.
That means every new item gets its own unique description without you having to write a word.
For instance:
Write a short and compelling product description for {{Post title}}. Focus on how the design makes the customer feel confident and stylish. Highlight key features using persuasive language. Keep it under 100 words.
Once you’ve written your System Message and Prompt, just hit the ‘Save’ button.
Automator will now remember these instructions for every new product you publish.

Step 7: Automatically Update Products with AI-Generated Descriptions
So far, your trigger and first action tell GPT to generate a product description. The next step is to automatically update the WooCommerce product with that description.
This step is essential because, without it, the AI-generated content would exist in the background but never appear on your product pages.
Connecting the OpenAI response directly to the product ensures every new product gets a polished, on-brand description immediately.
To do this, go to the Actions panel in your recipe and click the ‘Add action’ button again.
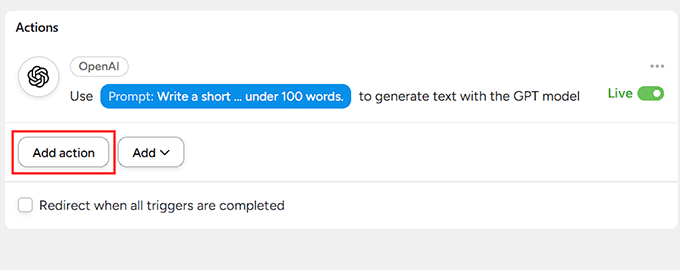

Then, from the dropdown list, select ‘WordPress’ as your action integration.
This will display a list of available actions you can perform with WordPress. From here, choose ‘Update the content of a post.’
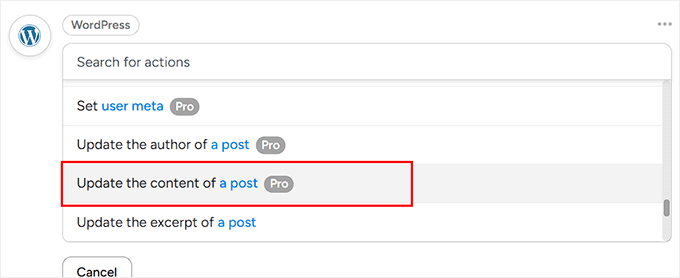

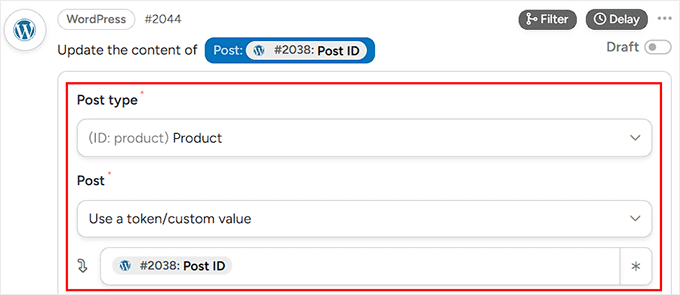
Automator will now prompt you to select a post type and a specific post.
Go ahead and choose ‘Product’ as the post type from the dropdown menu. Then, under ‘Post’, select ‘Use a token / custom value.’
Next, you need to click the asterisk and add the ‘Post ID’ token in the field under it.
This tells Automator to target the exact product that triggered the recipe, ensuring the AI-generated description is added to the correct item.

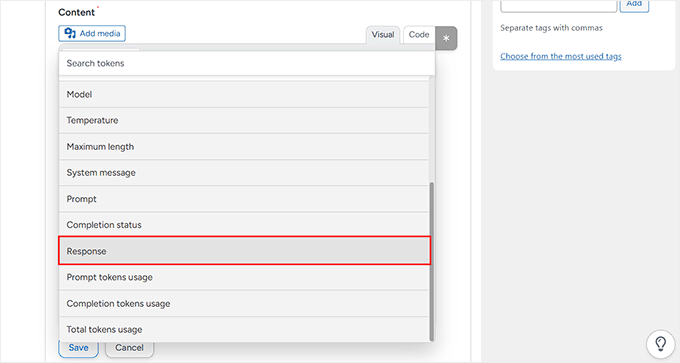
Next, scroll down to the ‘Content’ field and add the ‘Response’ token from your OpenAI action. To do this, click the asterisk icon in the top-right corner of the field and add the token.
This makes sure that each product’s content is automatically replaced with the AI-generated description.

Once everything is configured, click the ‘Save’ button.
From now on, every time a new product is published, GPT will generate a description, and Automator will add it directly into the product.
Step 8: Test Your AI-Generated WooCommerce Product Description
At this point, your recipe is ready to go—you just need to flip the switch. On the right-hand side of the editor, change the status from ‘Draft’ to ‘Live.’
Your automation is now active.


However, before you start relying on it, it’s a good idea to test things out.
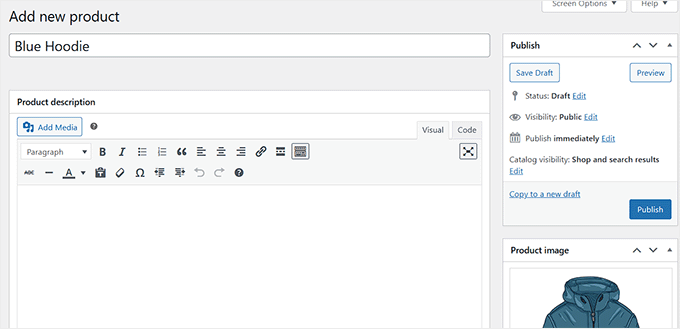
To do this, head over to your WordPress dashboard and add a new product. Give it a title, price, image, and whatever other details you normally include, and hit the ‘Publish’ button.

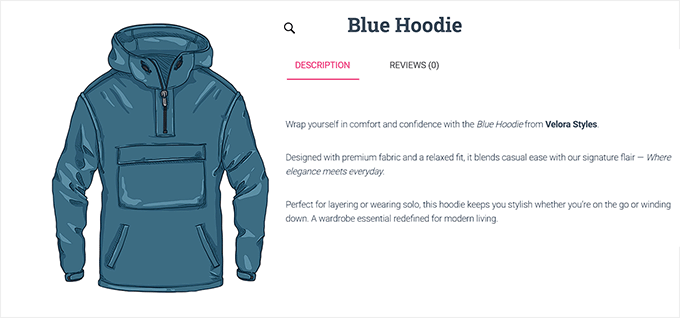
Now visit the product page on your site.
If all is working well, then Uncanny Automator contacts OpenAI and generates a fresh product description automatically.

Method 2: Generate AI Product Descriptions With StoreAgent (Beginner-Friendly Option for Small Shops)
If you’re starting with WooCommerce and want something simple, then StoreAgent is a great option. It’s an all-in-one AI suite made for WooCommerce.
StoreAgent comes with a ‘Product Description Assistant’ that can generate descriptions with one click.
Just keep in mind that it won’t automatically create descriptions in the background, so you’ll need to open each product and click a button.

For smaller online shops, this can actually be a good thing because it gives you more control and ensures you approve every piece of content before it goes live. However, Uncanny Automator is a better fit for larger stores.
Step 1: Install and Connect StoreAgent
First, you’ll need to install and activate the StoreAgent plugin on your WordPress site. If you haven’t done this before, you can check out our tutorial on how to install a WordPress plugin.
As soon as you activate the plugin, a new screen will appear asking you to connect your website with a StoreAgent account. Simply click the ‘Connect to StoreAgent’ button.
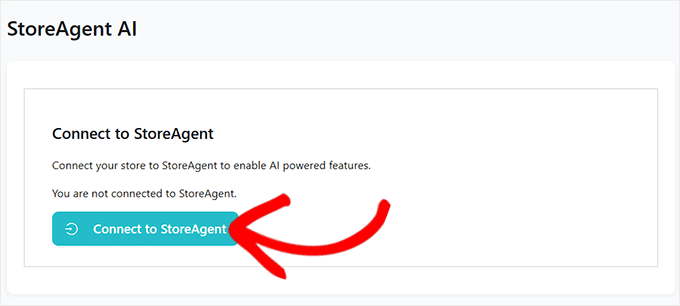

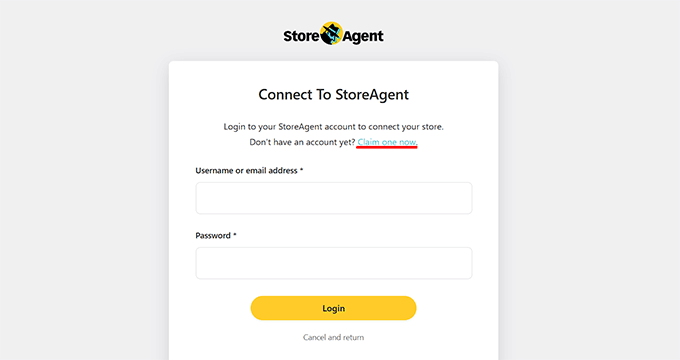
This will take you to the StoreAgent website, where you’ll have to enter your username and password.
If you don’t have an account, don’t worry—you can create one by clicking on the ‘Claim one now’ link.

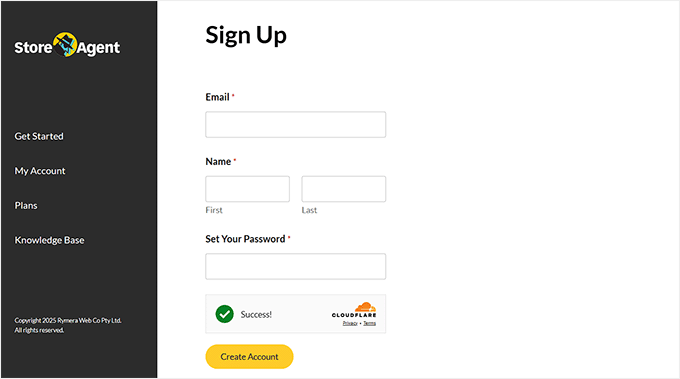
This will direct you to the signup page, where you simply need to enter your email address, name, and a password.
Once you’ve filled it in, click the ‘Create Account’ button.

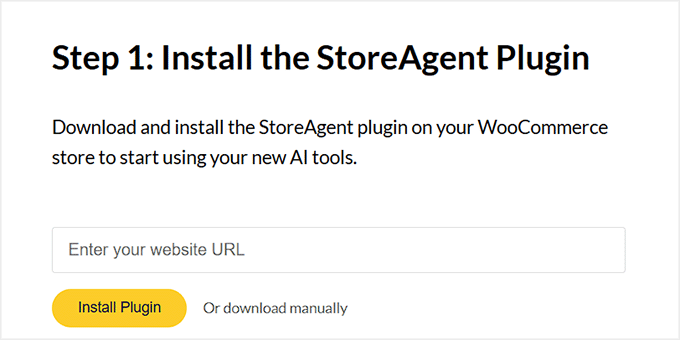
Next, StoreAgent will ask for your website’s URL.
You need to copy and paste your site address (URL) into the required field and click the ‘Install Plugin’ button.

You’ll then be redirected back to your WordPress dashboard. Since the plugin is already installed, the setup will complete automatically.
Step 2: Activate Product Description Assistant in StoreAgent.ai
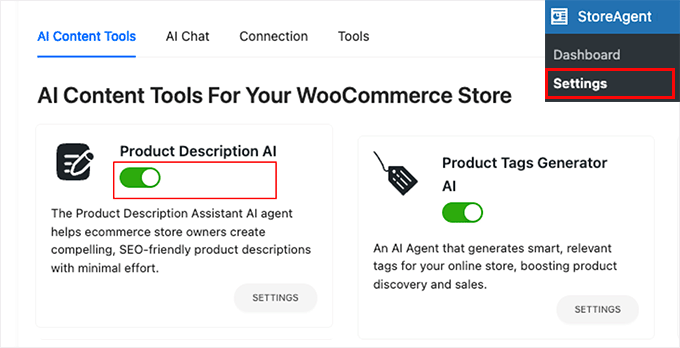
Now, head over to the StoreAgent » Settings » AI Content Tools page from your WordPress dashboard.
Here you’ll see all the different AI agents that StoreAgent offers.
Simply find the one called ‘Product Description AI’ and switch it from ‘Inactive’ to ‘Active.’

Step 3: Open WooCommerce Product to Generate AI Description
Next, go to Products » All Products in your WordPress dashboard. Pick any product you want to update by clicking the ‘Edit’ link under it.
Once the product editor opens, you’ll see a new button that says ‘Generate description with AI.’
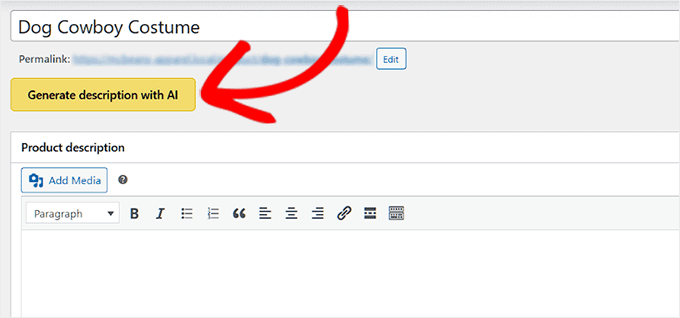

You’ll be using this button to let StoreAgent create a product description for you.
Step 4: Customize Your AI Product Description Settings
When you click the ‘Generate description with AI’ button, a form will pop up asking you to set a few preferences before the AI starts writing.
These options help StoreAgent understand your product better and make the description sound just the way you want.
The first thing you’ll see is the option to generate a product title. If your product doesn’t already have one, then StoreAgent can create a title for you.
It’s not always perfect, but it can save time if you’re stuck or want some inspiration.
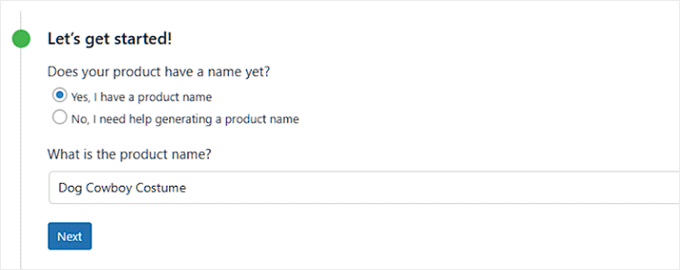

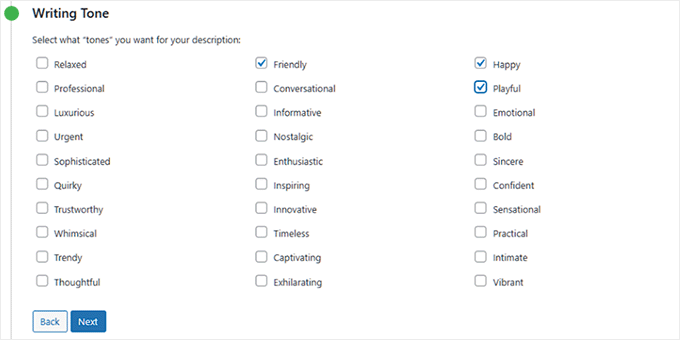
Next is the Writing Tone. This is where you decide how you want your description to sound.
For example, you could make it professional if you’re selling business products, or friendly and inspiring if you’re selling homemade items.
You can even select more than one tone to blend styles and get a result that feels natural to your brand.

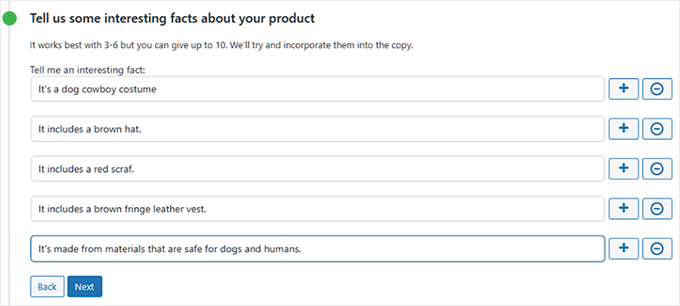
After that, you can also add interesting facts or key details about your product.
This is optional, but I recommend filling it in because it gives the AI more to work with. You can add things like the material, special features, or benefits.
The more details you share, the more accurate and engaging your description will be.

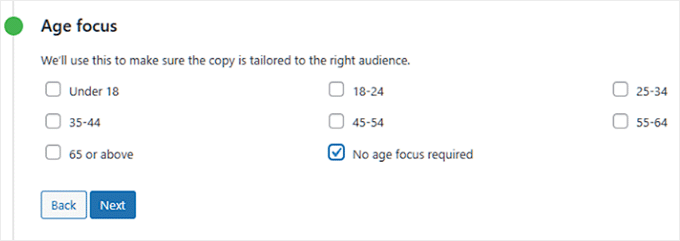
If your product is meant for a specific age group, such as kids or seniors, you can set that in the ‘Age Focus’ section.
If not, you can simply select ‘No age focus required.’
This tells the AI whether to tailor the language toward a particular audience or keep it general.

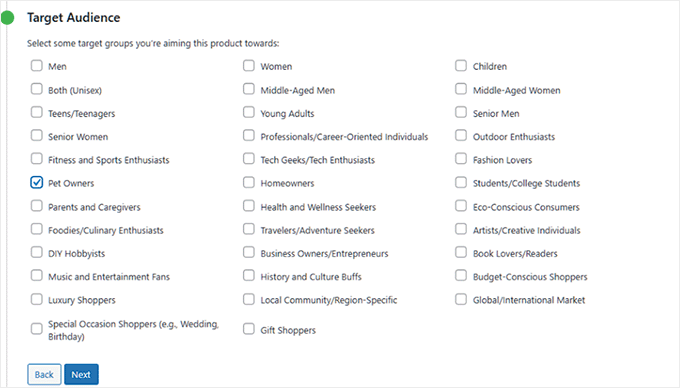
Then, there’s the option to define your target audience. Every product has one. For example, if you’re selling a dog costume, your audience would be pet owners.
Picking the right audience helps the AI write in a way that speaks directly to the people most likely to buy your product.

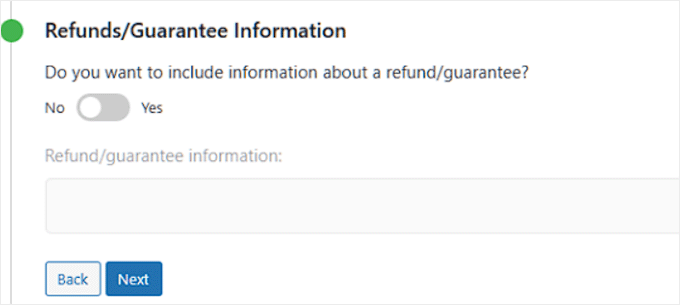
You’ll also see a section where you can mention refunds or guarantees.
If you want to highlight a money-back guarantee or a return policy, you can toggle this option and add the details. It’s a small touch, but it can make your description more persuasive.

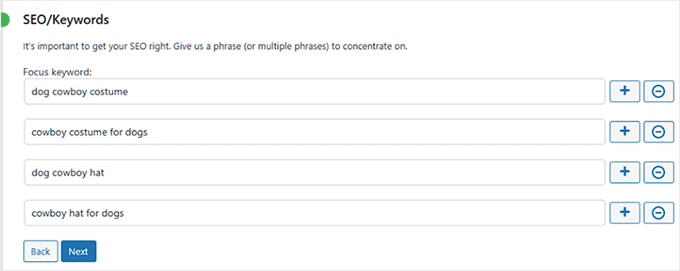
There’s also a field to add keywords. This is useful for WordPress SEO because it can help your product page appear in search results.
Just type in the terms people are likely to search for, and StoreAgent will naturally include them in the description.

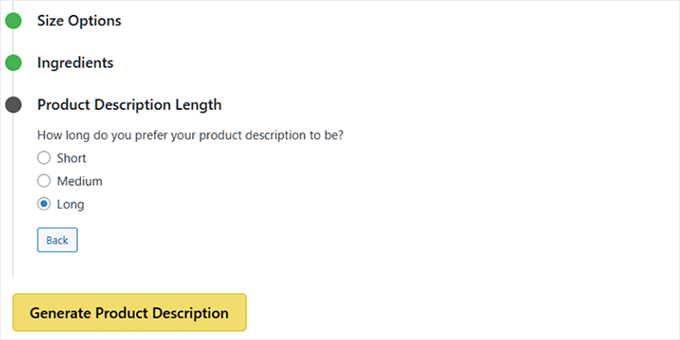
Finally, you’ll be asked to choose the description length. You can go for short, medium, or long.
A short description works well for simple products, while a longer one is better if your product needs more explanation.
It’s totally up to you, and you can always test different lengths to see which works best for your customers.

Step 5: Publish and Review AI-Generated Product Descriptions
Once you’ve set everything up, click the ‘Generate Product Description’ button. This tells the AI to create the description for you.
StoreAgent will instantly generate the text and show it in a popup. From here, you can review what was written.
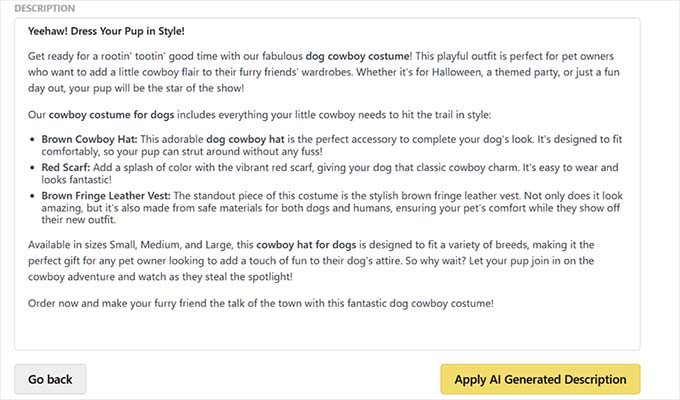

If you don’t like the result, just click ‘go back’ to adjust your options and try again. If you’re happy, simply click the ‘Apply AI Generated Description’ to add it to your product.
Finally, click the ‘Update’ or ‘Publish’ button to save your changes and make your product live.
After that, repeat the process with each product to create its AI descriptions.
💡Pro Tips for Better AI-Generated Product Descriptions
Even with powerful AI tools like Uncanny Automator or StoreAgent, getting great product descriptions isn’t just about clicking a button.
That’s why I suggest following these tips. They will make sure your AI-generated text is accurate, persuasive, and fully aligned with your brand.
1. Write clear and detailed prompts
Always include key details like features, materials, benefits, and relevant keywords for products in your prompt. The more details you include, the more accurate and persuasive the AI’s output will be.
Think of it like giving the AI a cheat sheet to follow. For example, my friend used this prompt for her fashion boutique:
Write a short and compelling product description for {{Post title}}. Highlight how the design makes the customer feel confident and stylish. Include the material and any standout features. Keep the tone friendly and engaging.
This gave her AI-generated descriptions that were professional, persuasive, and aligned with her brand.
You can also give the AI ‘negative instructions’ to make the output better. For instance, if you find the AI often uses generic words, you could add this to your prompt:
Do not use common marketing words like "amazing," "revolutionary," or "game-changer".
For more tips, check our guide on the best AI prompts for bloggers, marketers, and social media.
2. Keep your brand voice consistent
When using AI, you need to give it clear guidance on your store’s tone—whether that’s professional, playful, or inspirational. You can share examples of your existing product descriptions or brand guidelines so the AI doesn’t switch styles randomly.
For example, the same t-shirt could be described in very different ways depending on your brand voice:
- Professional: “Made from 100% organic cotton, this t-shirt offers a comfortable fit and long-lasting quality.”
- Playful: “Your new go-to tee for Netflix marathons, coffee runs, and everything in between.”
- Inspirational: “Wear it as a reminder that simple choices—like a soft, eco-friendly t-shirt—can make a big impact.”
Consistency in tone builds trust with customers and makes your products feel cohesive across your store.
3. Treat AI as your first draft assistant
AI is incredibly powerful, but it’s not perfect. Always think of it as a tool that gets you 90% of the way there.
Your human touch adds the final 10% that ensures accuracy, corrects any awkward phrasing, and adds a unique brand personality. Always read through the generated descriptions before publishing.
4. Use bulk generation wisely
For stores with many products, generating descriptions in bulk with Uncanny Automator saves time.
However, always spot-check a few items to ensure quality and make adjustments where needed.
Common Issues and Troubleshooting AI Product Descriptions
Even with AI, things don’t always go perfectly on the first try. That is why I want to share solutions to some common problems you might run into.
Why isn’t my API connecting?
Double-check that your OpenAI API key is copied correctly and pasted into the right field. Make sure there are no extra spaces or missing characters.
Why are the generated product descriptions too generic?
Your prompts may be too vague. You can include product details, benefits, and brand context to make the AI output more specific and engaging.
How do I manage costs when using OpenAI?
Set usage limits or monitor your API usage in the OpenAI dashboard. This helps prevent unexpected charges while keeping your automation running smoothly.
Why doesn’t StoreAgent generate a description automatically for each product?
Unlike Uncanny Automator, StoreAgent requires you to click the “Generate Description” button for each product. This gives more control but isn’t fully automatic.
Why is the AI sometimes missing product details?
The AI can only work with the information you provide. Make sure your product title, excerpt, and any facts or features are complete before generating a description.
Frequently Asked Questions About AI Product Descriptions
Here are some questions that our readers frequently ask before setting up automatic AI product descriptions on their WooCommerce store.
How much does OpenAI cost for generating WooCommerce product descriptions?
OpenAI charges based on usage, measured in “tokens,” which are small chunks of text. The cost depends on the length and number of product descriptions you generate. You can monitor and manage your usage in the OpenAI dashboard to control costs.
Do AI-generated WooCommerce product descriptions affect SEO?
Not if they’re well-written. AI-generated content can rank well if it’s unique, relevant, and optimized for keywords. However, you should always review and tweak the descriptions to maintain accuracy and add your brand voice.
Can I autogenerate AI descriptions for 1,000+ products?
Yes. Tools like Uncanny Automator allow for fully automated workflows, making it easy to generate AI descriptions at scale.
For StoreAgent, you’ll need to generate descriptions product by product, which works best for smaller catalogs.
What if the product descriptions are inaccurate?
Always check AI-generated content before publishing. You may need to edit it to correct errors and improve clarity for accuracy and persuasiveness.
I hope this article helped you learn how to easily auto-generate AI product descriptions in WooCommerce. You may also like to see our guide on how to automatically generate image alt text in WordPress with AI or our guide on how to use AI for marketing.
If you liked this article, then please subscribe to our YouTube Channel for WordPress video tutorials. You can also find us on Twitter and Facebook.

