Once, I missed sending a WooCommerce order notification and only found out because my customer reached out, upset.
Relying on email alone often doesn’t cut it. Messages can get lost in spam, delayed, or ignored if shoppers don’t check their inboxes.
Switching to WhatsApp made a big difference for me. Notifications arrive instantly, customers actually see them, and I can get real-time updates on every sale.
After testing several options, I’ve narrowed it down to three reliable methods anyone can use. In this guide, I’ll walk you through how to connect WhatsApp with WooCommerce, so you and your customers never miss an update again.
Why Set Up WooCommerce Order Notifications in WhatsApp?
Relying only on email for WooCommerce order updates can cause issues. Emails can end up in spam, show up hours late, or just get lost in a busy inbox.
WhatsApp solves this by sending instant updates straight to your customer’s phone, so they never miss an important update.
Here’s a closer look at how connecting WooCommerce and WhatsApp can be helpful:
- People check WhatsApp more. Many customers are on WhatsApp all day, while email gets ignored.
- Messages get read quickly. WhatsApp notifications are opened almost right away.
- Fewer customer questions. If shoppers get updates instantly, they don’t have to contact you for answers.
- Real-time updates build trust. Customers always know when their order is confirmed, shipped, or refunded.
With WhatsApp, your messages actually reach customers, which means less confusion and a smoother shopping experience.
Which Method Should I Choose?
In this guide, I’ll cover 3 ways to send WooCommerce order notifications in WhatsApp. Here’s how I recommend choosing between them:
- Method 1: PushEngage. Best for an all-in-one marketing platform. Send automated WhatsApp order updates to customers and your team, alongside push notifications, cart recovery messages, and promotions.
- Method 2: Uncanny Automator. Set up custom “recipes” to trigger WhatsApp messages from WooCommerce events, with flexible automation options.
- Method 3: Wawp. A simple free option that connects to your personal or business phone (similar to WhatsApp Web). It’s ideal for testing or small stores, but your phone must remain on and connected to the internet for it to work.
If you choose either method 1 or 2, you’ll also need to set up a WhatsApp Business account and message templates within WhatsApp.
Now, I’ll walk through each method step by step:
Let’s get started.
Before You Start: Set Up Your WhatsApp Business Account (For Methods 1 & 2)
To connect your WooCommerce store with WhatsApp, you’ll need to set up a WhatsApp Business Suite account, generate a permanent token, and create WooCommerce message templates.
Here’s a quick checklist of what you’ll need before you start:
- A Meta Business Suite account (or be ready to create one).
- Admin access to that account.
- A phone number that is not currently registered with a personal WhatsApp account. You’ll need this number exclusively for your business notifications.
In the next sections, I’ll guide you through each of these steps.
Step 1: Create a WhatsApp Business Account
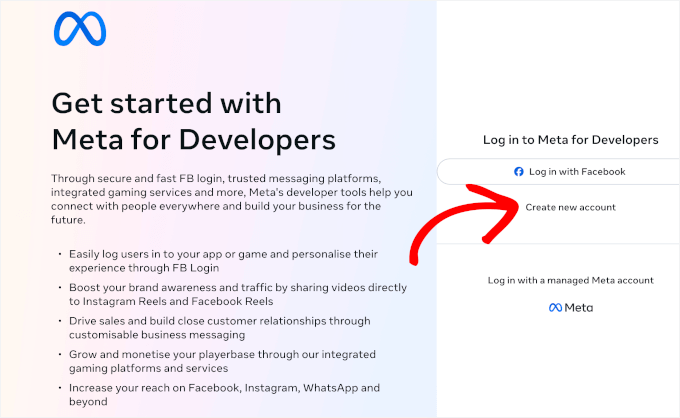
If you don’t already have a Meta Business Suite account, you can create one on the Meta website.
Just click ‘Create a New Account’ to sign up and complete the quick setup steps. Do note that you’ll need to verify your business information, which can take 1-2 business days.
💡 Disclaimer: The exact steps may vary slightly since Meta updates their interface from time to time, so don’t worry if things look a little different on your screen.

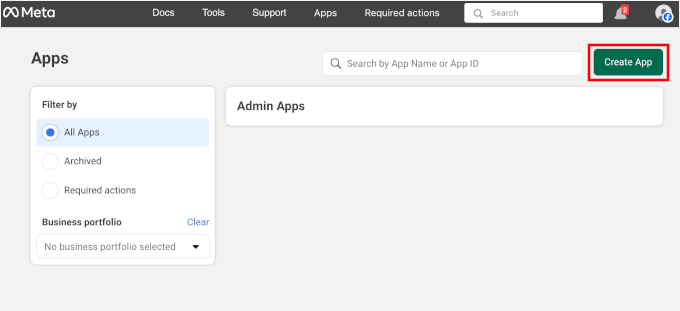
After creating your app, you’ll land on the app dashboard.
Go ahead and click the ‘Create App’ button.

This will start the app setup wizard.
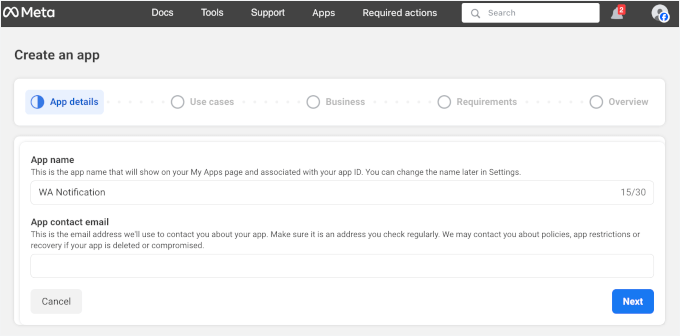
Here, simply fill in the ‘App name’ and ‘App contact email’ fields. This is for your reference only, but it’s helpful to have a clear, descriptive name.
After that, click the ‘Next’ button to continue the process.

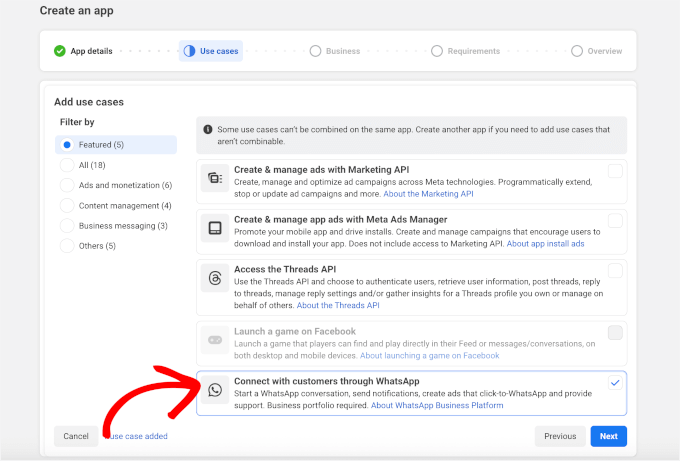
On the next screen, you’ll choose a use case.
As we want to send a WooCommerce order notification to WhatsApp, let’s select ‘Connect with customers through WhatsApp’ and click ‘Next.

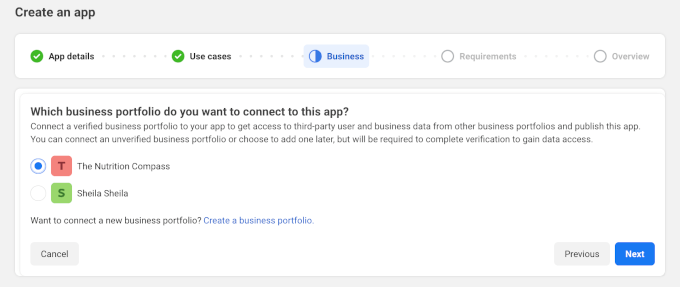
After that, you’ll need to link your business portfolio. Just click on the available option and click the ‘Next’ button to move on.
If you don’t have one, you can just click on the ‘Create a business portfolio’ link.

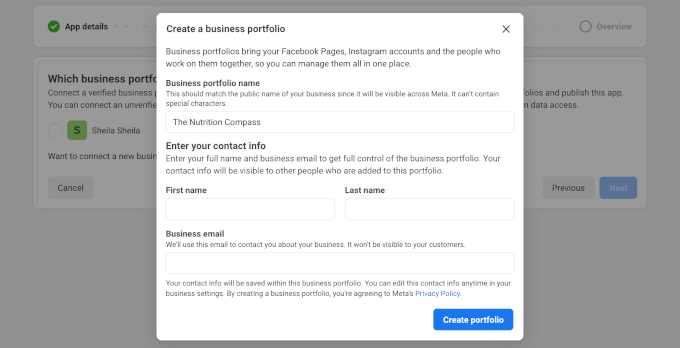
This will open a popup where you’ll enter your first name, last name, and business email address.
Once done, click ‘Create Portfolio.’

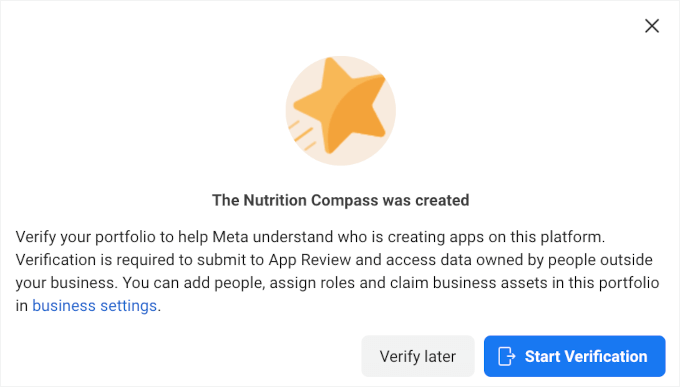
Meta will then prompt you to verify your business portfolio.
Simply click ‘Start Verification’ and follow the on-screen instructions.

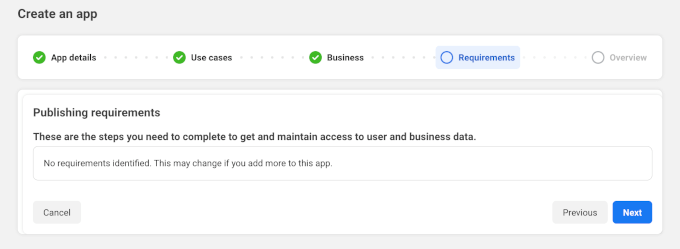
The next step is to review requirements.
For WhatsApp-related apps, there typically won’t be any requirements identified. So you can go ahead and click the ‘Next’ button.

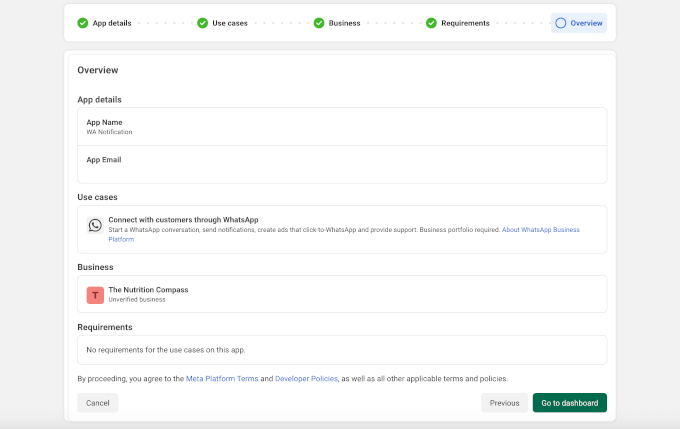
And for the last step, you’ll see a summary of your new WhatsApp Notification app.
You can review everything and then click ‘Go to Dashboard.’

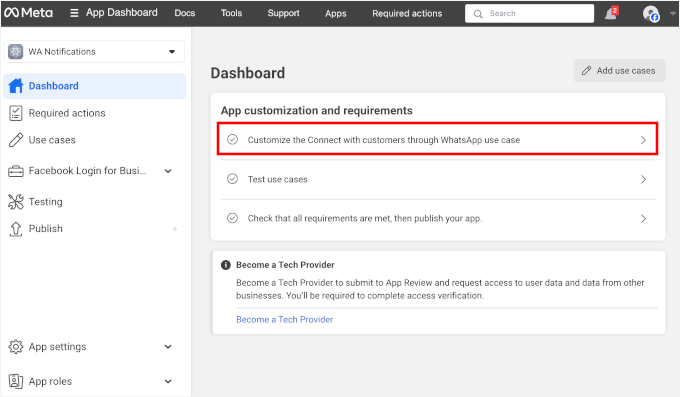
From the dashboard, you’ll see a prompt to set up the WhatsApp Business Platform.
Here, you’ll want to click the ‘Customize the Connect with customers through WhatsApp use case’ button.

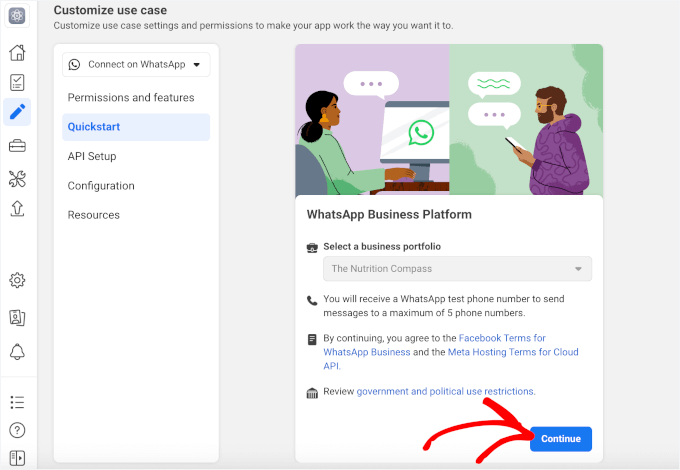
On the next screen, you’ll see a prompt to start WhatsApp Business Platform configuration.
Go ahead and click the ‘Continue’ button.

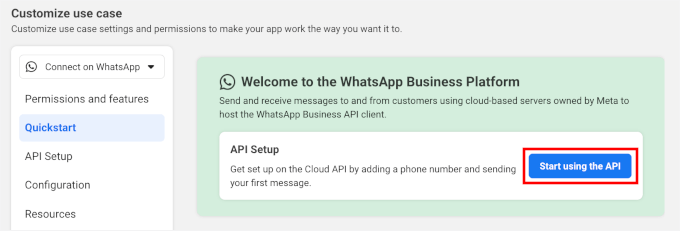
After that, you’ll see a WhatsApp Business Platform welcome message.
From here, you can click the ‘Start using the API’ button to start.

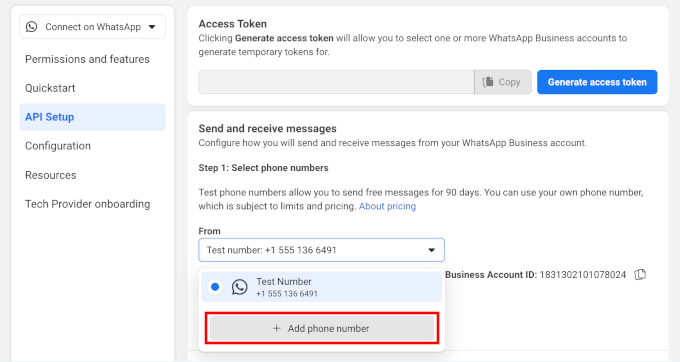
Then, in the ‘API Setup’ panel, you’ll need to register your phone number. Otherwise, Meta will use a test number to send your messages.
Click to expand the dropdown and then hit the ‘+ Add phone number’ button.

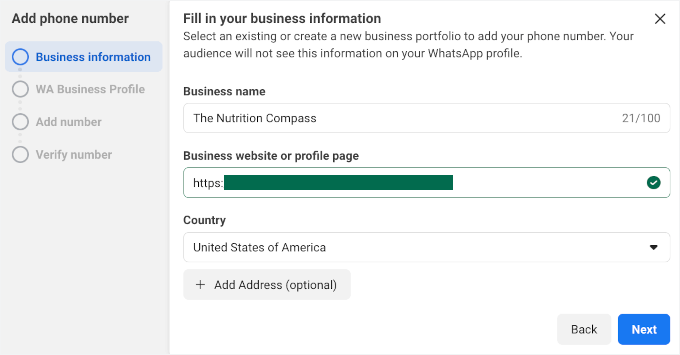
This will open a setup wizard for your WhatsApp configuration.
First, enter your business name, enter your business website address, and choose your country. Click ‘Next’ to continue.

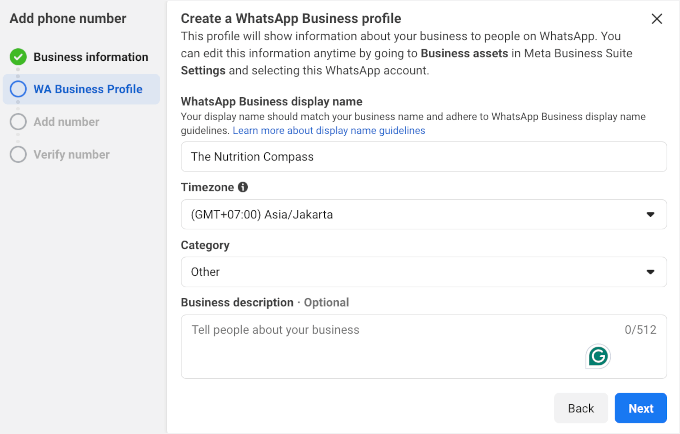
After that, let’s set up your WhatsApp Business Platform account, which includes details like display name, timezone, category, and business description.
Click ‘Next’ to proceed.

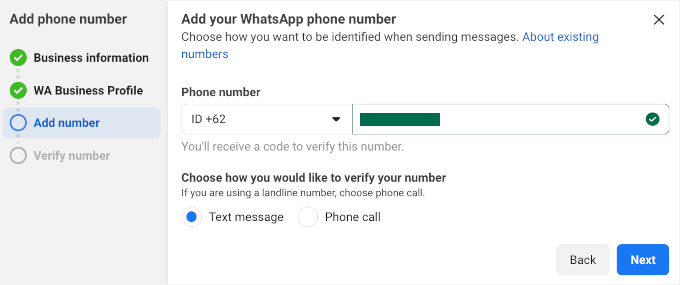
After that, go ahead and add your active phone number for WhatsApp.
Then, you can tick the radio button to confirm it through SMS or a phone call and click ‘Next’ to proceed.

In a few minutes, you should receive a verification code via SMS or phone call (depending on your choice in the previous step).
Once you have it, simply enter the 6-digit code in the field and click ‘Next.’


Upon verification, you’ll see a ‘Generate access token’ button.
Go ahead and click on it.


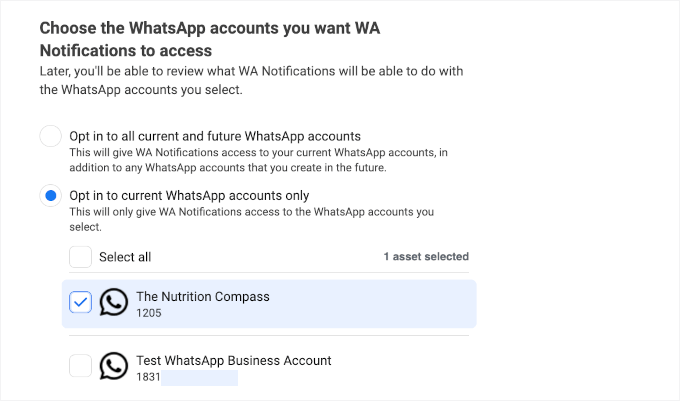
In the popup that appears, you’ll choose the WhatsApp account you want to give permissions to send notifications.
You’ll see the phone number you just registered and the test number that Meta provides. Let’s click on your registered phone number.
Meta will then ask you to grant your permission to send messages on your behalf.

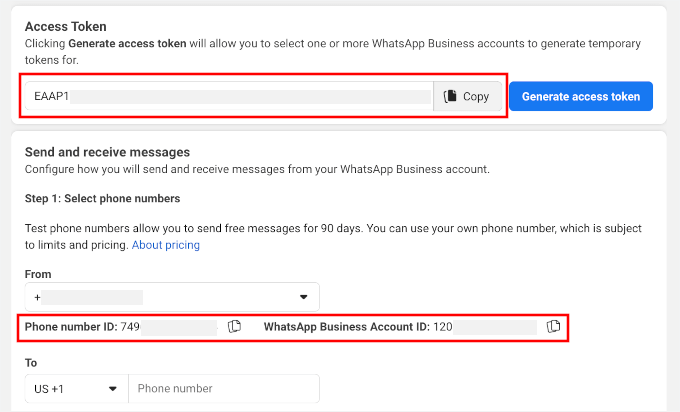
Meta will then take you back to the ‘API Setup’ panel, where you can see your access token. Simply click the copy icon and store it somewhere safe, like a notepad.
Keep in mind, this token only lasts for 24 hours.
In addition to that, you’ll need to keep your ‘Phone number ID’ and ‘WhatsApp Business Account ID’ somewhere safe.

With that done, you’ll get your WhatsApp Business Platform account.
You can access it through Meta Business Suite.
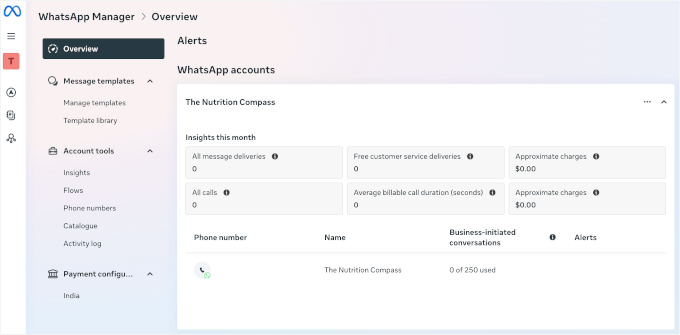
In this account, you can create, manage, and track all your automated WhatsApp messages. Here’s what the WhatsApp Manager interface looks like:

Step 2: Get a Permanent Access Token
So far, we’ve set things up so you can use WhatsApp on your WordPress site, but the access token you made earlier only works for 24 hours.
To ensure your automations can run 24/7, you’ll need a permanent access token.
The way to get one is by creating a ‘System user’ in your Meta Business Settings. Think of a ‘System user’ as a dedicated robot account that gives your tools (like PushEngage or Uncanny Automator) lasting permission to send messages on your behalf.
From your Business Settings, go ahead and select your business.
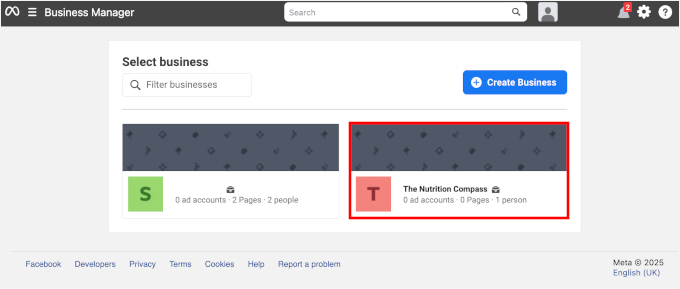

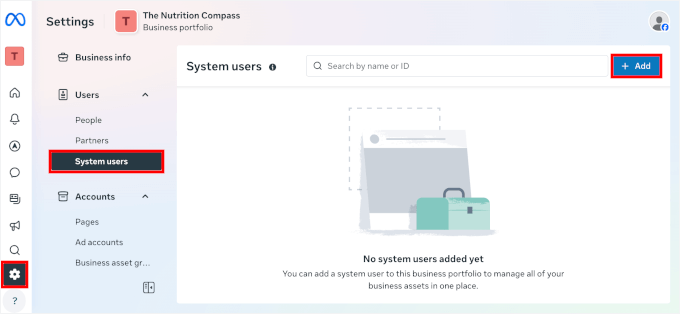
On the next screen, let’s look at the left menu and go to ‘Settings.’
From here, you can click ‘System users’ and hit the ‘Add’ button.

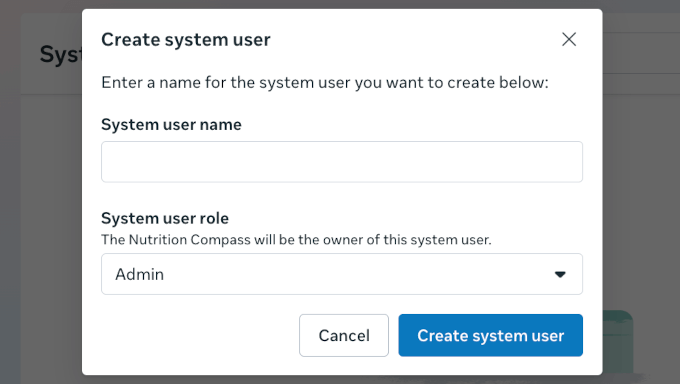
In the popup that appears, go ahead and give your system user a name.
Then, select ‘Admin’ as the role and click ‘Create system user.’

Once that’s done, you’ll be back on the ‘System users’ page.
Here, click on the three-dot button on the right and select ‘Assign Assets.’


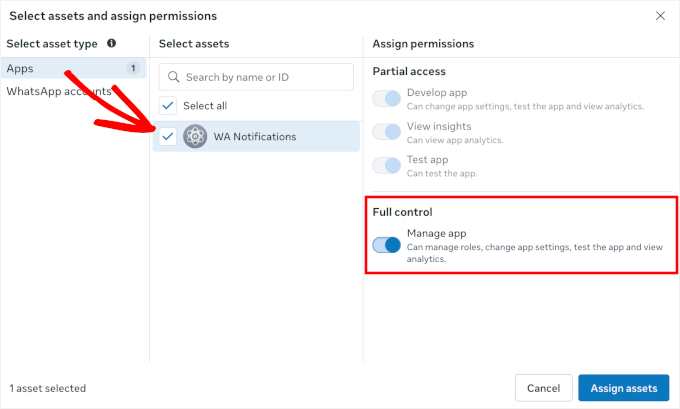
In the popup that appears, you’ll need to assign permissions.
To do this, you can click ‘Apps,’ select your asset, and switch the ‘Manage app’ on in the ‘Full control’ section.
With that done, go ahead and click the ‘Assign assets’ button.

Meta will then ask you to review and accept their non-discrimination policy.
Basically, this tells you that you agree not to use Facebook’s advertising tools for anything that discriminates against people based on things like race, religion, gender, age, or other protected characteristics.
It’s just their way to make sure everyone is treated fairly and that ads follow the law.
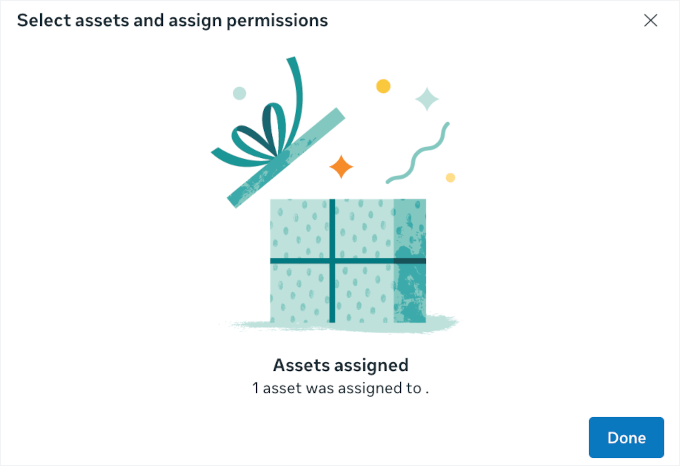
Once granted, you’ll see the ‘Asset assigned’ message. Simply click the ‘Done’ button or ‘X’ to close this popup.

This will take you back to the ‘System users’ page.
And you should now see a ‘Generate Token’ button in your system user. Let’s click on that.


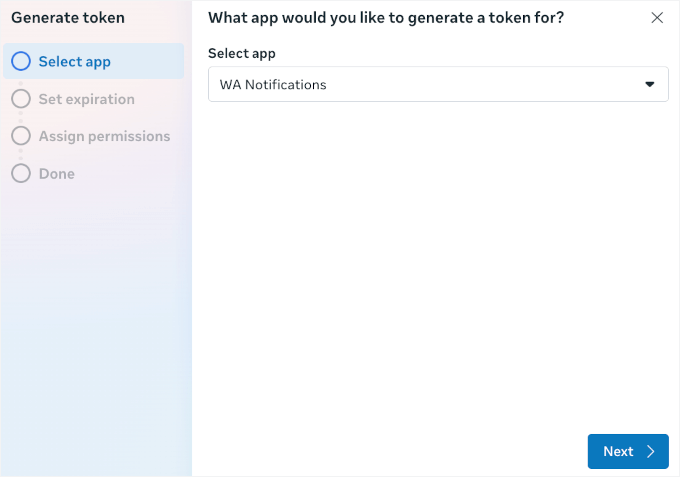
In the window that pops up, you’ll see a 4-step setup wizard for your permanent token.
From here, you can select your app from the dropdown menu and then click the ‘Next’ button to continue.

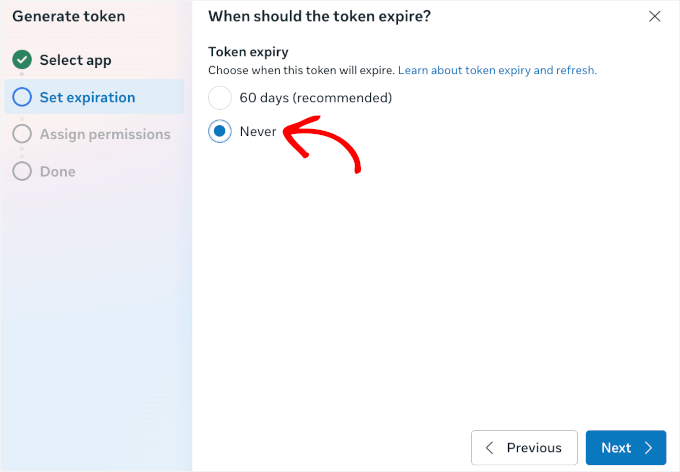
You can then set when the token should expire.
Make sure to choose ‘Never’ and click on ‘Next.’

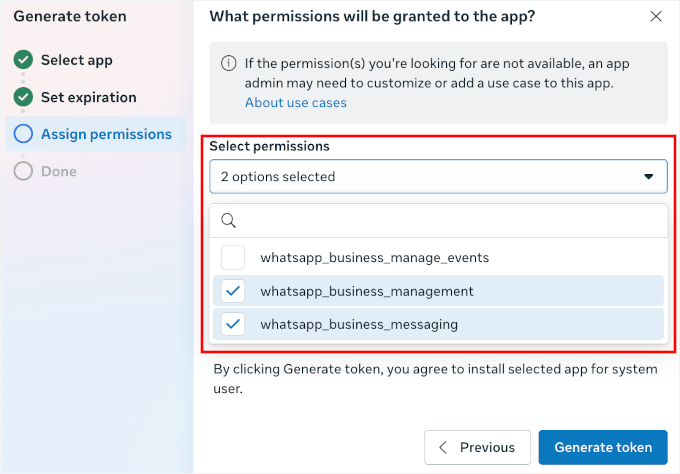
The next step is to assign permissions.
You’ll see a list of options, and you’ll want to check the boxes for:
- whatsapp_business_management
- whatsapp_business_messaging
This lets your system user manage your WhatsApp business account and send messages on your behalf. Basically, you’re giving the necessary access so everything works smoothly.
Once you’ve checked those boxes, just click the ‘Next’ button to continue.

In the last step, you’ll see your permanent token.
Just click the ‘Copy’ button and ‘Done’ to finish this up.
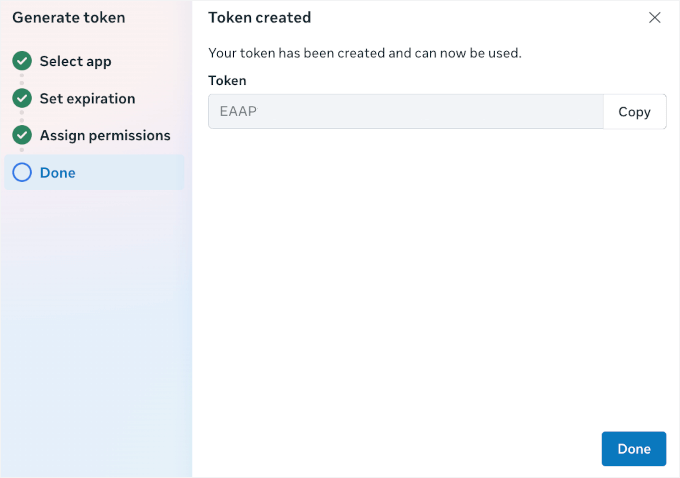

With that done, I recommend storing this somewhere safe, like a password manager.
Step 3: Customize Message Templates in WhatsApp Business Platform
Before you go on, you’ll need to create a few automated order messages for your app.
By default, your WhatsApp Business Platform account comes with a hello_world template. It’s fine for testing, but it’s not very useful for real order notifications.
That’s why we’ll add new templates tailored to your store. This way, your WhatsApp notifications are more relevant, branded, and effective.
💡 Important: Both PushEngage and Uncanny Automator pull message templates directly from your WhatsApp Business Platform account. If you skip this step, you’ll only be able to use the basic hello_world template for automation.
Inside your WhatsApp Manager, head over to the ‘Message templates’ section.
Here, you’ll find the ‘Template library,’ which includes pre-made templates that you can customize and activate right away.
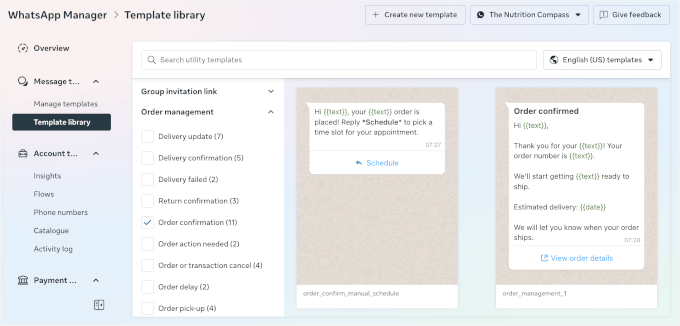

For this tutorial, though, let’s create one from scratch. This gives you full control to match your brand voice and set up the right dynamic tags.
Just go to the ‘Message templates’ section and click the ‘Create Template’ button to open the text editor.
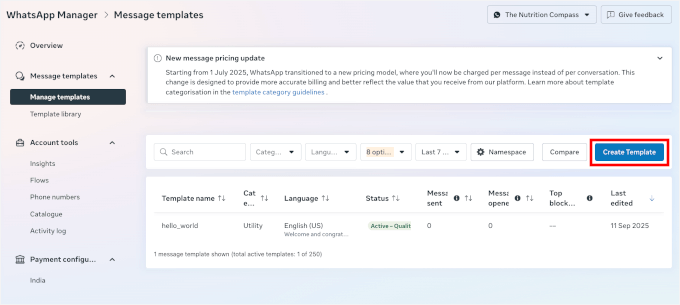

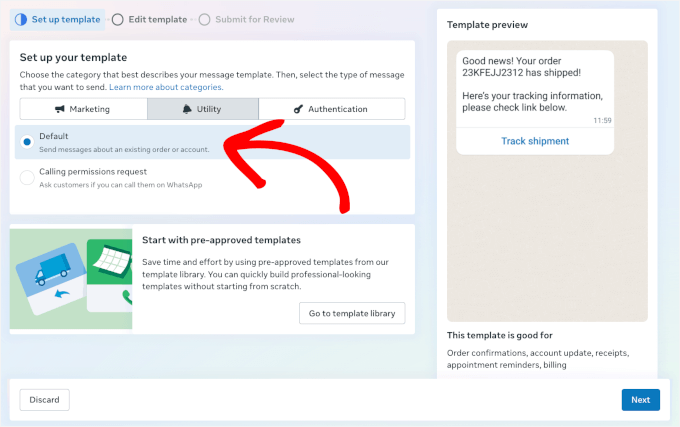
On the next screen, you’ll need to pick a template type:
- Marketing – for promotions, sales, or offers.
- Utility – for order updates, shipping info, or other customer updates.
- Authentication – for login codes or password resets.
For order notifications, let’s use the ‘Utility’ template since these messages provide customers with order information, not promotions or login details.
Then, there are the ‘Default’ and ‘Calling permission request’ options:
- Default – Lets you send messages about an existing order or customer account. This is the option most WooCommerce stores will use.
- Calling permission request – Asks customers if you can call them on WhatsApp, which usually isn’t needed for order notifications.
For this setup, let’s click ‘Default’ since we only need to send order updates. Click ‘Next’ to continue.

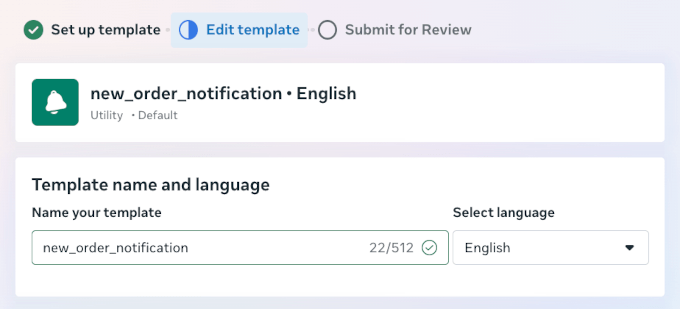
Next, in the ‘Edit template’ section, you can name your template and select your language.
For the template name, Meta will automatically use lowercase and convert spaces to underlines.

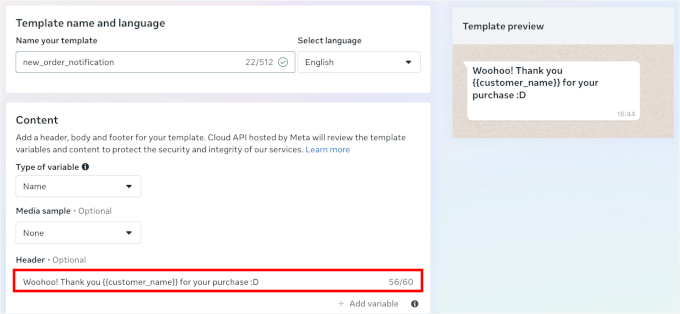
After that, you can scroll to the ‘Content’ section.
This is where you fine-tune what your message will look like:
- Choose a variable type – Use either number variables like {{1}}, {{2}} or name variables like {{customer_name}}, {{order_number}}. Both pull in real customer data, but name variables are easier to work with as they show exactly what will appear in your message.
- Set up a media sample (optional) – If you plan to add an image, video, or document to your message, you can upload a sample here. But in my opinion, this is better for promotional messages since the media should fit with your text.
- Define the message header (optional) – Add a short line of text or an image that appears above your main message. This works well for attention-grabbing details, like “Order Update” or “Woohoo! Thank you {{customer_name}} for your purchase :D”
If you add a header, you can preview your template on the right-hand panel.

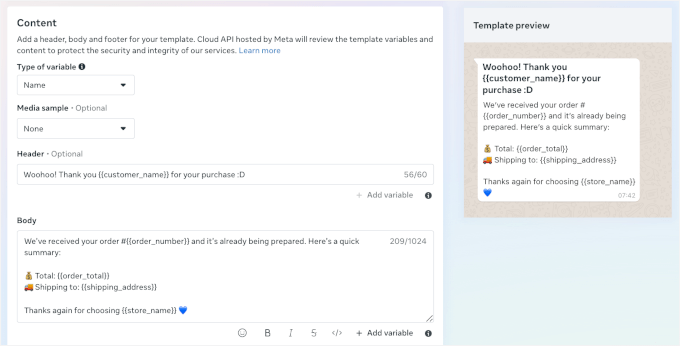
From here, you can edit the message content to match how you normally communicate with customers.
You can add dynamic variables like {{customer_name}}, {{order_number}}, and {{order_total}} to make each message personal.
For example, here’s my message content:
“We’ve received your order #{{order_number}} and it’s already being prepared. Here’s a quick summary:
💰 Total: {{order_total}}
🚚 Shipping to: {{shipping_address}}
Thanks again for choosing {{store_name}} 💙”
As with the header, you can immediately see what it looks like under ‘Template preview’ on the right.

Next, let’s scroll down to ‘Variable samples.’
Here, you can use sample data to preview your dynamic variables.
You can also add a message footer, like “Have questions? Contact us at support@[store].com.”
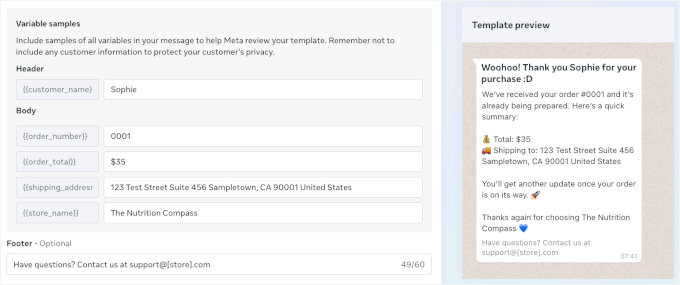

Once everything looks good, click the ‘Submit for review’ button to save and activate this template.
The process is similar for all order notifications, so you can set up as many as you need. For example:
- Admin notification template – notifies your team when a new order comes in.
- Shipping notification template – updates customers when their order is on the way.
- Order complete template – confirms delivery and thanks the customer. You can also include return and refund information here.
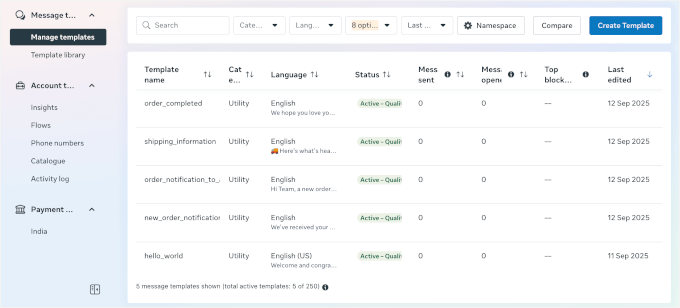
After creating all the message templates you need, you’ll see them in your Meta dashboard’s Message Templates section.
Here’s what it might look like:

Now, you can move on to using either Method 1 or Method 2 below.
Method 1: Send WooCommerce Order Notifications with PushEngage (Multi-Channel Messaging)
PushEngage is one of the best multi-channel engagement platforms for WordPress. It lets you combine WhatsApp order notifications with web push notification campaigns, cart recovery messages, and personalized promotions.
It’s a powerful choice if you want to manage all customer messaging in one place. While the setup involves connecting through Meta’s Business API, you’ll get professional-grade automation and reliability in return.
If you haven’t already done so, please follow my instructions on how to set up a WhatsApp Business account.
Step 1: Install and Activate the PushEngage Plugin
You need to sign up for a PushEngage account to link your WhatsApp Business Platform account to your WordPress website.
📝 Note: PushEngage offers a free version, which is great if you want to test things out or only need basic push notifications. But to unlock WhatsApp order notifications and automation features, you’ll need the PushEngage Business plan (or above).

Once you’ve finished signing up, you can install and activate PushEngage on your WordPress site.
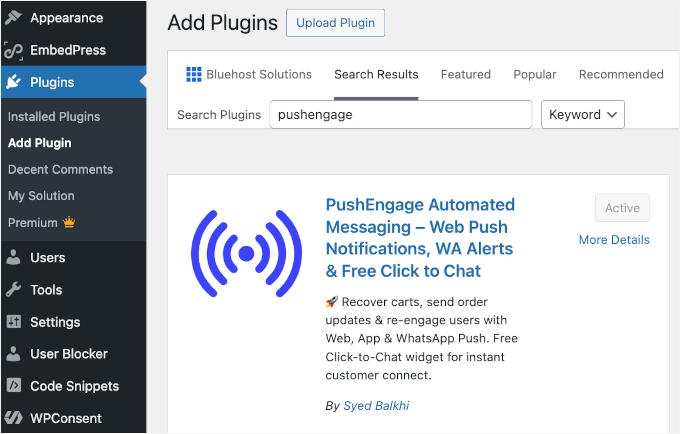
Just head to your WordPress dashboard and go to Plugins » Add New.
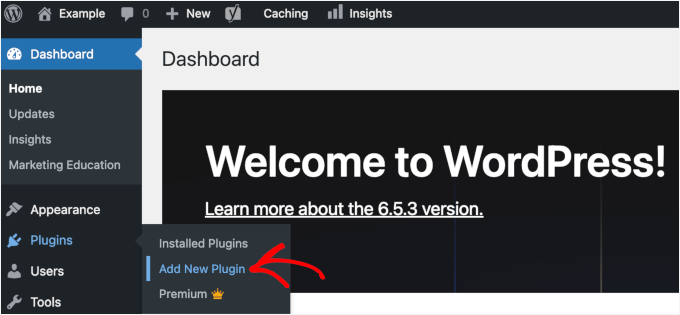

On the next screen, you can search for “PushEngage” and click ‘Install Now,’ then ‘Activate.’
Once activated, you’ll see a new PushEngage menu in your WordPress dashboard. For details, see our guide on how to install a WordPress plugin.

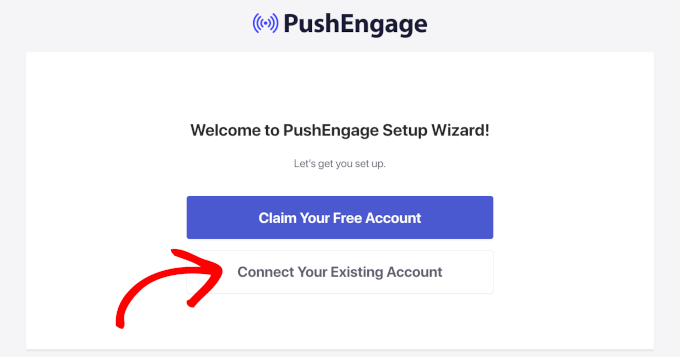
From here, WordPress will prompt you to claim a free account or connect to your PushEngage account.
Go ahead and click the ‘Connect Your Existing Account’ button to launch the setup wizard. You can follow the instructions from here.

Step 2: Connect WhatsApp Business Platform Account to PushEngage
In this step, you’ll link your WhatsApp Business Platform account to PushEngage. This is where those API credentials you generated before will come in handy.
From your WordPress dashboard, navigate to PushEngage » WhatsApp and then switch to the ‘Settings’ tab.
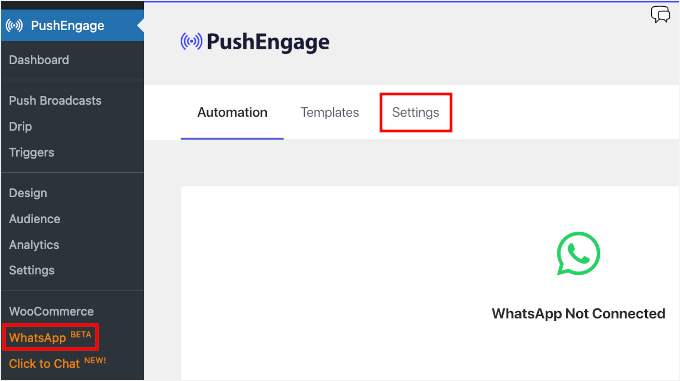

On the next screen, you’ll see two tabs.
Let’s go to the ‘WhatsApp Cloud API’ tab.
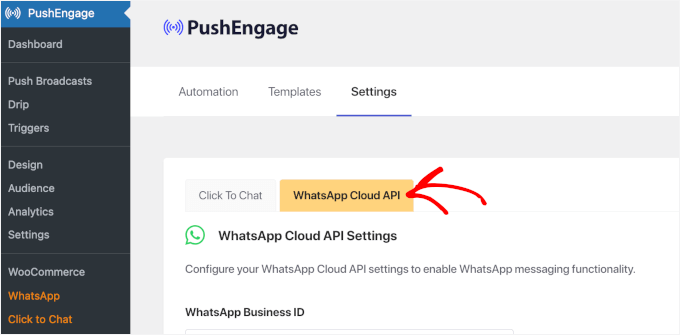

From here, you should see the WhatsApp Cloud API settings.
Simply enter your permanent token, phone number ID, and any other required information from your Meta Business setup.
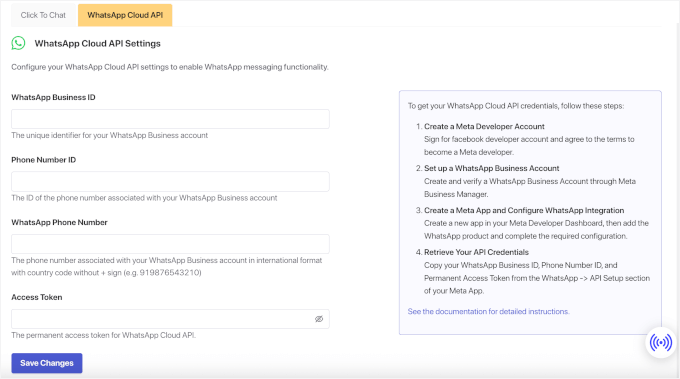

Once that’s done, click the ‘Save Changes’ button to store your settings.
Step 3: Create WhatsApp Notification Automation in PushEngage
The next step is to assign your custom message templates to the PushEngage automation.
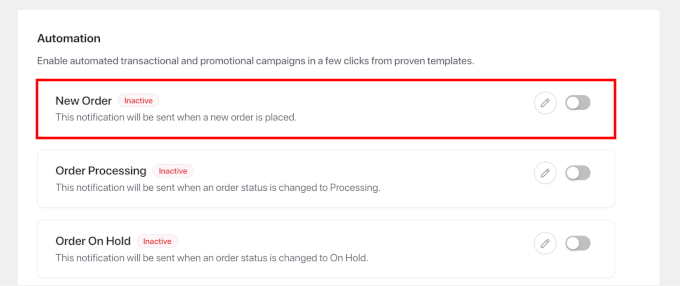
Navigate to PushEngage » WhatsApp and click on the ‘Automation’ tab.


In this tab, you’ll see a list of ready-made workflows, like:
- New Order – triggers as soon as a customer places an order.
- Order Processing – activates when you start preparing the order for shipment.
- Order Completed – sends a message once the order has shipped.
- Order Cancelled – notifies the customer if an order is cancelled.
- Order Refunded – useful if you handle returns or issue refunds often.
For this tutorial, I’ll show you how to create a new order notification. So let’s click on the toggle for the ‘New Order’ option.

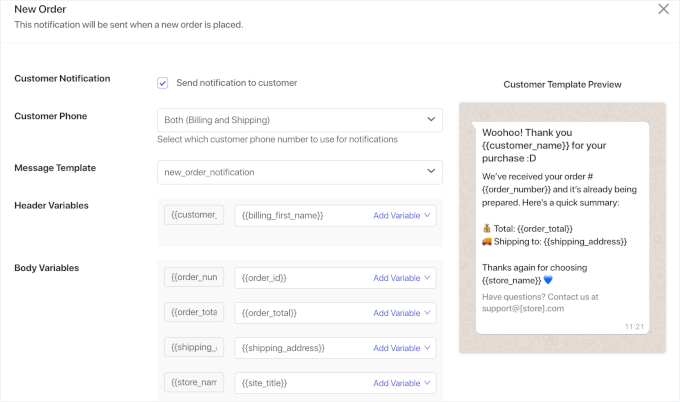
In the popup that appears, you can choose to send notifications to customers, store admins, or both.
Customer notifications keep buyers informed, while admin notifications help you track new sales in real time.
In the customer notification section, you can:
- Enable ‘Send notification to customer’ – to send notifications to shoppers.
- Specify the customer phone – open the dropdown and select the appropriate option, for example, ‘Billing Phone.’
- Choose a message template – pick the
new_order_notificationstemplate you just created.
Once a template is selected, click the ‘Add Variable’ dropdown and insert the relevant variables for each field.

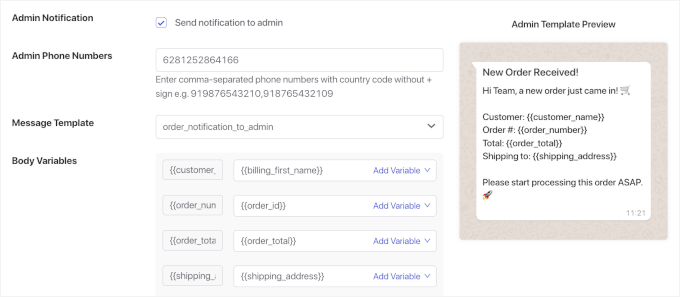
Then, you can scroll down to enable the admin notification.
Simply tick the ‘Send notification to admin’ checkbox, enter the admin’s phone number, and set up a message template along with its variables.

You can then repeat this process for all the automated WhatsApp notifications you want to use.
Step 4: Test Your WhatsApp Notifications
Before going live with customers, I recommend running through a complete test cycle. This process helps you catch any issues with message formatting or timing.
To do this, you can place a test order in your WooCommerce store using your own phone number as the customer contact. Don’t forget to use a phone number that’s registered with WhatsApp.
Your first WhatsApp order notification should arrive within a few minutes. It will come with the order details, and you will want to check if it appears in a clean, professional format.
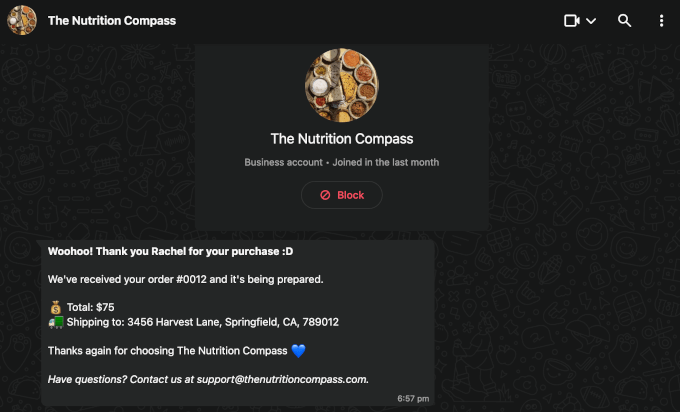

If you’re sending admin notifications too, make sure those are working correctly.
And if you’ve set up order complete notifications, be sure to test those as well. To do this, go to your WooCommerce orders page and update the status of your test order. For example, you can change it from ‘Processing’ to ‘Completed.’
That update should trigger the Order Complete workflow, so confirm that the WooCommerce notification arrives in WhatsApp as expected.


Once everything checks out, your WhatsApp notifications are ready for real customer orders.
And that’s all there is to it!
To keep track of your campaigns, you can go to PushEngage » Dashboard.
This section gives you quick statistics on your total number of push notification subscribers, notifications sent, views, and clicks. This information helps you see how your messages are performing.


Method 2: Send WooCommerce Order Notifications with Uncanny Automator (Automation-Focused)
Uncanny Automator is a powerful automation plugin for WordPress that connects your favorite tools and plugins together.
With this tool, you can build custom workflows (“recipes”) that send WhatsApp order notifications alongside other WordPress actions. This makes it ideal if you need precise triggers or want to automate tasks that go beyond standard order updates.
For more details on what you can do with this plugin, see our guide to creating automated workflows with Uncanny Automator.
And before starting this part of the tutorial, please follow my instructions on how to set up a WhatsApp Business account if you haven’t already.
Step 1: Install and Activate Uncanny Automator
First, you need to install and activate the Uncanny Automator plugin in WordPress.
📝 Note: Uncanny Automator has both free and pro versions, and you can actually get started with WhatsApp notifications using their free tier. They give new accounts 250 free app credits, which is enough to test everything out.
To start, you can head to your WordPress dashboard and go to Plugins » Add New.


Then, search for “Uncanny Automator,” click the ‘Install Now’ in the search result, then click ‘Activate’ when it appears.
You can see our guide on how to install a WordPress plugin for step-by-step instructions.


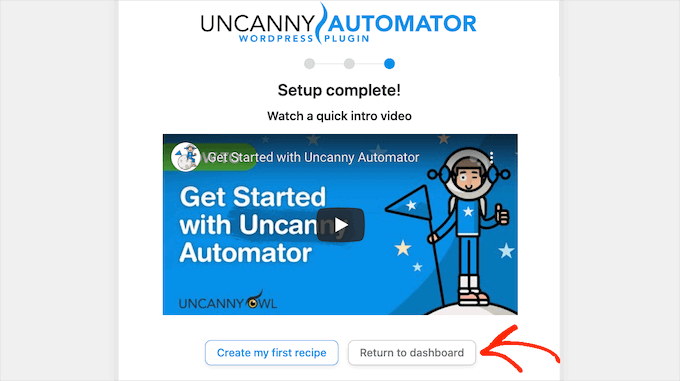
After activation, you’ll see a new ‘Automator’ menu in your WordPress admin area.
Click on it and follow the setup wizard to register your account and claim your free credits.

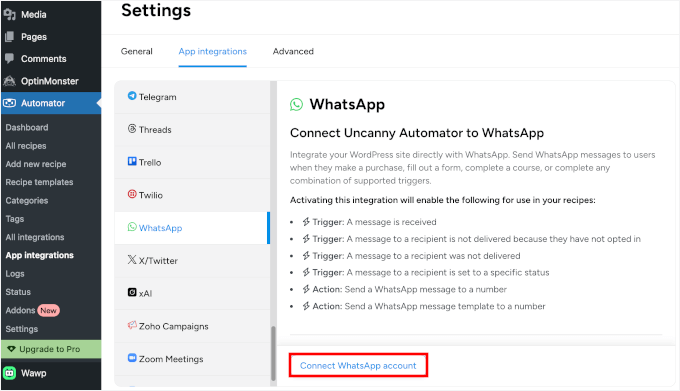
To connect Uncanny Automator with WhatsApp, go to Automator » Settings » App Integrations » WhatsApp.
Then, you can go ahead and click ‘Connect WhatsApp account.’

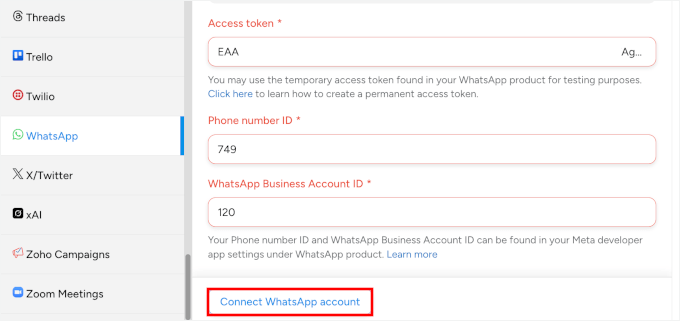
From here, you can paste in your permanent token, phone number ID, and WhatsApp Business Account ID from the Meta dashboard.
And once again, click on the ‘Connect WhatsApp account’ button.

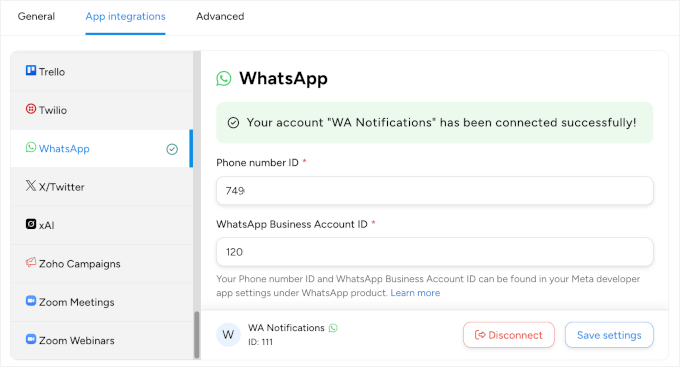
After a few seconds, you’ll get a success message.
And here’s what it looks like:

Step 2: Create Your WhatsApp Notification Automation Recipe
Automator uses “recipes” to describe automations. Think of them like “if-then rules” that connect different parts of your website. Each recipe has triggers (what starts the automation) and actions (what happens as a result).
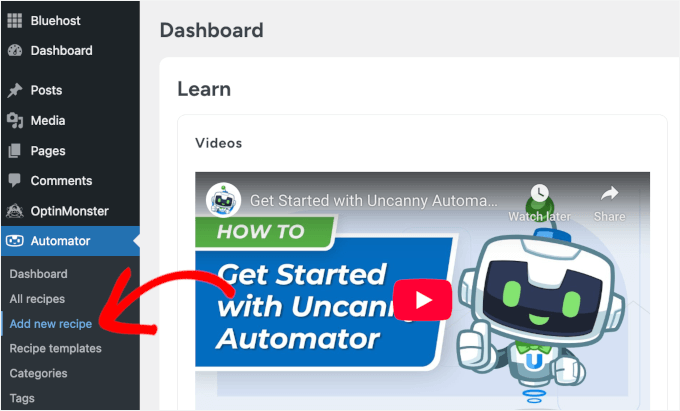
To create your automation recipe, let’s first navigate to Automator » Add new recipe in your WordPress dashboard.

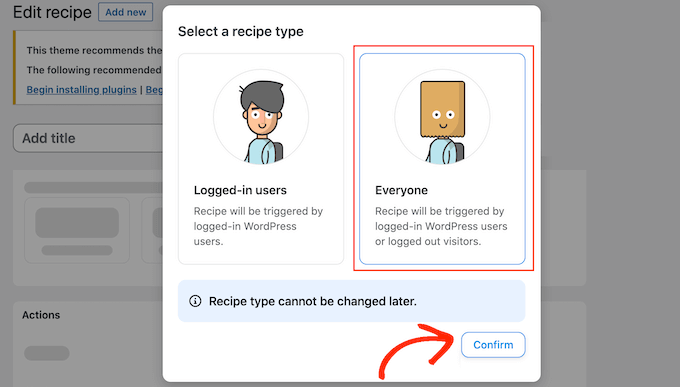
In the popup that appears, you’ll see a modal asking what type of recipe you want to create.
Let’s choose ‘Everyone’ as the recipe type and click ‘Confirm.’
This way, your automation will work for both customers with accounts and those who check out as guests. Uncanny Automator can pull the phone number directly from the order details, so notifications will be sent to all purchasers.

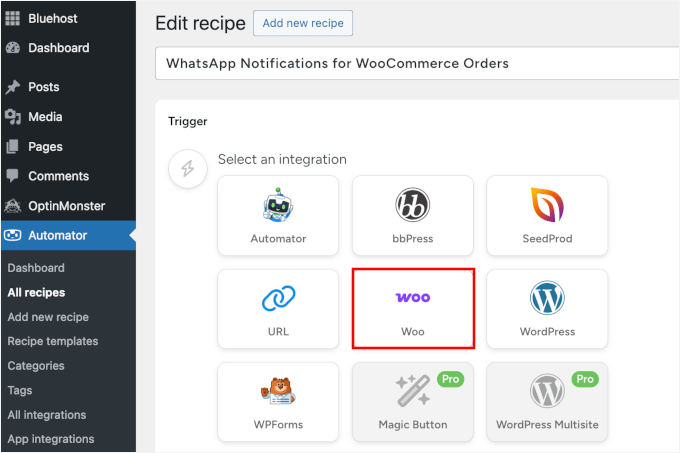
In the recipe editor, you can go ahead and give your recipe a descriptive name like “WhatsApp Notifications for WooCommerce Orders.” Clear naming helps a lot when you have multiple recipes running.
After that, you can scroll down to set up what event should start your WhatsApp notification.
Automator has dozens of WooCommerce triggers to choose from. In the ‘Trigger’ panel, select ‘WooCommerce’ (or Woo) from the list of available integrations.

In the dropdown, you’ll see various WooCommerce events you can use as triggers.
Let’s choose ‘A user purchases a product.’ This trigger fires when someone successfully completes their purchase.
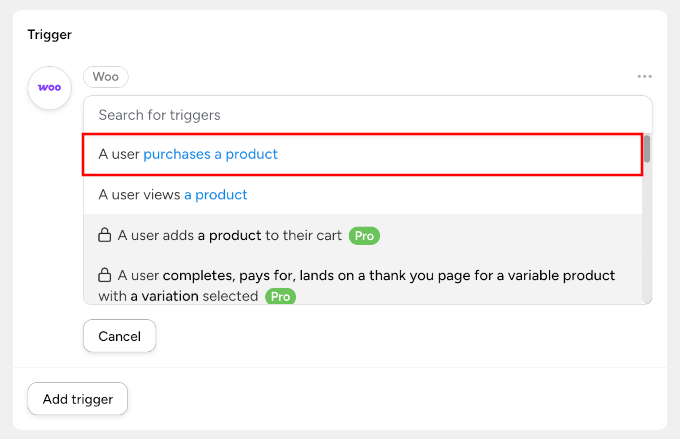

If you have the Pro version, you’ll get more options.
For example, you can choose a more specific trigger like “A user completes, pays, and lands on a thank-you page for a variable product with a variation selected.”
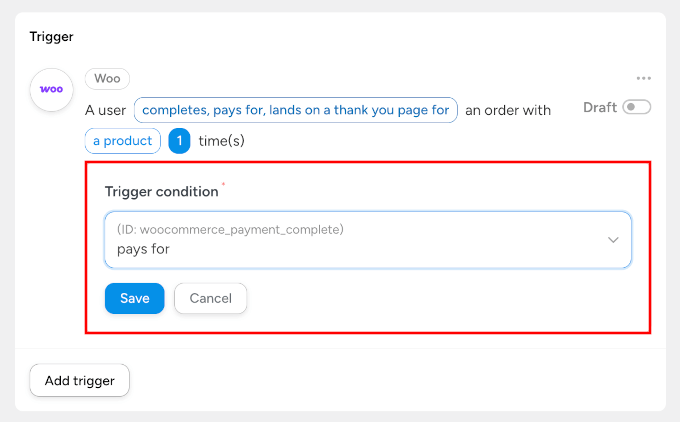
After that, you can set the trigger condition to ‘pays for’ so it only runs when payment is actually processed. Then, you can click the ‘Save’ button to continue.

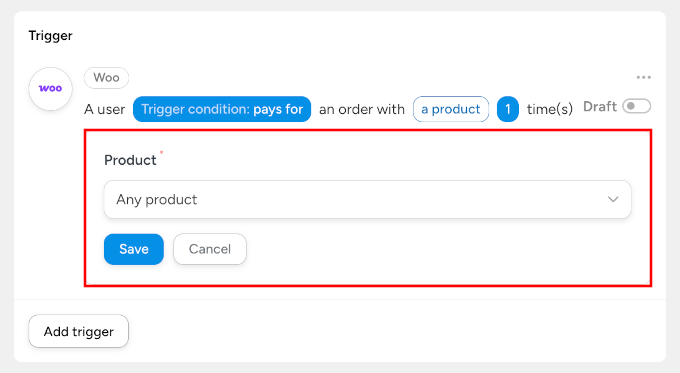
Then, you’ll need to specify your product selection.
You can choose ‘Any product,’ unless you only want notifications for specific items. Don’t forget to click ‘Save.’

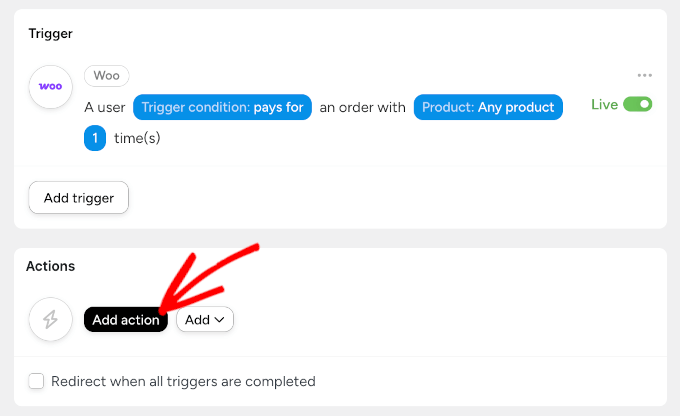
The next step is to set up an action. This is what happens after your trigger fires. In other words, this is where you’ll configure the actual WhatsApp message.
To start, click the ‘Add action’ button in the ‘Actions’ panel.

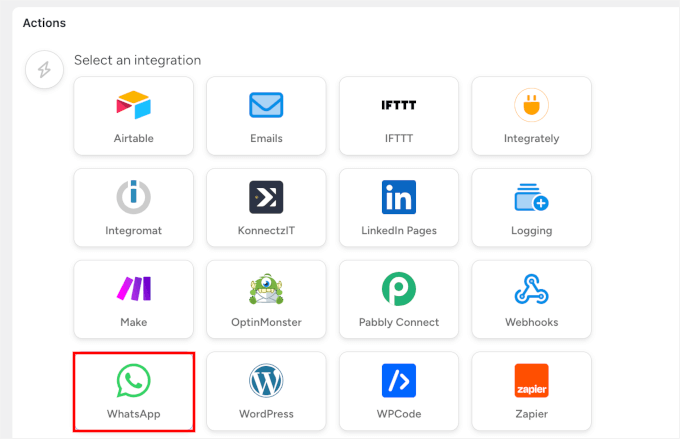
Then, you can select ‘WhatsApp’ from the integration list.
You’ll also notice that there are plenty of other integrations available with Uncanny Automator, including OptinMonster and Airtable.

Now, you should see different WhatsApp actions available.
Here, you can choose ‘Send a WhatsApp message template’ for first-time notifications that need to follow WhatsApp’s template requirements.
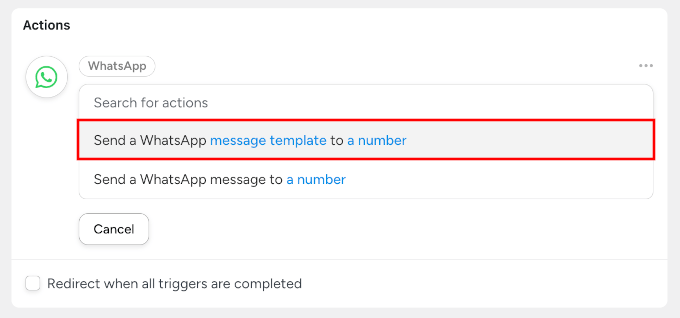

Make sure to pick the template that you created in the WhatsApp Manager dashboard. In my example, it’s called ‘new_order_notification’.
The ‘Send a WhatsApp message to a number’ method works better for customers who have already opted in to receive messages.
Remember to click the ‘Save’ button when it appears.
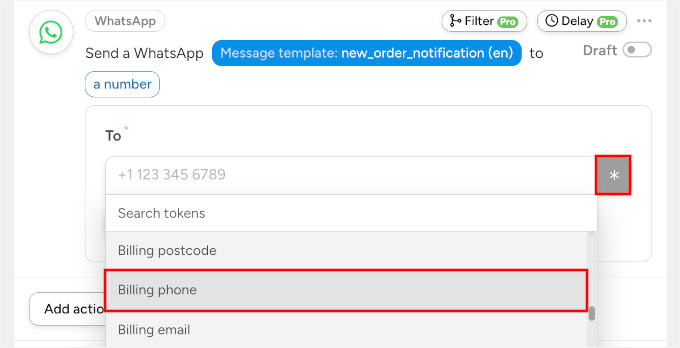
In the phone number field, you can use Automator’s token system to pull the customer’s billing phone from their order.
Just click the asterisk icon, select the ‘Billing phone’ token from WooCommerce, and click ‘Save.’

Step 3: Activate and Test Your Automation
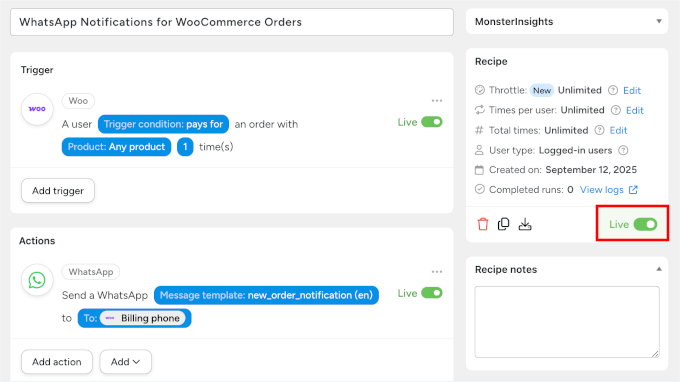
Now, you can activate your recipe, and Automator makes this easy with their draft and live modes.
To activate your automated WhatsApp notification recipes, you can toggle from ‘Draft’ to ‘Live’ using the switch at the top of the recipe page.

Now, you can place a test order on your online store using your own phone number as the customer contact. Make sure you complete the entire WooCommerce checkout process, including payment.
Within a few minutes, you should receive a WhatsApp notification with all the dynamic tokens displaying the correct information from your test order.


You can also head to your WooCommerce dashboard and manually change the test order’s status from ‘Processing’ to ‘Completed’.
This will trigger any extra notifications you’ve configured.


That’s all!
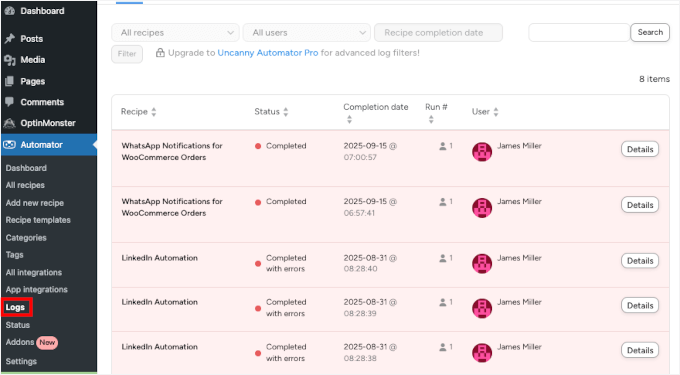
And to monitor all your automation activity, you can go to the Automator » Logs section, which shows you exactly when recipes run and whether they succeed or cause errors.

Method 3: Send WooCommerce Order Notifications with a Free Plugin
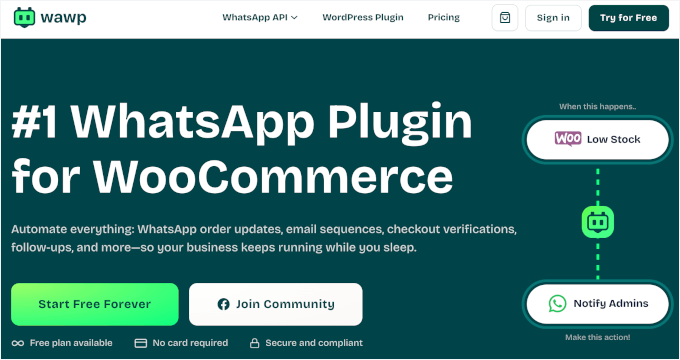
Wawp is a lightweight WhatsApp notification plugin designed for simplicity and quick setup. Its main advantage is that it doesn’t require a full Meta Business API setup, making it ideal for small online stores or anyone testing WhatsApp notifications.
💡 Heads up: Since this method uses your phone to send messages, it’s important that your phone stays charged, turned on, and connected to the internet. If your phone goes offline, notifications will stop sending until it reconnects.
Step 1: Install and Activate the Wawp Plugin
Before installing the plugin, you need to go to the Wawp website and follow the signup process for a free account.
Start by clicking the ‘Start Free Forever’ button, filling in your account details, and verifying your WhatsApp number.
The free plan lets you send up to 50 messages per month, so you can experiment with order updates without any upfront cost. When you’re ready, it’s easy to upgrade or move to a more advanced solution like PushEngage or Uncanny Automator.

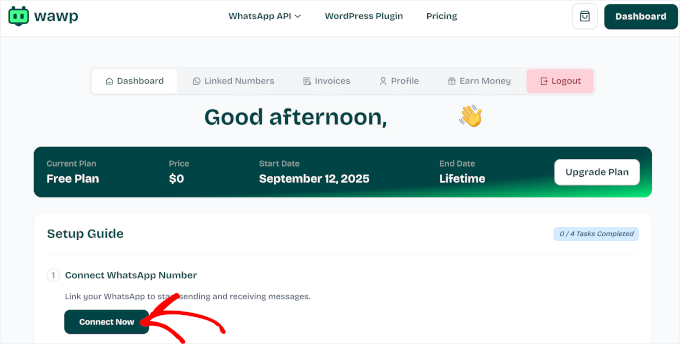
In your account dashboard, you’ll see the setup wizard.
The first thing to do here is click the ‘Connect Now’ button to launch the wizard.

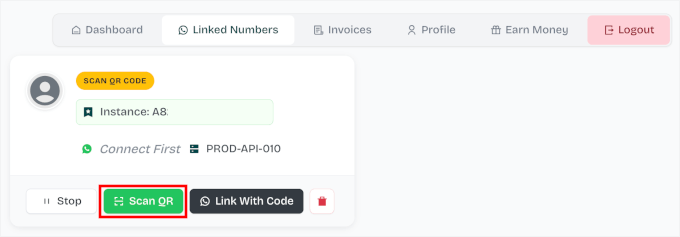
This will take you to the ‘Linked Numbers’ panel, where Wawp will prompt you to create a new instance.
An instance is like a workspace that links your WhatsApp number to Wawp. Think of it as the bridge between your Wawp account and your WordPress website. Without it, your store can’t send or receive WhatsApp messages.
Go ahead and click on the ‘Create New Instance’ button.


Here’s where Wawp’s approach differs significantly from the other methods. Instead of a complex API setup, you simply scan a QR code with your phone.
Just click the ‘Scan QR’ button, and in your phone, tap ‘Link a Device’ and use your phone’s camera to scan the QR code from your computer screen.

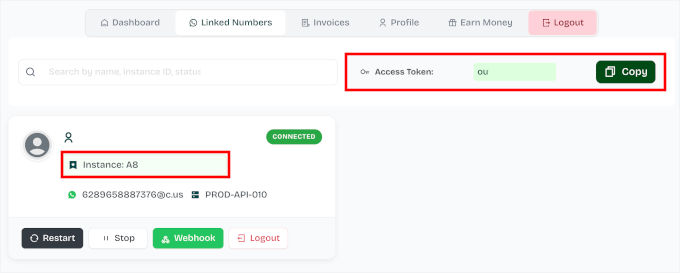
Once connected, Wawp will show you the ‘Connected’ label and generate the ‘Instance ID’ for your account automatically.
On this page, you can also see your ‘Access Token.’
Let’s copy both pieces of information, as you’ll need them in step 2.

With that done, you can start installing the Wawp plugin.
In your WordPress dashboard, go to Plugins » Add New.


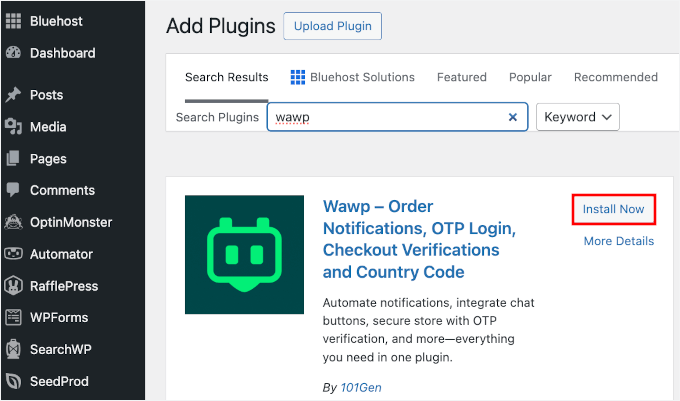
On the next screen, simply use the search bar to find the Wawp plugin.
When you see the plugin in the search results, click the ‘Install Now’ button. Then, once again, on ‘Activate’ to complete the process.

Upon activation, you’ll notice a new ‘Wawp’ menu item appears in your WordPress dashboard.
For a step-by-step guide, see how to install a WordPress plugin.
Step 2: Connect Your WordPress Site and Your Wawp Account
Now that you have Wawp installed on your site, let’s connect both platforms.
From your dashboard, you’ll want to navigate to Wawp » Sender Settings. Then, in the ‘Connect your WhatsApp’ section, go ahead and click ‘+ Add Manually.’
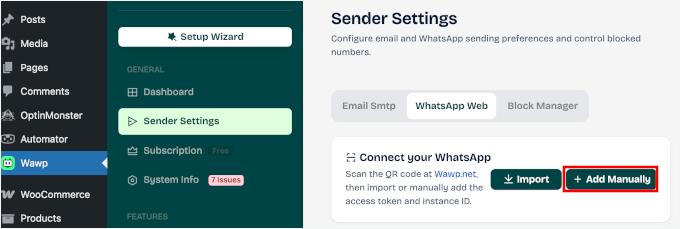

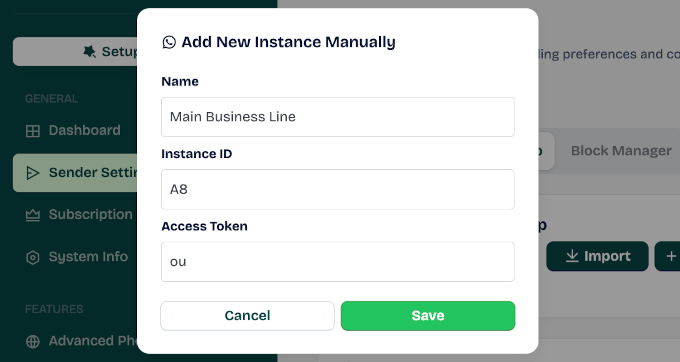
This will open a popup where you can fill in your instance details.
Simply copy and paste your instance name, instance ID, and access token into the relevant fields. After that, click ‘Save’ to continue.

This will redirect you to the ‘Sender Settings’ panel.
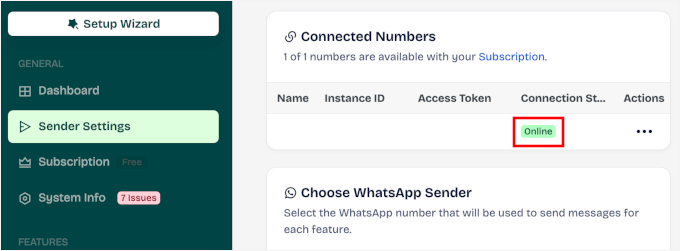
In the ‘Connected Numbers’ section, you should be able to see your instance added. The ‘Online’ connection status indicates that the link is successful.

Step 3: Create Automated WooCommerce Order Notifications
By now, you’re ready to create your WooCommerce order notifications.
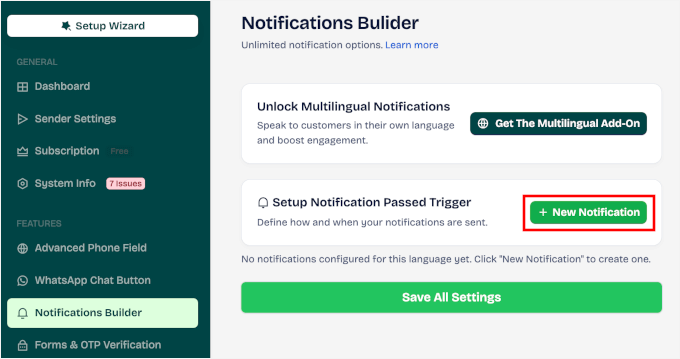
In the Wawp plugin settings, look for the ‘Notifications Builder’ section and click ‘+ New Notification.’

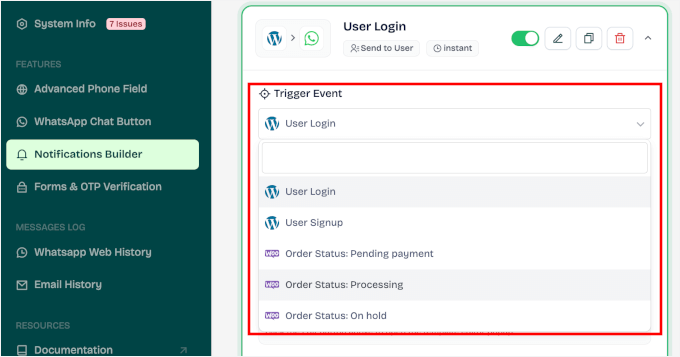
You’ll then see different WooCommerce events listed in ‘Trigger Events.’
They include ‘Order Status: Processing,’ ‘Order Status: Completed,’ ‘Order Status: Failed,’ and so on.
For the first notification, let’s choose ‘Processing.’

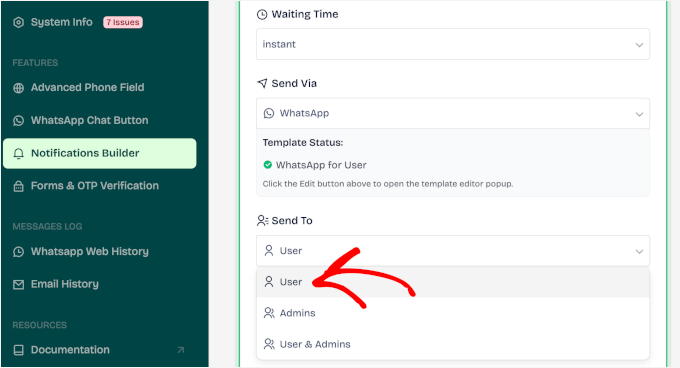
This will open the notification template customization panel, where you can adjust the following settings:
- Waiting Time – Choose how long to wait before the notification is sent: instant or after a few minutes delay.
- Send Via – Select the delivery channel: WhatsApp, email, or both. By default, this is set to WhatsApp.
- Send To – Decide who should receive the message: the user, the admin, or both.
For example, my setup is: ‘Instant’ for Waiting Time, ‘WhatsApp’ for Send Via, and ‘User’ for Send To.

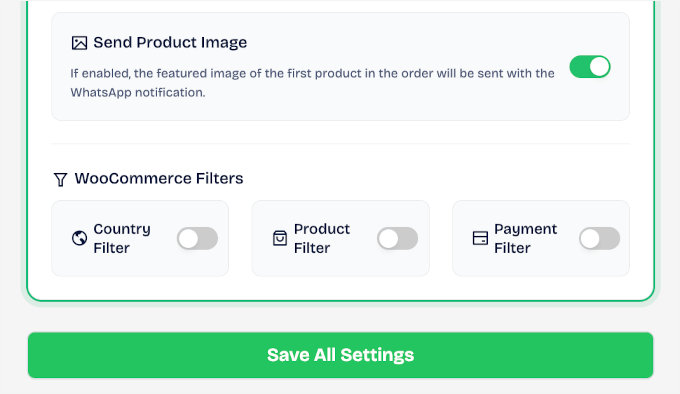
If you scroll further down this panel, you’ll find some additional options. For instance, you can choose to include the product image in your WhatsApp notifications.
You’ll also see a few WooCommerce filters that let you control exactly when messages are sent:
- Country Filter: Send or exclude messages based on the customer’s billing country.
- Product Filter: Target specific products by choosing whether to send or not send messages for them.
- Payment Gateway Filter: Decide which payment methods, like Stripe, bank transfer, check, or COD, should trigger a notification.
You can tweak these filters to fit your store’s workflow and customer base.

Next, you might want to edit the basic message template.
I personally always customize the message to match how I communicate with customers. Personal touches make a big difference in customer service.
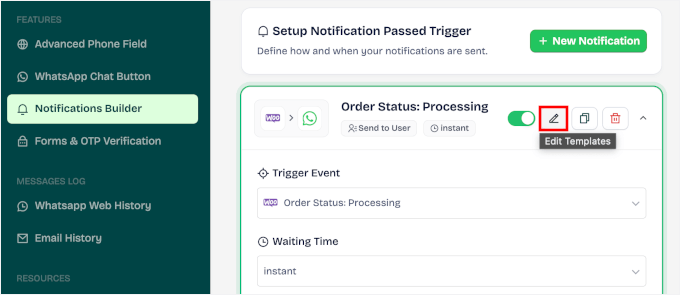
You can scroll up this panel and click the pencil icon to edit the message template.

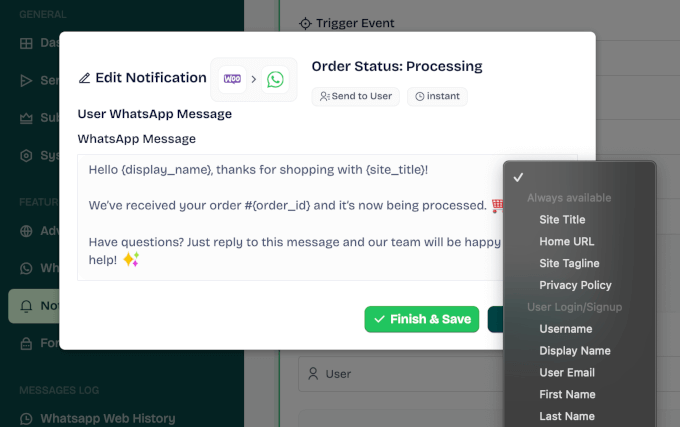
In the popup that appears, you can type your custom message into the text field.
You might also notice that Wawp supports dynamic tags like {Order_ID}, {Display_Name}, and {Order_Total}. These tags automatically fill in information from each specific order.
So, for example, you might write:
“Hello {display_name}, thanks for shopping with {site_title}!
We’ve received your order #{order_id} and it’s now being processed. 🛒
Have questions? Just reply to this message and our team will be happy to help! ✨ “
Don’t forget to click ‘Finish & Save’ to apply your custom WhatsApp message.

You can repeat this process for all the order notifications you want to send through WhatsApp. For most stores, I think new order and order complete notifications are a good start.
Once you’re finished with your automated WhatsApp notifications, you can see them all listed in your Wawp’s notification builders like this:


Step 4: Test Your Automated WhatsApp Notification Setup
In this final step, let’s make sure everything runs smoothly before real customers receive notifications
You can place a test order in your WooCommerce store using your own phone number as the customer contact information. Simply complete the entire checkout process as a real customer would.
After that, check that you receive the WhatsApp notification and verify that the dynamic tags are pulling in the correct information from your test order.
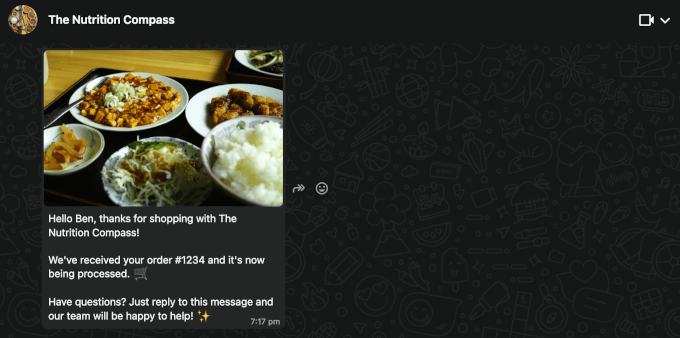

Next, go to your WooCommerce admin area and manually update the test order’s status – change it from ‘Processing’ to ‘Completed,’ for example.
This should trigger any additional notifications you’ve set up.
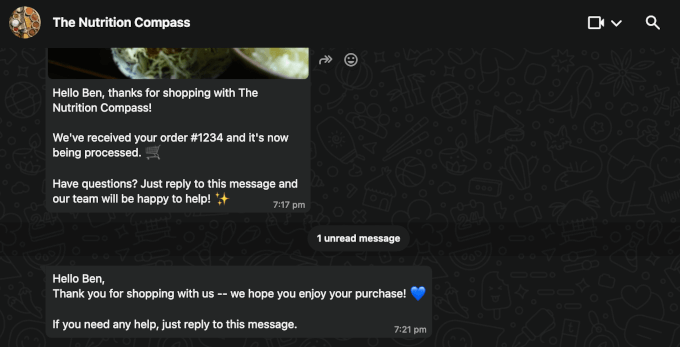

If everything looks good, your Wawp integration is ready to handle real customer orders. Keep an eye on your message credit usage through the first few weeks to see if you need to upgrade your plan.
And that’s all!
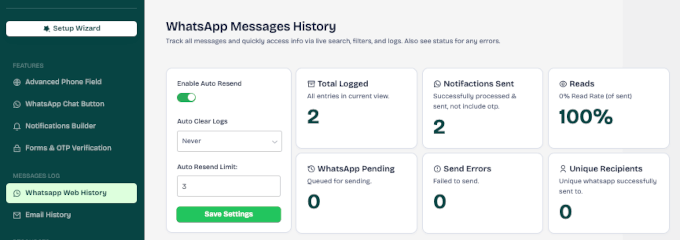
To monitor your automation, go to the ‘WhatsApp Web History’ panel in the Wawp menu. This page records the total automated messages logged, sent, read, pending, errors, and unique recipients.

FAQs About Sending WooCommerce Order Notifications in WhatsApp
What is WhatsApp Business Platform, and how does it work?
The WhatsApp Business Platform is the advanced version of WhatsApp for medium and large businesses. Unlike the regular app, it supports automated customer communication such as order updates, reminders, and customer support messages.
It runs through an API, so you’ll connect it to WooCommerce using a plugin or third-party service. Messages are sent based on approved templates, and businesses can reply to customers within a 24-hour support window.
Is WhatsApp Business free or paid?
There are two versions of WhatsApp for business, and they have different costs:
- WhatsApp Business App: This is a free mobile app. It’s great for small businesses that want to chat with customers manually, but it does not support the kind of automation we cover in this guide.
- WhatsApp Business Platform (API): This is the powerful tool needed for automation. It is a paid service where Meta charges you per conversation or message. This is the version that tools like PushEngage and Uncanny Automator connect to.
How do I integrate WhatsApp with WooCommerce?
The easiest way is with a plugin like PushEngage, Uncanny Automator, or Wawp. Once connected, you can automatically send order confirmations, shipping updates, or anything else you need.
Can I send automated WhatsApp messages from WooCommerce for free?
You can use the free WhatsApp Business app for manual replies and basic broadcasts, but it does not support full automation.
For automated order notifications, bulk messages, or abandoned cart emails, you’ll need the WhatsApp Business Platform.
While it’s paid, some categories of customer-initiated messages (for example, replies within 24 hours) are free. So costs will depend on how and when messages are sent.
Further Reading: More WooCommerce Tutorials
I hope this guide has helped you send WooCommerce order notifications to WhatsApp.
If you found this helpful, then you might want to check our other helpful guides to improve your WooCommerce store’s performance:
If you liked this article, then please subscribe to our YouTube Channel for WordPress video tutorials. You can also find us on Twitter and Facebook.

