If visitors can’t find what they’re looking for on your website, then they’ll leave, and they might not come back.
The problem is that the default WordPress search is very basic. Visitors type in a keyword, press Enter, wait for a full page to load, and still might not find what they need.
That’s where live autocomplete search (also called Ajax search) can help. It shows results instantly as someone types, making it easier for them to find the right content faster.
In this guide, I’ll show you how to add live autocomplete search in WordPress so you can create a faster, smoother search experience that keeps people on your website longer.

Why Add Live Autocomplete Search in WordPress?
Live autocomplete search helps visitors find what they’re looking for on your website faster, without reloading the page. As users type in the search bar, results appear instantly in a dropdown, so they can click and go straight to the content they need.
This kind of fast, helpful experience keeps people on your WordPress website longer. They don’t have to guess the right keyword or wait for a slow results page. And they’re less likely to hit a dead end.
Unfortunately, WordPress search is pretty limited by default. It doesn’t always search through things like product details or custom post types, and it struggles with exact matches.
Sometimes it even shows a “no results found” page, even when the content is there.


That’s where live search can be really helpful. It’s especially useful for blogs, news sites, and online stores, where visitors want to find something specific, fast.
If you want to make it easier for people to discover your best content, adding live search is a simple and effective way to do that.
How to Add Live Autocomplete Search in WordPress
The easiest way to add live autocomplete (Ajax) search to your site is by using a plugin. In this tutorial, I’ll use the free SearchWP Live Ajax Search plugin, which is one of the best WordPress search plugins.
It works out of the box by automatically upgrading any existing search forms on your site, such as the one in your theme’s header or sidebar. This means you can get live search suggestions instantly without needing to code or change any settings.


💡 Note: If you want to fine-tune your search even further, I recommend upgrading to SearchWP Pro. It lets you choose exactly what content to include in search, including custom fields, taxonomies, WooCommerce products, PDF content, and more.
You can learn more about this plugin in our detailed SearchWP review.
Now, I’ll walk you through how to create a live autocomplete search in WordPress.
Here’s a quick overview of all the things I’ll cover:
Let’s get started!
Step 1: Install and Activate SearchWP Live Ajax Search
First, you need to install and activate the SearchWP Live Ajax Search plugin.
You can find this plugin directly in your WordPress dashboard by going to Plugins » Add New and searching for “SearchWP Live Ajax Search.”
Once you find the plugin in the search results, click the ‘Install Now’ button. After installation completes, click ‘Activate’ to enable the plugin on your site.
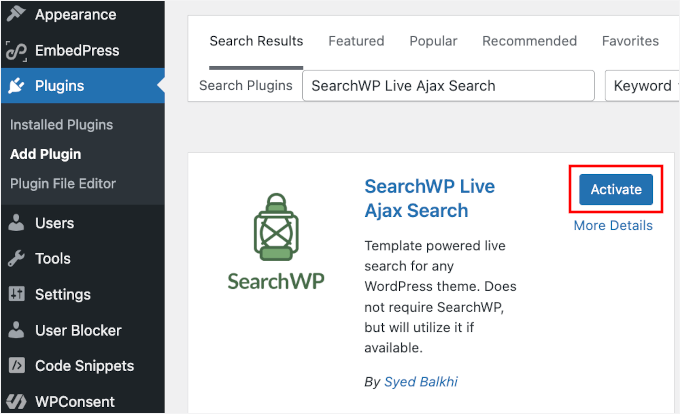

For detailed installation instructions, see our step-by-step guide on how to install a WordPress plugin.
The plugin is completely free and developed by the same team behind the premium SearchWP plugin. It works independently, so you don’t need to purchase anything to get started with live search functionality.
Upon activation, a new ‘SearchWP’ menu item will appear in your WordPress admin area. You’ll use this to configure your settings in the next step.
Step 2: Configure Basic Search Settings
Now that the plugin is installed, you need to enable the live search functionality.
Head over to SearchWP » Settings in your WordPress dashboard.
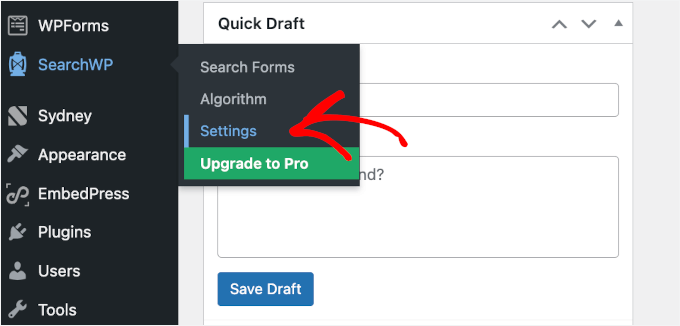

On the settings page, you’ll see a few different options for configuring your search.
Make sure that you’re in the ‘Live Search’ tab and look for the ‘Enable Live Search’ toggle near the top of the page.
Simply click the toggle to turn it on, and then make sure to click the ‘Save’ button to store your settings.
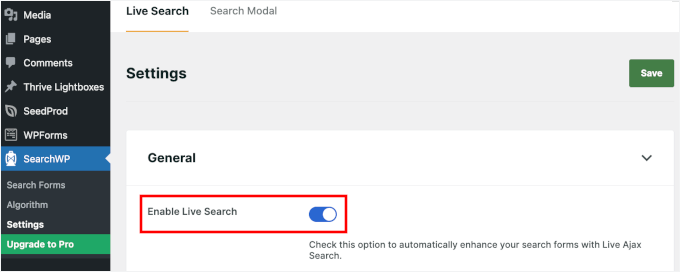

Once enabled, the live Ajax search will automatically start working with your existing search forms across your WordPress site.
The plugin uses smart defaults that work well for different types of websites right out of the box. By default, it will search your post titles and content to provide relevant results.
Step 3: Add the Live Search Bar to Your Site (Optional)
The SearchWP Live Ajax Search plugin automatically enables live search on any existing search forms in your WordPress theme.
However, you may also want to add a search bar to a new location, like your sidebar, footer, or a custom landing page. This step will show you how to do that.
Add Live Autocomplete Search to Widget-Ready Areas
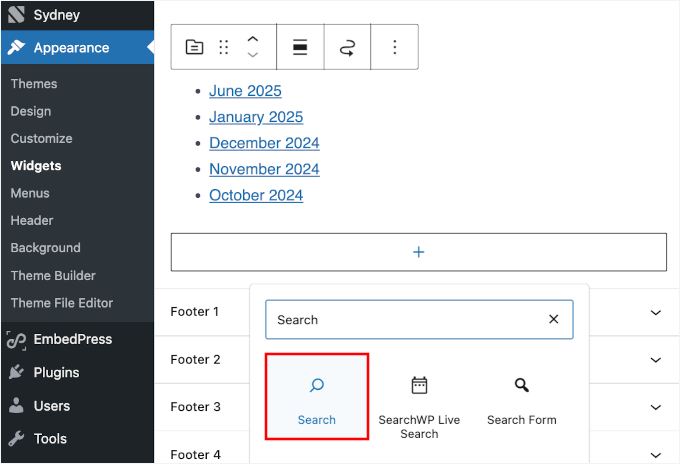
To add a search box to widget areas like your sidebar or footer, you need to go to Appearance » Widgets in your WordPress dashboard.
Click the ‘+’ button in the widget area, such as the sidebar or footer. Then, look for the Search widget.

Once added, you can customize the placeholder text.
For example, if you run a news site, you might customize the widget title with something like “Search Latest Stories” or “Find News Articles.”
Or you can simply leave it as “Search.”
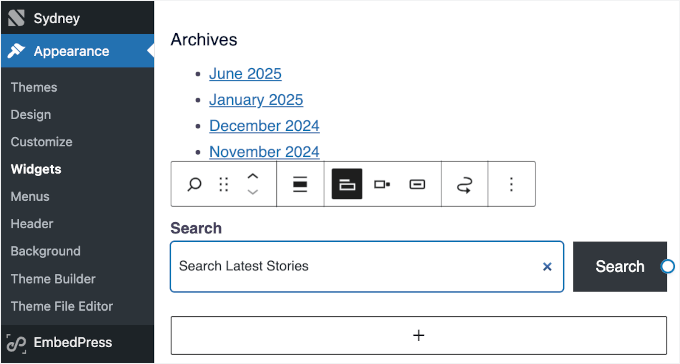

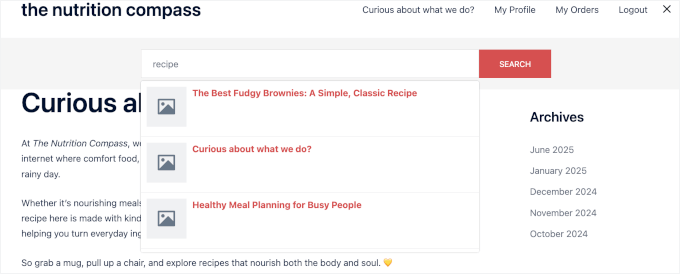
Don’t forget to click the ‘Update’ button to save your changes. The live search box will now appear in your widget area.
Here’s what it looks like on my demo site:

Add Live Autocomplete Search Using Full Site Editor (FSE)
If you’re using a block-based theme that supports the Full Site Editor, then you can add search boxes to different parts of your website, like the header, sidebar, and more.
First, go to Appearance » Editor from your WordPress dashboard.
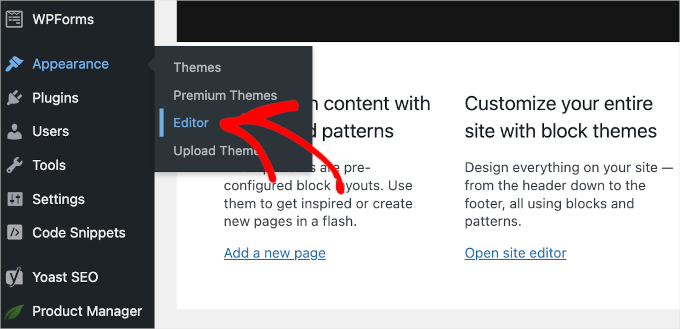

This will launch the Full Site Editor.
Then, you need to open the ‘Templates’ tab.


From here, click on the template you want to edit, such as your Header or a Page template.
The exact options will depend on the theme you’re using, but I recommend picking a Header template or the navigation menu so that the search bar will appear across your website.


Once you click on the template, you’ll see a visual editor with blocks.
Go ahead and click the ‘+’ button to add a new block, then look for ‘Search’ in the block inserter.
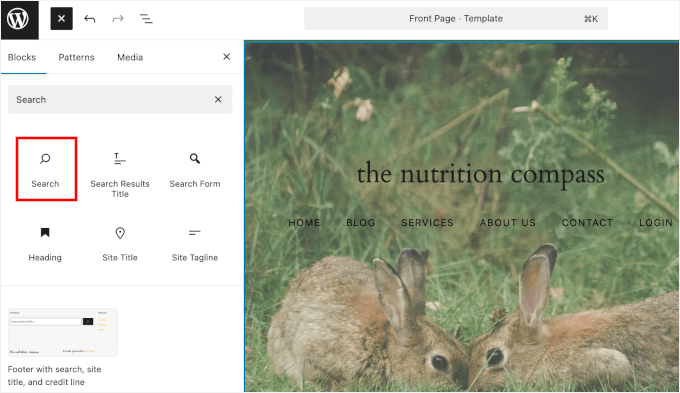

You can move the Search block up and down to your desired location within the template.
From here, you can customize the search block’s appearance using the block settings panel.
For example, you can adjust the placeholder text.
If you run a WordPress blog, then you may want to use something like “Search the blog” or “Find helpful articles.” Or you can also simply leave it as “Search.”
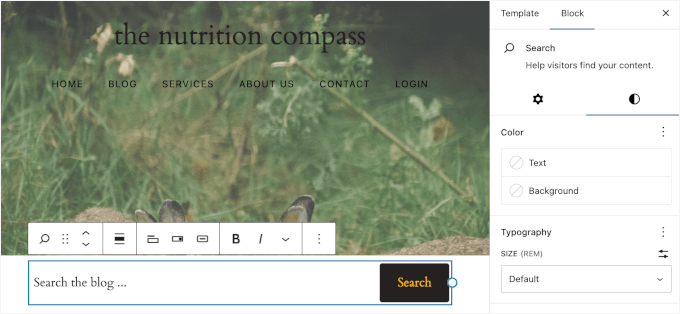

You can also customize the search bar style and layout options to match your site’s design.
Once you are happy with how it looks, click the ‘Update’ button to save your changes.


Step 4: Test and Troubleshoot Your Live Search
Now it’s time to test your new live search feature to make sure it’s working correctly.
I recommend opening your website in an incognito window and typing a few characters into the search box.
If everything’s working, you’ll see results appear instantly in a dropdown. That means Ajax is working correctly.


It’s a good idea to test your live search on different devices, including phone and tablet, to make sure it’s mobile-friendly. Try it in multiple browsers too, such as Chrome, Firefox, and Safari, to make sure live results appear consistently.
If the live search isn’t showing up or working as expected, then the most common culprits are caching issues and plugin conflicts.
Your browser or caching plugin might be storing an old version of your site’s files (a ‘cached’ version) to speed up loading times. Sometimes, this can prevent the new live search script from running correctly.
Clearing your WordPress cache and browser cache ensures that your site loads the latest version of its files, which often fixes the issue.
A good plugin for this is WP Rocket. It’s beginner-friendly and lets you clear cache, optimize scripts, and control how files are loaded for better performance.
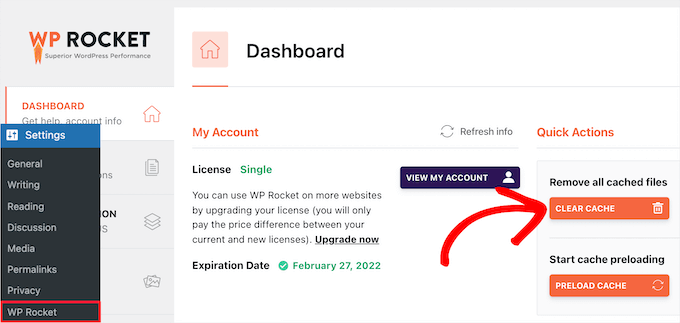

For details, you can see our guide on how to clear the WordPress cache.
If that doesn’t solve the issue, try deactivating other plugins one by one to check for conflicts. This can help you identify if another plugin is interfering with your live search.
For more troubleshooting tips, please see our guide on how to fix WordPress search not working.
Bonus Tip: Upgrade for Even Smarter Search (Fuzzy Matching)
Your new live search offers a much better user experience to your visitors. But what happens if someone makes a typo? By default, WordPress might return no results for “wordpres” instead of “wordpress.”
This is where fuzzy search comes in, and it’s a powerful feature available in the premium SearchWP plugin.
Fuzzy search helps your website understand what your users are trying to find, even if they misspell or use partial words.
For example, if someone searches for “vntage furniture,” a site with fuzzy search will still show them relevant results for “vintage furniture.”


This prevents users from hitting a no results dead end and helps them find content, improving user experience and keeping them on your site.
For step-by-step instructions, you can see our guide on how to add fuzzy search in WordPress.
FAQs for Adding Live Autocomplete Search in WordPress
I get a lot of questions from our readers about WordPress search functionality, so I’ve put together answers to the most common ones.
What’s the best WordPress search plugin?
For live search functionality, I recommend SearchWP Live Ajax Search because it’s free and works great right out of the box.
If you need more advanced features like custom field searching or detailed analytics, then the premium SearchWP plugin is excellent.
How can I add autocomplete to address fields in WordPress?
Address autocomplete is different from content search. It uses services like Google Places API to suggest real addresses as users type.
You’ll need a form plugin like WPForms or Gravity Forms that includes address autocomplete features. This connects to mapping services to provide street address suggestions, which is separate from searching your site’s content.
Can I create a form that lets users search within a specific category?
If you want to add a dropdown menu so users can search by category, then you’ll need the SearchWP Pro plugin.
The free SearchWP Live Ajax Search plugin (the one we cover in this guide) will show category names in the live results, but it doesn’t let you create a full search form with category filters.
To get that feature, you’ll need to upgrade to the full SearchWP plugin and follow our tutorial on how to search by category in WordPress.
How do I add a search feature to my WordPress site?
Most WordPress themes include a built-in search widget that you can add to your menu, sidebar, header, or footer.
For details, see our guide on how to add a search bar to your WordPress menu.
More Guides to Improve WordPress Search
I hope this guide helped you add live autocomplete search to your WordPress site.
You may also want to check out our other related guides to improve your site’s search:
If you liked this article, then please subscribe to our YouTube Channel for WordPress video tutorials. You can also find us on Twitter and Facebook.


