Interactive content is king in the age of AI and SEO. With “old” strategies fading in effectiveness, free tools are one of the best ways to actively engage your audience—while attracting massive SEO traffic & becoming your best new lead magnets. Enter: How to embed AI tools on your website.
Today, the free tools on my blog bring me 100s of thousands of people every single month… leading to 1000s of new email subscribers for my list, and 100s of new customers for RightBlogger (each month). Here’s a screenshot of my Google Analytics showing traffic to some of my free tools over a recent 30-day period:
Here’s why embeddable tools are such an incredible win for anyone who runs a website today—they’re unique, customizable, deliver personalized results, they provide instant value to your audience, and more than anything else… it’s now super easy to make your own embeddable AI tools with RightBlogger’s Tool Studio.
Check out my full tutorial video for a walkthrough of how to embed AI tools on your website right now:
Considering embedding AI tools on your website? I like the way you think. Here are just a few of the benefits you’ll get by embedding AI tools on your website:
- Boost in free SEO traffic (free tools solve real problems for people)
- Increase in new email subscribers (free tools are incredible lead magnets)
- Improved time on page (search engines will often rank tool pages higher than blog posts)
- Higher likelihood of attracting quality organic backlinks (free tools are link-worthy)
Free embeddable tools are a winning formula that gets your audience involved, creates memorable experiences, and builds deeper relationships between you and your peeps. Now that free tools are easy to make and embed, it’s a no-brainer traffic & lead generation strategy.
Now, let’s get into how you can execute on this strategy too.
Luckily, you no longer need to be a coding whiz in order to create and embed AI tools on your website. That’s exactly why we built RightBlogger’s Tool Studio—so you can quickly make any tool idea come to life & get an embed code right away.
Our platform lets you build custom AI tools and embed them without writing a single line of code.
The best part about making embeddable AI tools in RightBlogger? It’s so easy that anyone following along with this guide (and the video walkthrough above) can learn how to embed AI tools on your website in a matter of minutes.
Need Smart Embeddable Tool Ideas?
Use my Free Tool Idea Generator to quickly get 10+ actionable tool ideas you can make & engage more with your audience.
Of course, you can make your embeddable tools in any way you see fit—this walkthrough will be focusing on how to embed a tool on a website using what we believe to be the easiest process, with Tool Studio. You’ll get this nifty little embed code right here:
If you’re making custom AI tools on your own, all good. You’ll wanna jump straight down to the ‘how to embed’ portion of this guide.
👋 Important Note: In order to unlock the Tool Studio suite of features, you’ll need to be a RightBlogger Pro (and up) subscriber. Our Pro plan starts at $24.99/mo (billed annually), and with this plan you’ll access our 80+ powerful tools for content creators, marketers & entrepreneurs. We also have free educational online courses, a private community, and regular live events. Once you’re in, you can jump over to the RightBlogger Tool Studio page and start creating.
How to Create an Embeddable AI Tool (with Tool Studio)
Let’s walk through the basics of getting your first custom AI tool built, using RightBlogger’s Tool Studio—in my experience, by far the easiest way to make embeddable AI tools right now.
Here’s our step-by-step process for building your first embeddable AI tool:
1. Access & Open Tool Studio
Once you’re logged into RightBlogger (and subscribed to our Pro plan or higher), look for Tool Studio in the left sidebar menu, or from the Tools dropdown menu in the top navigation area.
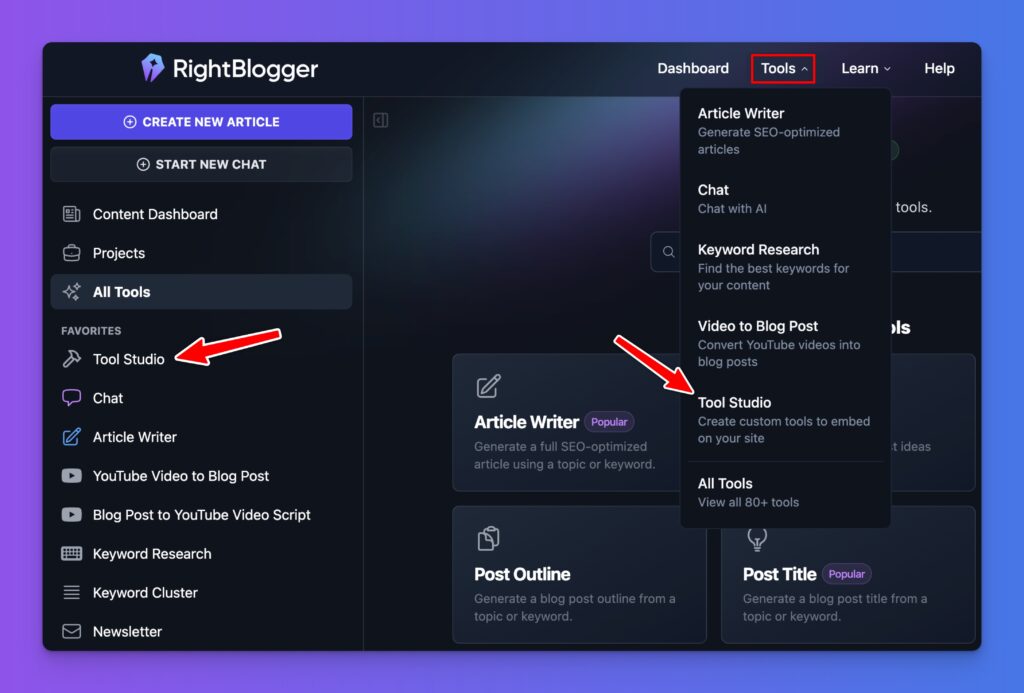
Pro Tip: I recommend adding Tool Studio to your Favorites in RightBlogger. This’ll make Tool Studio always appear up near the top of your left sidebar menu, so you can always access your tools quickly.
2. Add a New Tool
Whether you’re a first-time Tool Studio user, or coming back to make your 30th embeddable AI tool, you’ll see the Add New Tool button.
Click Add New Tool to start creating your first AI tool. You’ll see the first step here:

Pro Tip: If you’ve already been using RightBlogger (or if you connect your site to a Project), then Tool Studio will automatically suggest smart tool ideas based on the topics you tend to cover on your website or in the content you’ve made using RightBlogger. Pretty nifty.
3. Describe Your AI Tool
This is where the magic really happens. You can create a tool that functions exactly how you imagine it.
Be as detailed as possible when describing the vision you have for the AI tool you want to create, but all you’ll need is 1 sentence (minimum) to get started. During the next step of the process, you’ll be able to edit, tweak & improve every aspect of your tool.
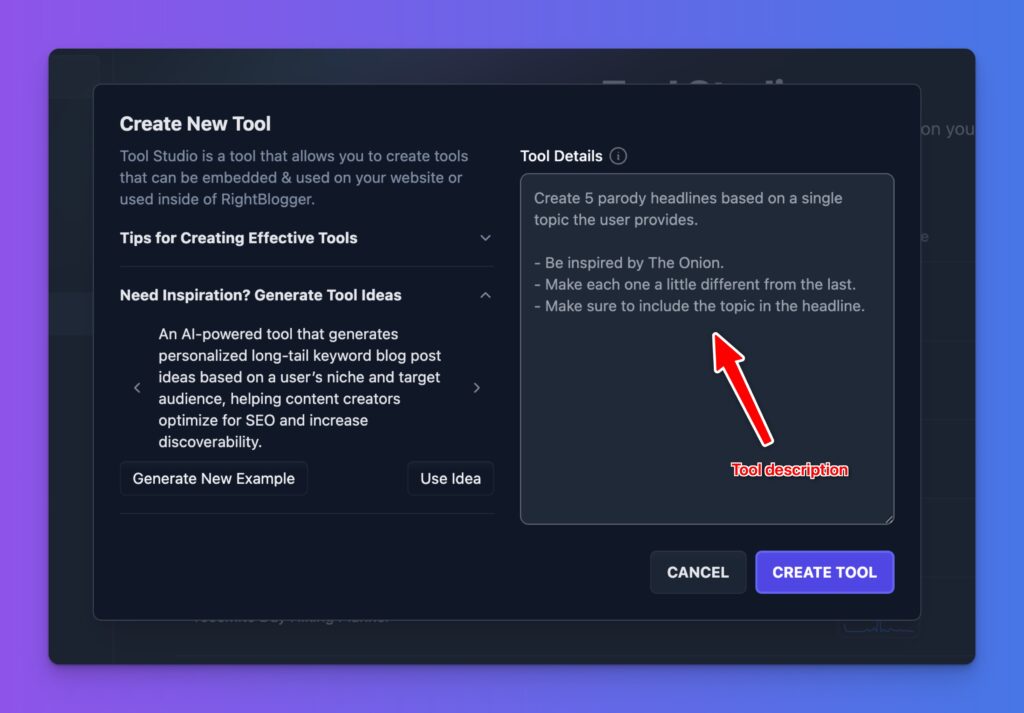
A few great prompt elements to tell Tool Studio during the creation process include:
- How many inputs you want the tool to have
- The types of inputs you want the user to feed the tool
- How many outputs you want the tool to generate
- The type of output format you want the tool to produce
The more information you give Tool Studio, the better it can understand your vision and create the perfect tool for your audience.
The example prompts you’ll see, based on your account activity in RightBlogger, will will give you even more actionable ideas for clever tool ideas you can embed on your website.
💡 If you’re ever stuck at the ideation stage, be sure to try my Free Tool Idea Generator to brainstorm possibilities—and don’t hesitate to reach out to me at [email protected]. I’ll help you figure out a tool that’ll be a hit with your audience.
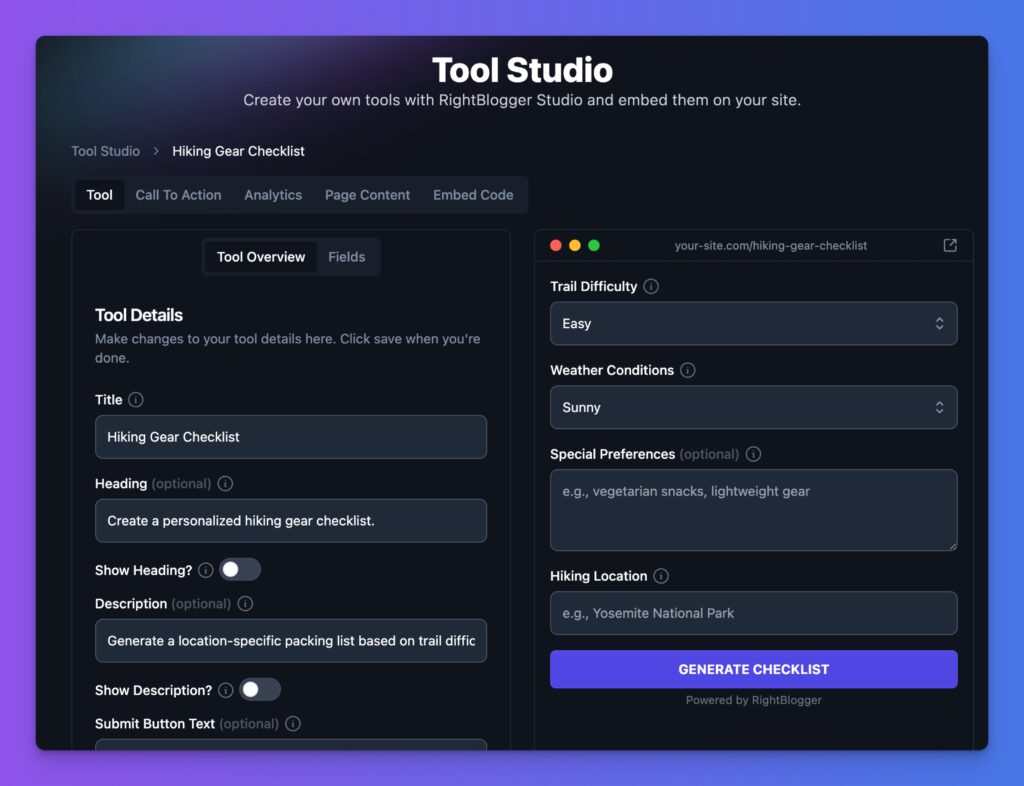
Step 2: Editing & Personalizing the Details of Your AI Tool
Once you’ve described your tool, Tool Studio will build the entire first draft of it for you.
It’ll look something like this, with a fully functional preview of how your tool will look & act, on the right side here:
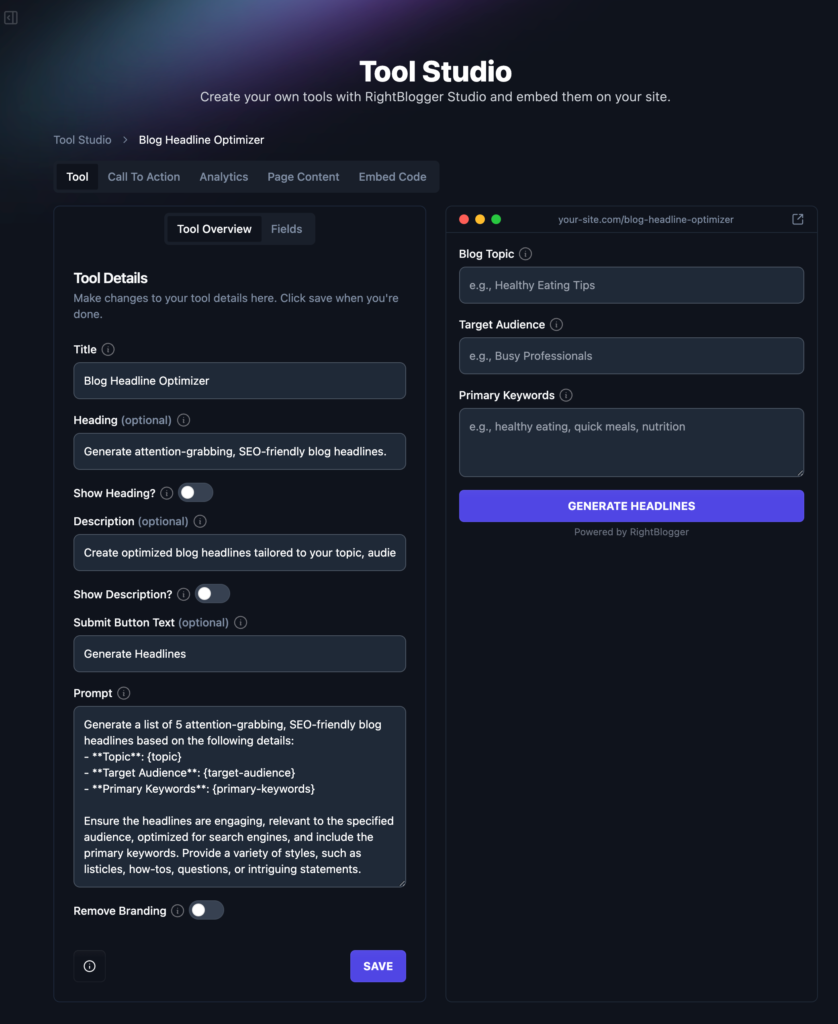
You’re now entering the playground. If you feel overwhelmed with all the options, don’t worry—you’ve got time to tinker with everything, it’ll be much easier (and fun) than you think.
Don’t like one of the dropdown menu items? Wanna add new options to a field? Change the placeholder text? Update the behind-the-scenes Prompt the tool will use? We got you.
At this stage, you can now fine-tune all the details of your embeddable AI tool, to perfection. Have fun with it and weave as much of your own personal experience, expertise & personality into the tool as possible. This’ll make it truly feel yours.
Here are a few things you’ll want to evaluate and potentially make edits to:
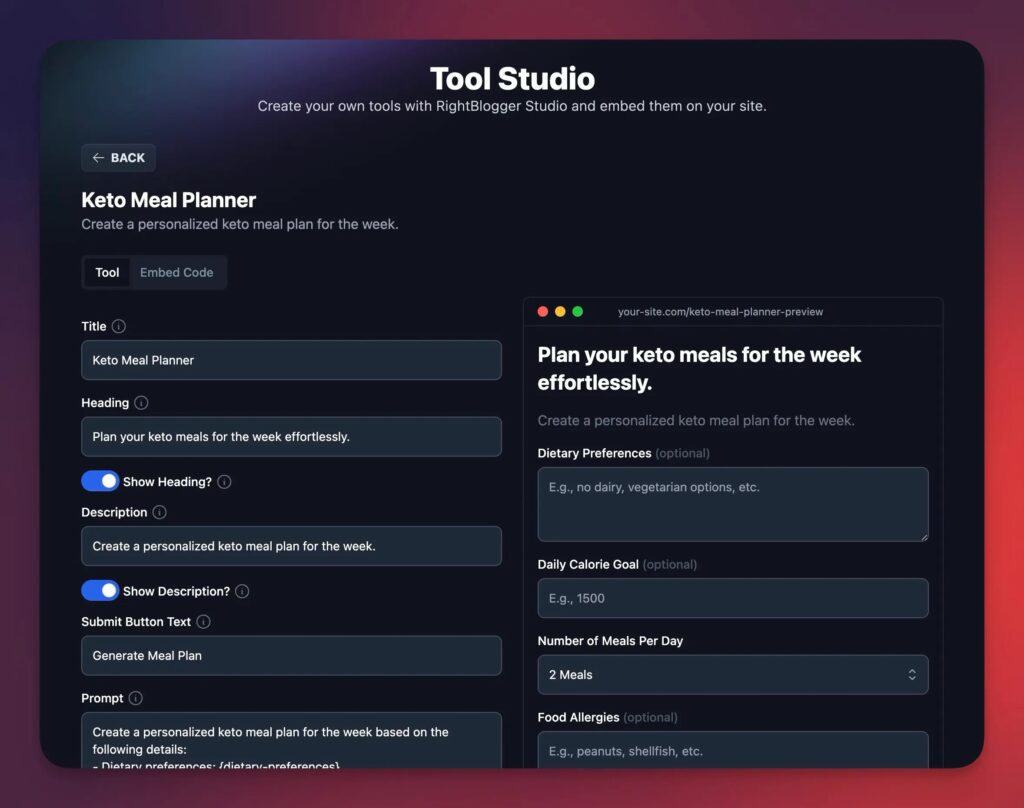
Editing Your Tool Details & Input Fields
This page is where you’ll customize how your tool looks & functions, in as much detail as you’d like.
From the Tool Overview tab, you’ll be able to make higher level edits. In the Fields tab, you’ll be able to drill into specific edits & changes to the individual fields inside your tool:
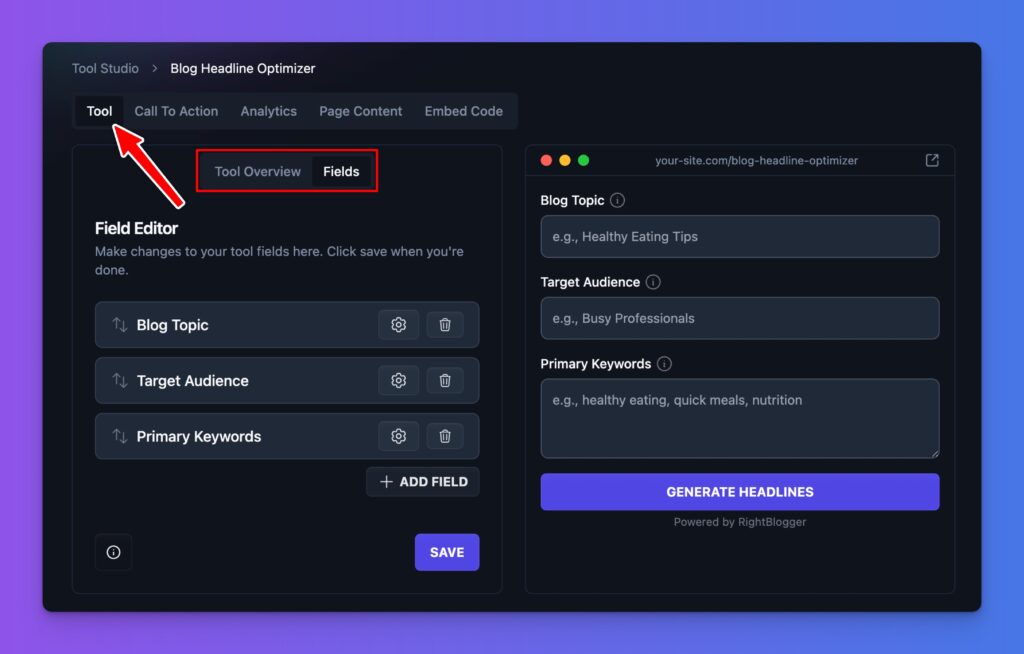
You’ll see a live-updating preview of what your tool on the right side, so you can see your changes in real-time.
You can also test the tool right here to make sure it’s working properly. You’ll also be able to edit details like:
- Title & Description: You can customize the title and description of your tool. By default, the title & description are toggled not to display when you embed your tool, because adding the title & description manually to your page (above the embedded tool) will be better for SEO best practices. See examples of this in practice with any of the tools on my blog right here.
- Submit Button Text: Change the text on the submit button to match the tone and purpose of your tool.
- Prompt Customization: This is the AI engine that drives your tool once a user clicks the submit button. Tool Studio will generate a prompt for you, but you can customize it further. You can even use variables to insert the user’s input into the prompt.
👋 Important Note: I recommend keeping the heading & description disabled within the tool embed, and using your CMS to add the title & description, instead. This helps Google understand the context of your tool and improves your on-page SEO. Always save your changes after editing a tool, and be aware that any changes you make, are published to that tool immediately.
Call to Action
The Call to Action (CTA) area is where you’ll control how to turn your tool users into leads.
It’s crucial to include a call to action in your embedded tool, so that you’re maximizing the value free AI tools have to contribute to your overall business. By adding some of the people who use your tool, to your email list, you’ll be able to connect deeper, market your offer to them, and qualify them for potentially becoming a customer.
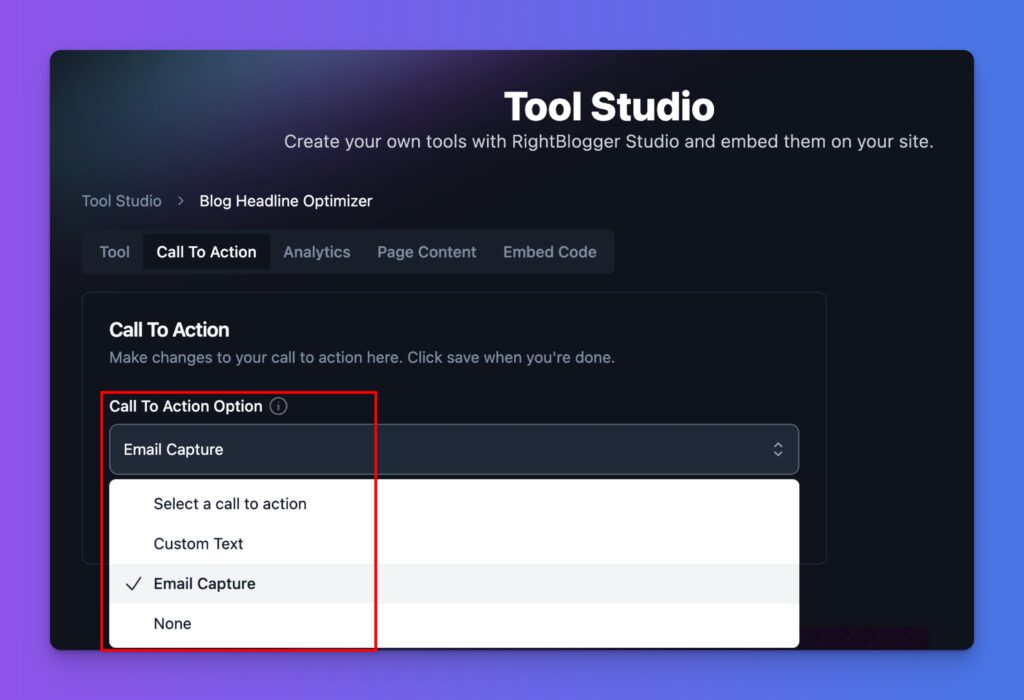
Tool Studio gives you several options straight out of the box:
- Custom Text: This lets you create a custom message with a link to a product, landing page, PDF, or other resource you wanna promote here.
- Email Capture: This adds an email signup form displayed above the tool output, immediately after the tool is used, allowing you to capture leads for your email marketing efforts.
- None: This removes the CTA entirely if you just want the free tool to be used without asking for anything in return.
Personally, I recommend using the email capture CTA. It’s a great way to build your email list and connect with your audience.
Pro Tip: We’re working on integrating Tool Studio with email marketing platforms like Kit and Mailchimp, or through Zapier. In the meantime, you can export the captured email addresses as a CSV file from this CTA page, and import them into your email marketing provider at regular intervals. We’ll have integrations ready very soon.
Analytics
The analytics tab in Tool Studio shows you how many times your tool has been used.
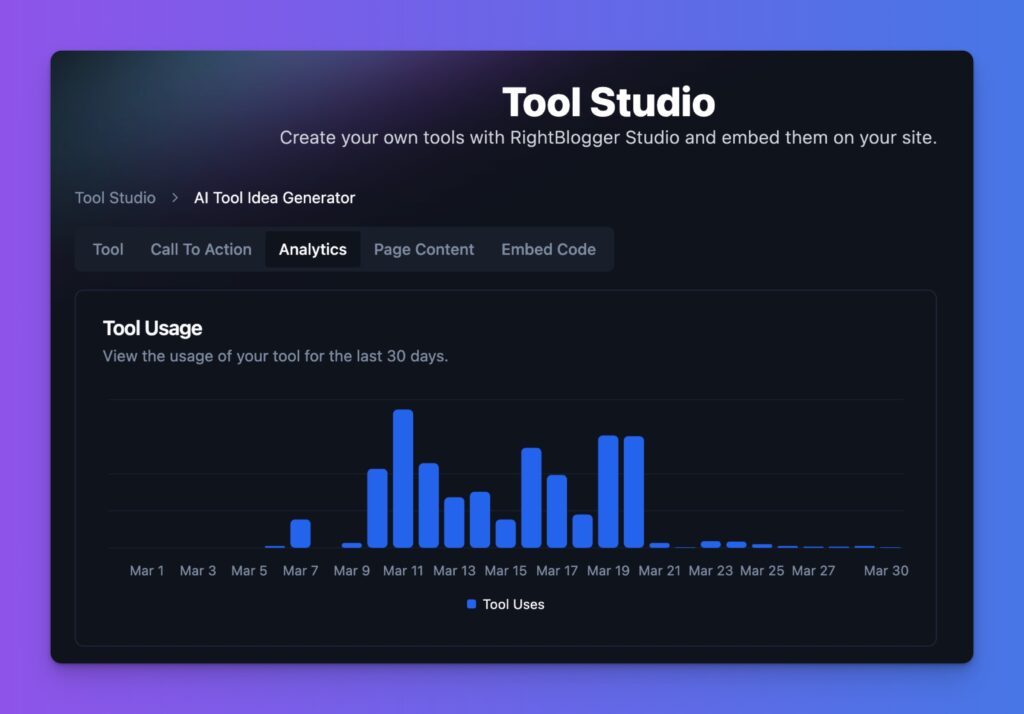
This data helps you track your tool’s performance and see how it’s resonating with your audience.
Page Content
One of the most important ingredients for a successful tool page (in order to drive SEO traffic from Google) is having a well thought out landing page with SEO-optimized content that’s designed to get it ranked in organic search results.
That’s where Page Content comes into play—Tool Studio will automatically generate your first draft of an SEO landing page, including your SEO meta title, meta description, and instructional sections that walk through using the tool. Here’s a quick preview:
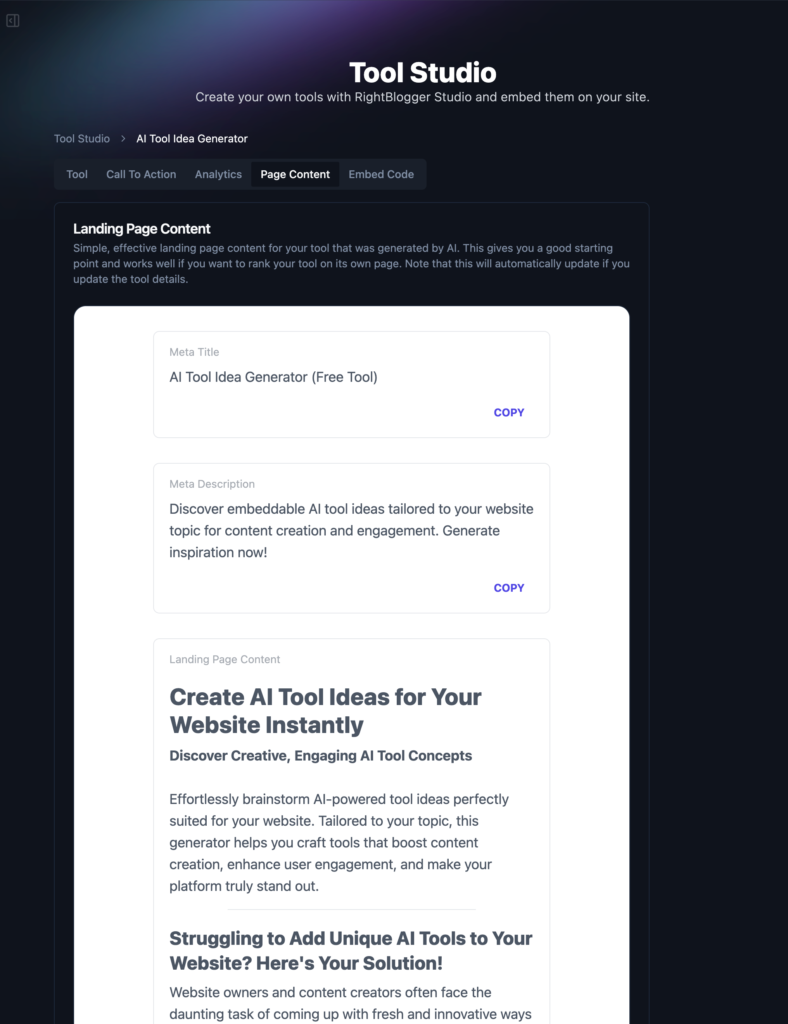
Pro Tip: As with all AI-assisted content, you’ll wanna tune up the landing page copy in order to make sure it truly captures everything you’d like to include on this page (explaining how to use your tool, perhaps educating a bit more on the topic your tool deals with, and answering some frequently asked questions). These details will make the difference between your tool getting SEO traffic, or not.
Understanding Branding Options
With RightBlogger, you have options for branding. If you’re a RightBlogger Business subscriber, you can remove all RightBlogger-related branding from your embedded AI tools.
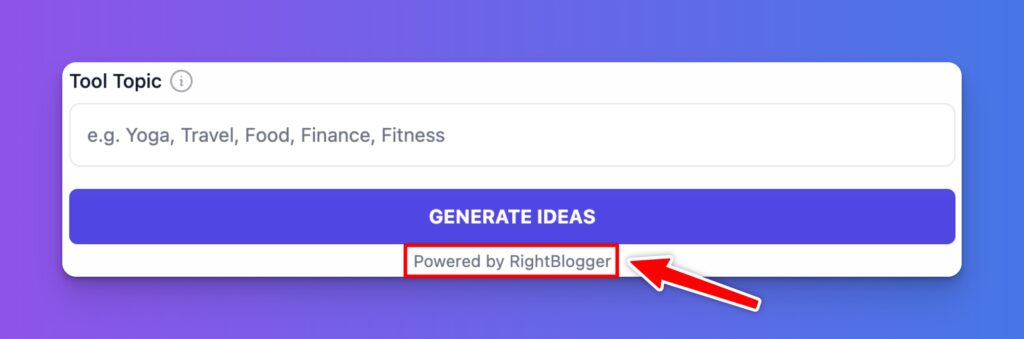
For RightBlogger Pro users, “Powered by RightBlogger” branding is included under the submit button. This helps us keep RightBlogger affordable for everyone—and as an added bonus, you can join our affiliate program & slot your affiliate link in there, so anyone who joins from your link will earn you a commission.
Testing Your AI Tool
Before embedding your AI tool on your website, it’s important to test it out.
Use the preview function on the right side of your Tool tab, inside Tool Studio, to see how your tool looks and functions.
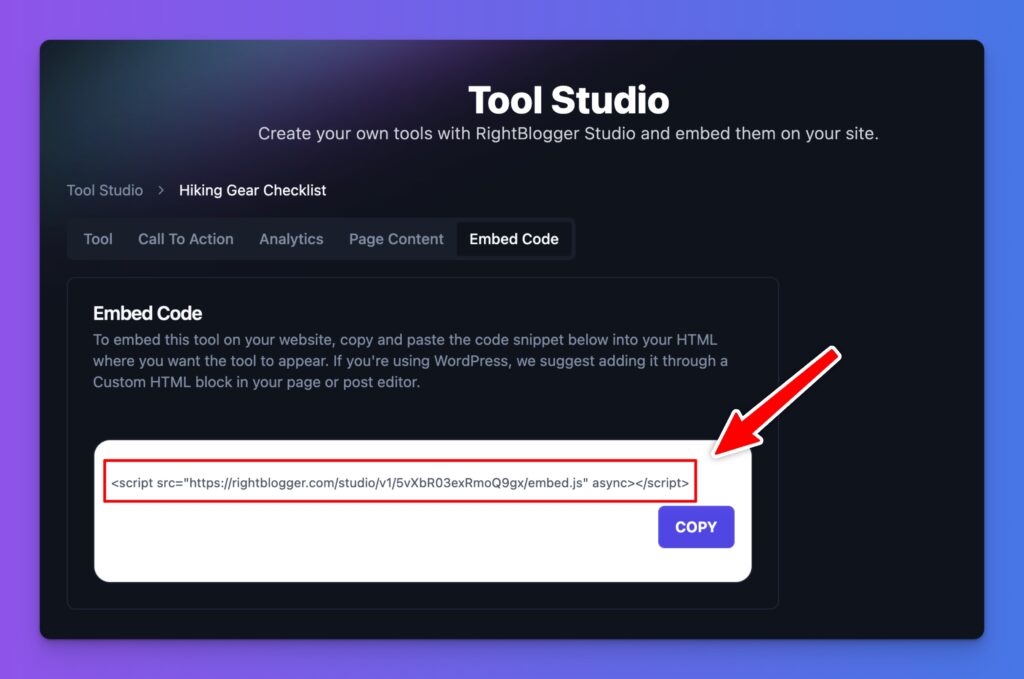
Step 3: Embedding Your AI Tool (and Generating Leads)
You’ll be able to grab the copy & paste code snippet that’ll make your embeddable tool display on your website, under the Embed Code tab:
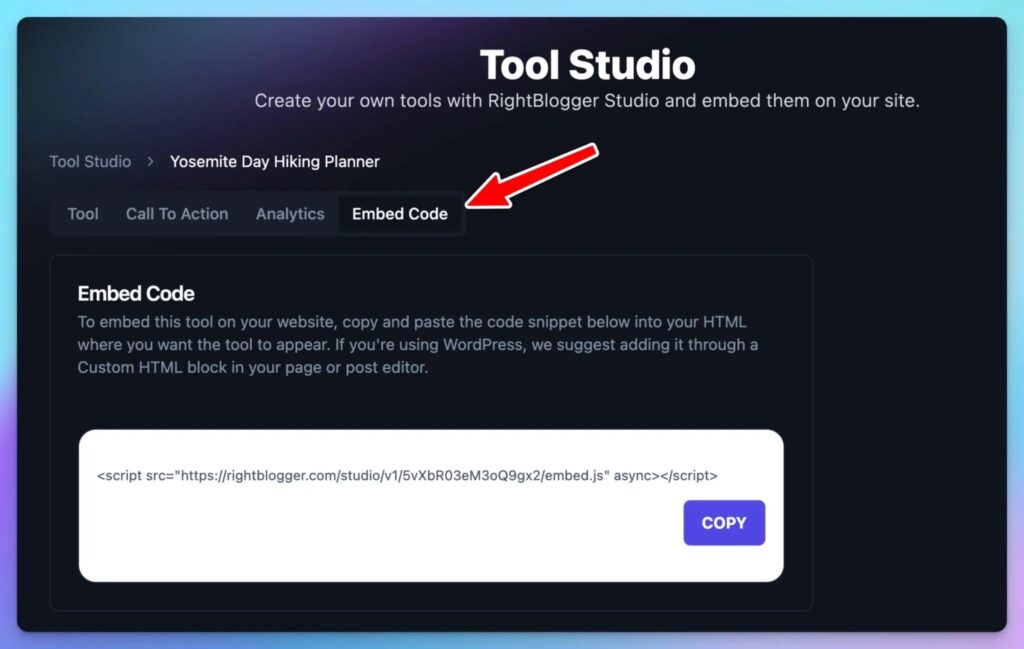
Once you’re here, this is what you’ll wanna do with the code snippet:
- Copy the snippet of code to your clipboard
- Paste the code into your desired location on your website. I like to embed tools both (1) inside relevant blog posts at useful locations for my readers (only once per post/page) and (2) on their own dedicated landing pages where they have the most SEO opportunity to rank in Google searches related to the tool
How to Embed an AI Tool on a WordPress Website (Step-by-Step)
💻 Pro Tip: If you’re using WordPress to embed your tool, this is super easy. You’ll add a ‘Custom HTML‘ block and paste your code in there, just like so:
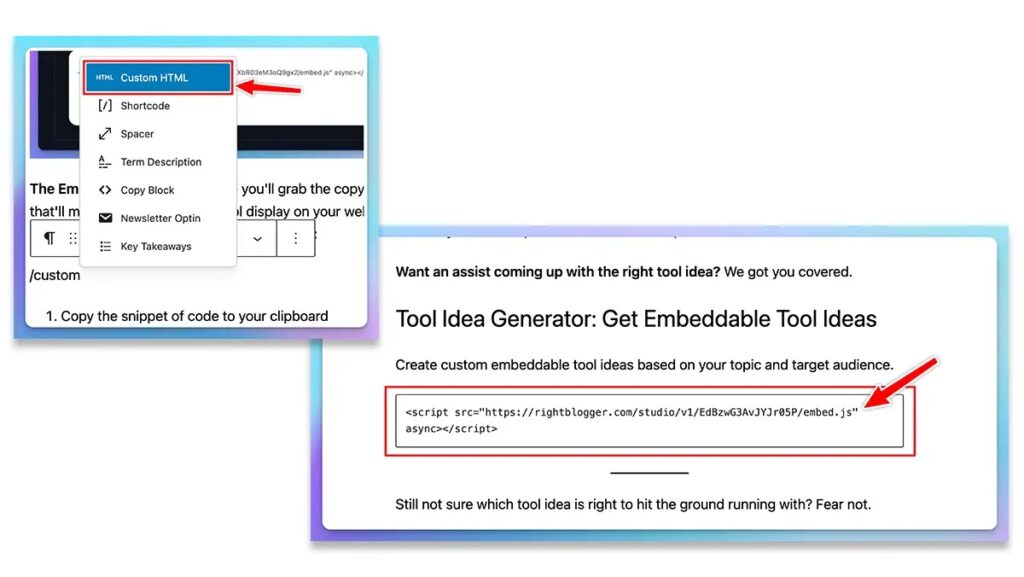
The process is similar for Elementor and other page builders.
If you’re not comfortable embedding the code yourself, ask a developer for help, or drop us a line to [email protected].
Embeddable AI Tools: Find Your Winning Tool Idea Today
You’re now ready to start driving SEO traffic to your tool pages & generating more leads from them.
Need some ideas for AI tools you can create with Tool Studio? Be sure to try my Free Tool Idea Generator to get personalized recommendations, and keep in mind that these types of tools are some of the most effective ways to solve real reader challenges with free tools today:
- Text generation tools (user gives some input, tool generates a custom output)
- Brainstorming tools (tool helps user come up with ideas & solutions based on a topic)
- Planning tools (tool helps user develop a plan based on inputs)
- Selector tools (user gives some input, tool helps user decide on an action, outcome, or process)
- Assessment tools (user give some input, tool analyzes and creates a personalized assessment)
The possibilities with free tools are endless. Come take RightBlogger’s Tool Studio for a spin today, I know you’ll love it.
The real key is to think about your audience’s needs and create tools that solve their problems, while providing real value. You’ll build memorable relationships, and with a foundation like that… you’re creating a lot of opportunities for your future.
Create SEO Blog Posts in Minutes with RightBlogger
Join 23,317+ creators, bloggers, marketers, writers, freelancers & entrepreneurs in using my very own kit of powerful tools for content creation: RightBlogger. You’ll unlock 80+ blogging, SEO, marketing, sales and productivity-focused tools to create content faster & more effectively today. Plus, you’ll access our library of high-impact courses, a private community, and more.


