When I first started building websites, I thought about using Drupal. It’s a strong platform, but it was too complicated and hard to learn, especially for beginners.
That’s why I chose WordPress instead. It’s powerful, easy to use, and now, it’s what I use for all my websites.
Over the years, I’ve helped many business owners and developers switch from Drupal to WordPress. I know it can feel overwhelming to move your whole website without losing content or breaking anything.
That’s why I created this simple guide to help you migrate from Drupal to WordPress safely and easily. It walks you through each step, using methods I’ve tested and improved with others who have made the same switch.
Whether your website is small or large, I’m here to help you make the change as smoothly as possible. Let’s get started together!
Why Migrate From Drupal to WordPress?
Drupal and WordPress may look similar. But in practice, these website builders are very different.
I’ve found that Drupal, while incredibly capable, can sometimes feel complex and overpowered.
Simple content updates start taking longer than they should. Finding the right developer to make tweaks isn’t always easy or cheap. And honestly, the backend can feel overwhelming sometimes.
In my experience, WordPress is much more user-friendly, which is why I always recommend it to people looking to make a website.
Think of it as your favorite everyday tool that’s easy to pick up and intuitive to use. It makes many tasks very easy to do, like writing and publishing a new blog post, adding an image to a page, or installing a simple contact form.
Drupal, on the other hand, is more like a highly specialized toolkit. It is precise and powerful, but it can feel like overkill for your daily needs. It can be difficult to do something that’s simple in WordPress, like setting up a custom page layout.
See my comparison of Drupal vs. WordPress for more details.
Step 1. Back Up Your Drupal Website and Link Structure
Before you start migrating your Drupal site, you need to create a safe copy of everything.
It’s also a great idea to back up the link structure of your website. You’ll use this information later to make sure you don’t lose your search engine rankings.
Backing Up Your Drupal Website Using a Module
You can back up your Drupal website easily using a module, or more advanced users can do it manually (see below).
The Backup and Migrate module makes backing up a Drupal website pretty straightforward.
Just visit Administration » Extend and you will find the module in the ‘Other’ section. Simply click the checkbox next to the module and then click the ‘Install’ button at the bottom of the page.
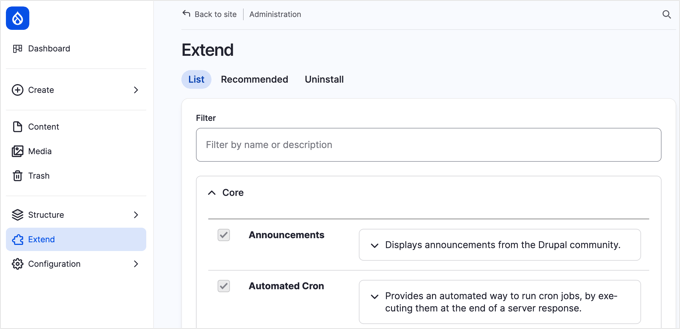

Note: If you don’t see it listed, then the module’s files haven’t yet been added to Drupal. This is a little technical, and you may need to contact your hosting provider for support.
More advanced users can install the module by using SSH. You will need to navigate in the terminal to the root directory of your Drupal installation and type in the following command:
composer require 'drupal/backup_migrate:^5.1'
Once the module is installed, you’ll find it in your Drupal admin menu. It allows you to create backups of your database, files, or both. For a full site backup, you’ll want to back up everything.
Backing Up Your Drupal Website Manually
Alternatively, if you’re comfortable with the technical side of things, then you can also back up your Drupal site manually.
First, you’ll need to back up your website files using your hosting provider’s file manager or FTP software.
When the file manager opens, click on the public_html folder in the left menu and then select your website’s folder in the left pane. You need to right-click on that folder and create the ‘Compress’ option from the menu.
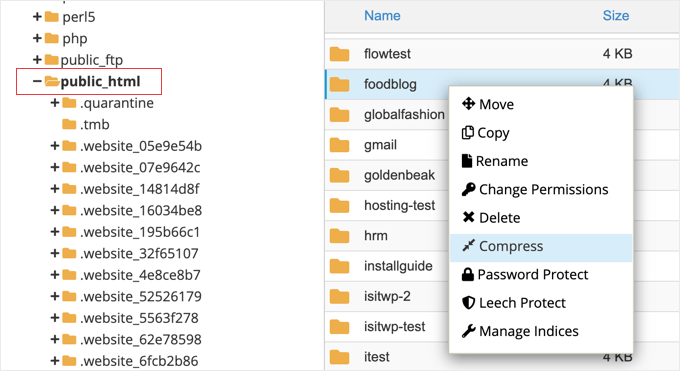

When asked for a compression type, you should select the ‘Zip Archive’ option. After your website has been compressed, you can close the confirmation message.
Next, you need to find the compressed zip file in the public_html folder. Right-click the file and select the ‘Download’ option. Make sure you store this backup file in a secure location.
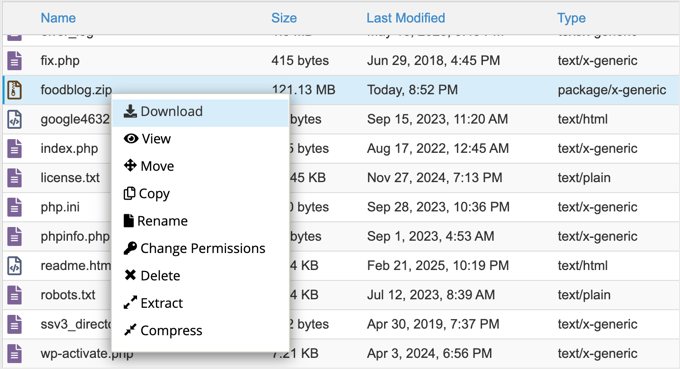

Next, you’ll need to back up your database using phpMyAdmin. You will find this useful tool in the account dashboard of most reputable hosting providers.
For example, on Bluehost, you will find it by clicking on the Hosting tab and then scrolling down the page.
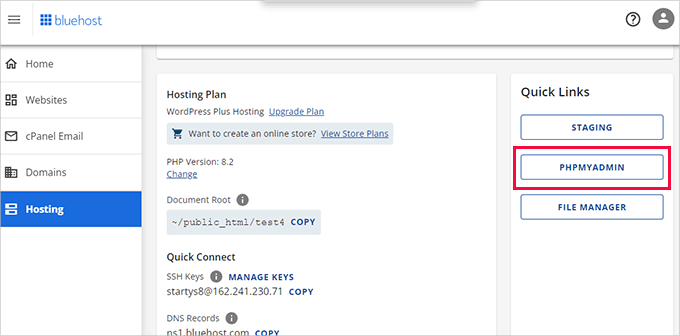

Clicking the phpMyAdmin button will launch the application in a new browser tab.
From here, click to select your Drupal database from the left column and then click on the ‘Export’ button at the top.
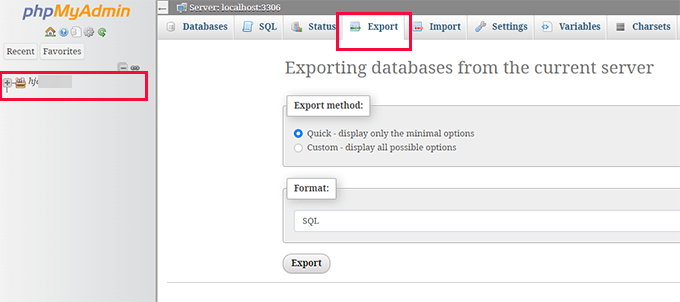

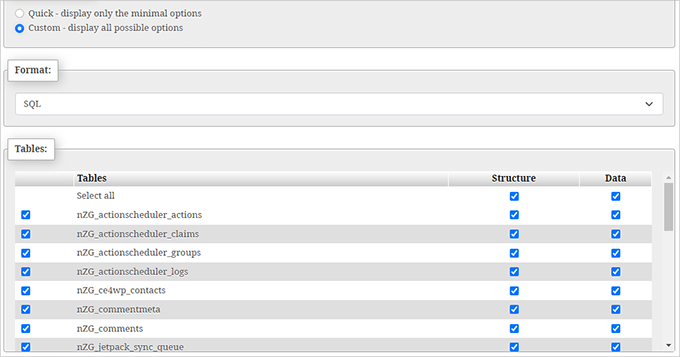
When you are asked to select the export method, you should select ‘Custom’. It will show you all of the database tables in your Drupal website.
To create a full backup, make sure all of the tables are selected.

You now need to scroll down to the ‘Output’ section and select the ‘Save output to a file’ option.
For compression, select the ‘zipped’ option.
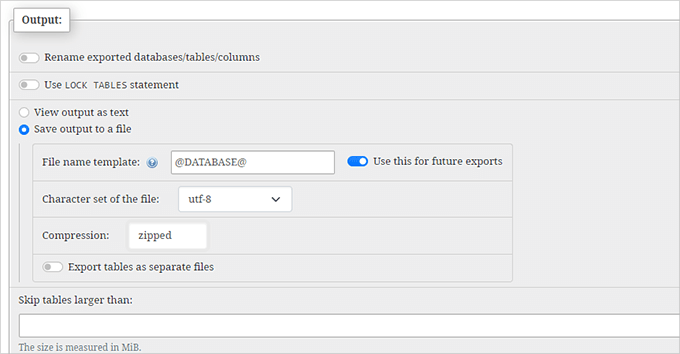

Finally, scroll to the bottom of the page and click the ‘Go’ button.
The compressed database file will be saved to your computer, and you can store it safely, along with the file backup you created earlier.
Backing Up Your Link Structure
Next, you need to back up your link structure. This is important for SEO and making sure that people can find your content online.
You need to make a list of all your current Drupal URLs so that you can set up redirects later in WordPress. This way, if someone clicks an old link to your Drupal website, then they’ll be automatically sent to the right page on your new WordPress site.
I like to use a Chrome extension called Link Klipper. It’s free, easy to use, and can quickly save all the links from a website. You can easily install it in your browser using the link above.
Next, you need to visit your Drupal website’s homepage in your Chrome browser. Once there, just click the Link Klipper icon in your browser toolbar and choose the option that says ‘Extract All Links’.
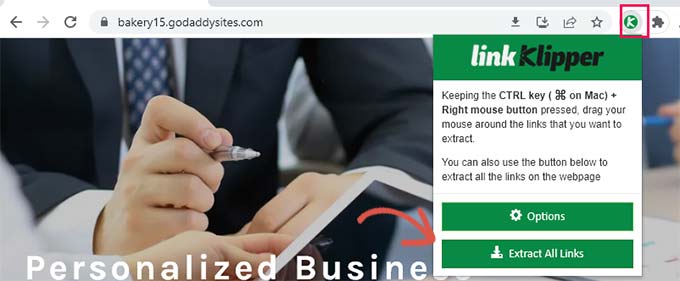

Link Klipper will do its thing and grab all the links from your homepage and the pages it can find linked from there. It will download these links as a comma-separated values (CSV) file.
When you open that CSV file in Excel or Google Sheets, you’ll see a complete list of your Drupal URLs. Make sure you save this file somewhere safe because you’ll need it later.
Step 2. Installing and Setting Up WordPress
The requirements for both Drupal and self-hosted WordPress are quite similar. You’ll need a domain name and a WordPress hosting account to start with WordPress.
If you already have a domain name and website hosting account for your Drupal website, then you can use them for your WordPress website as well.
Alternatively, if you want to move to a different hosting provider, then I recommend using Bluehost, which is one of the top hosting companies recommended by WordPress. They offer WordPress hosting and a free domain name for just $1.99 a month.
Alternatives: If you’d like to explore a few other good options, then Hostinger and SiteGround are also worth considering. They both have strong reputations in the WordPress hosting world and offer good performance. For more options, see my expert pick of the best WordPress hosting providers.
For this guide, I’ll use screenshots from Bluehost to give you a visual example of the process.
You need to navigate to the Bluehost website and click the green ‘Get Started Now’ button.


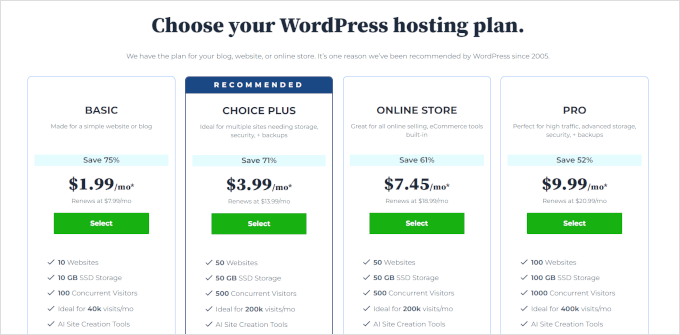
You’ll then land on their pricing page, which shows you different hosting plans. Their ‘Basic’ plan is perfect for most websites.
Pick a plan that suits you by clicking the ‘Select’ button under it.

Next, you’ll be asked about the domain name you want to use. This is your website’s address, like www.yourwebsite.com.
You need to select ‘I’ll create my domain name later.’ This gives you time to migrate everything before pointing your domain to WordPress.
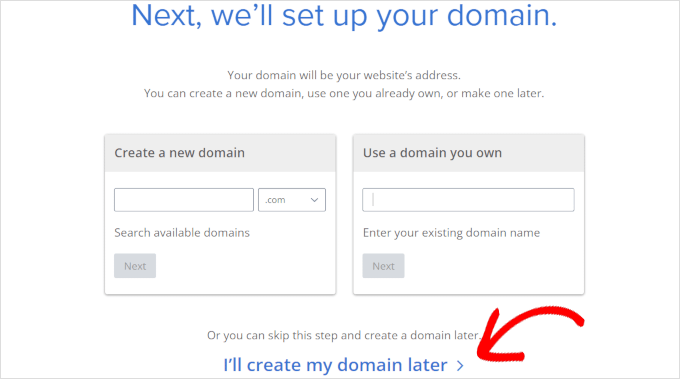

Why set up a domain later? 🤔 If you already have a domain connected to your Drupal site, then choosing this option lets you set up WordPress without affecting the live site. Once everything is ready, I’ll show you how to point your domain to WordPress.
After the domain step, you’ll need to fill in your account details (name, address, and so on) and your payment information to complete the purchase.
Bluehost will then send you a confirmation email with your login details. Keep this email safe! You’ll need those details to log in to your hosting account dashboard.
When you log in to your Bluehost account for the first time, they install WordPress automatically for you.
Now, just look for the ‘Edit Site’ button in your hosting dashboard and click it. That will take you straight to your WordPress admin area, where you can manage your new website.
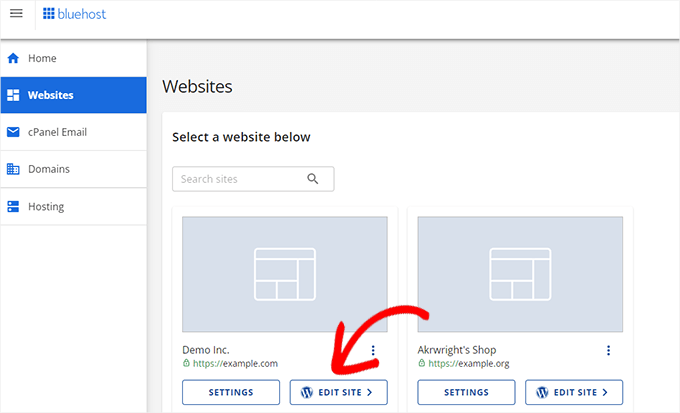

And that’s it. You’ve now successfully installed WordPress.
Step 3. Importing Your Drupal Content
To make the migration process as smooth as possible, I’ll show you how to use a free WordPress plugin called FG Drupal to WordPress. It automates a lot of the heavy lifting involved in moving content between these two platforms.
First, you need to install and activate the plugin. For more details, see my step-by-step guide on how to install a WordPress plugin.
You’ll then find the importer tool under Tools » Import in your WordPress dashboard menu. You’ll see a list of different import options. Look for ‘Drupal’ in the list and click the ‘Run Importer’ link.
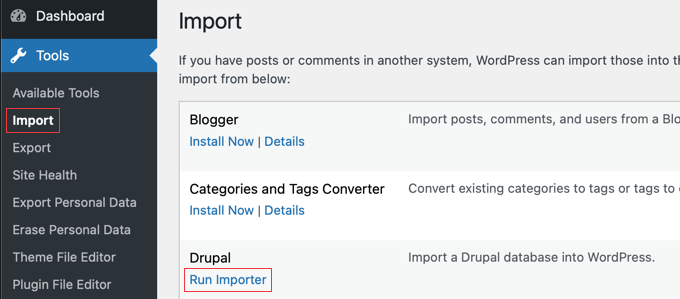

This will launch the FG Drupal to WordPress importer. Now, you’ll need to give the importer some information about your Drupal website so it can connect and grab your content.
The first thing it will ask for is your Drupal website URL.


Next, it needs your Drupal database details to get all your posts, pages, and other content. You’ll need to provide:
- ⛁ Database Host: This is usually
localhostif your Drupal and WordPress sites are on the same server. If not, you’ll need to get this from your Drupal hosting provider. - ⛁ Database Name: The name of your Drupal database.
- ⛁ Database User: The username used to access your Drupal database.
- ⛁ Database Password: The password for that database user.
- ⛁ Table prefix: Drupal uses table prefixes to keep things organized in the database. You’ll need to enter your Drupal table prefix here. It’s often something like
drupal_.
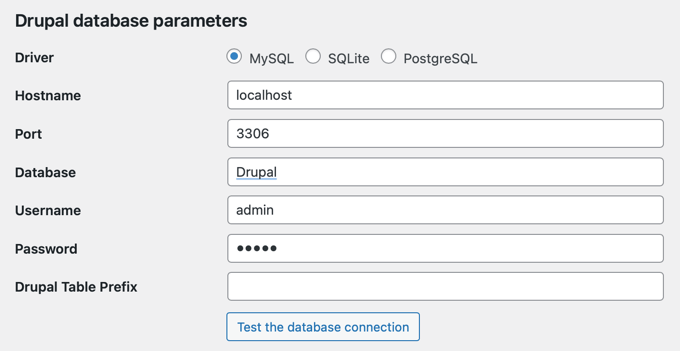

You may have written this information down when you first set up your Drupal website. Otherwise, advanced users can use FTP to find the details in your Drupal settings.php file. Or simply contact your Drupal hosting provider and ask for assistance.
Once you’ve entered all the database details, click the ‘Test database connection’ button in the importer. If everything is correct, then you should see a ‘Connection successful’ message.


Below the connection settings, you’ll see some additional options in the importer. These let you control what gets imported, like featured images, content images, and other things.
Just leave the default settings as they are for your first import.
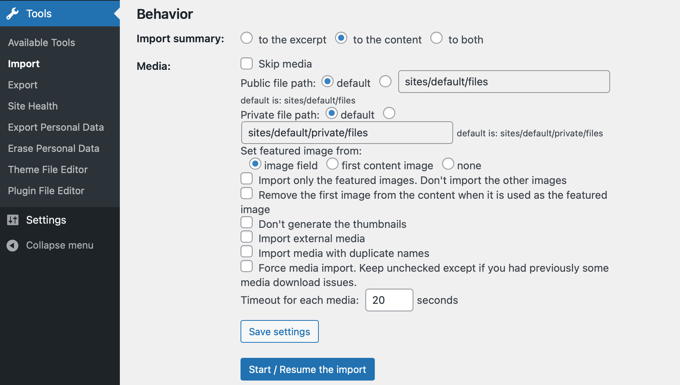

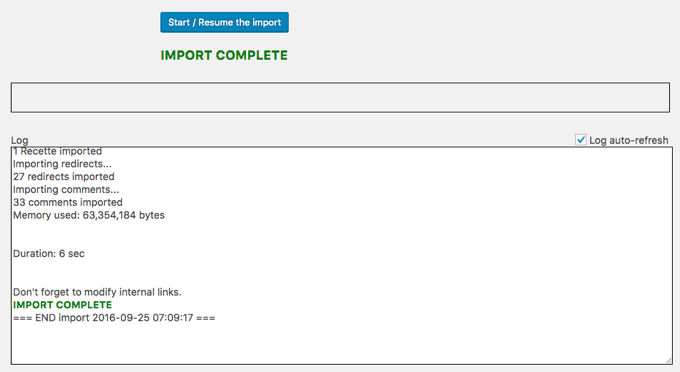
When you’re ready, you can start the import by clicking the big ‘Start / Resume the Import’ button. The importer will start fetching your content from your Drupal website and bringing it into WordPress. It will also import your images, blog comments, and more.
The time it takes depends on the amount of content you have. Once the import is finished, you should see a success message.

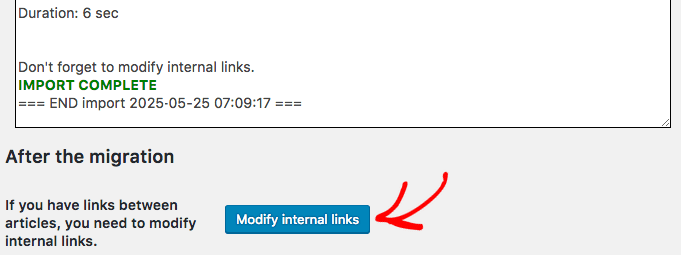
The FG Drupal to WordPress plugin can also help you fix internal links.
Sometimes, after a migration, links within your content might still be pointing to your old Drupal site structure. The plugin can try to update these to point to your new WordPress site.
Scroll down to the bottom of the importer page and click the ‘Modify internal links’ button.

Step 4. Pointing Your Domain Name to Your New WordPress Website
Now that your content is imported into WordPress, you need to make sure people will find your new site when they type in your domain name.
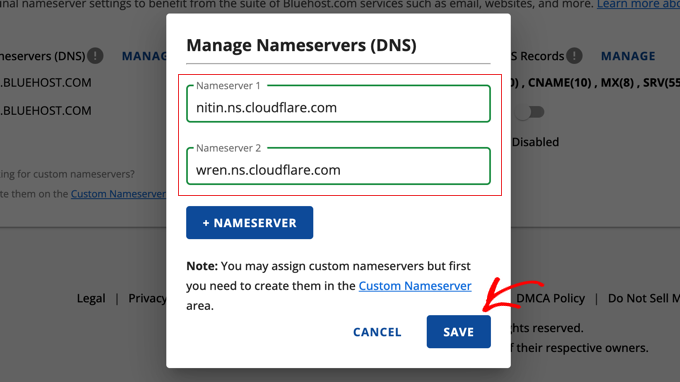
If you already have a domain name for your Drupal website (like yourwebsite.com), then you want to keep using that same domain for WordPress. You need to adjust your nameservers to point to your new WordPress site.
Your new WordPress hosting provider, like Bluehost, Hostinger, or SiteGround, will give you the nameserver information you need.
It usually looks like a pair of addresses, something like:
ns1.your-wordpress-hosting.com
ns2.your-wordpress-hosting.com
You change these settings with your domain name registrar, the company where you originally registered your domain name.
Sometimes, your domain registrar might be the same company as your hosting provider. But often, they’re separate. Common domain registrars include companies like Network Solutions and Namecheap.
You need to log in to your account at your domain registrar’s website. Once you’re logged in, find the settings for your domain name. Look for something like ‘DNS Settings’, ‘Nameservers’, ‘Domain Management’, or ‘Manage DNS’.
For example, here is the screen you will see on Bluehost.

You’ll find step-by-step instructions for many popular domain registrars in my guide on how to easily change domain nameservers.
Once you’ve updated your nameservers, it takes a little while for these changes to spread across the internet. This is called DNS propagation.
DNS propagation can take anywhere from a few hours to, in some cases, up to 24-48 hours. During this time, some people might still see your old Drupal website, while others might start seeing your new WordPress site.
Step 5. Setting Up Permalinks and Redirects
Your old Drupal site had its own way of structuring URLs. WordPress does things a bit differently with permalinks.
Because the URLs for each post will be different, anyone who has a link to your old Drupal content will end up seeing a frustrating ‘404 Page Not Found’ error on your new WordPress site.
To prevent broken links, you have to set up SEO-friendly permalinks in WordPress and redirect your visitors from your old Drupal URLs to the right pages on your new WordPress site.
Setting Up WordPress Permalinks
WordPress gives you a few different options for how your website addresses (URLs) are structured. These are called permalinks.
The ‘Post name’ setting is a popular choice. It creates nice, clean URLs that usually include the title of your page or blog post. This structure can be helpful for both visitors and search engines because it makes the URL easy to read and gives a clear idea of what the page is about.
In your WordPress dashboard, go to Settings » Permalinks. You’ll see a section called ‘Common Settings’. Find the option labeled ‘Post name’ and click the radio button next to it to select it.
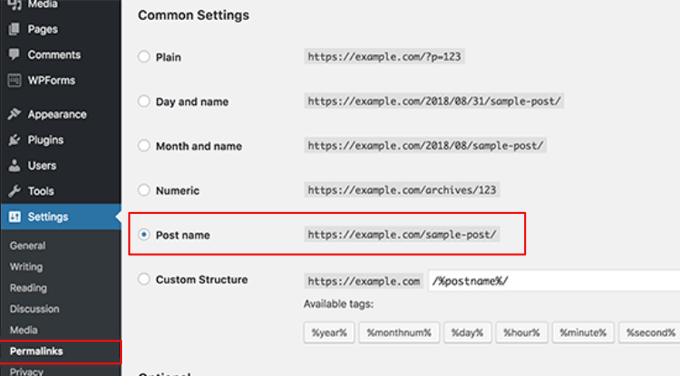

Then, just scroll down to the bottom of the page and click the ‘Save Changes’ button. Done!
Setting Up Redirects from Your Old Drupal URLs
Now you need to set up redirects to make sure your old Drupal links still work. To do this, you will need that list of old Drupal URLs you grabbed using Link Klipper in Step 1.
Tip: If you use the premium version of FG Drupal to WordPress to import your Drupal content, then it can automatically create these redirects for you.
To set up redirects easily in WordPress, you need to install and activate a plugin called Redirection. It’s free and it makes managing redirects a breeze. If you need help, see my guide on how to install a WordPress plugin.
Once activated, you’ll find the Redirection plugin settings under Tools » Redirection in your WordPress menu.


In the Redirection plugin interface, you’ll see fields for Source URL and Target URL:
- Source URL is where you enter your old Drupal website URL – the one you want to redirect from. Just include the part after the domain name, like
/my-old-page. - Target URL is where you enter the new WordPress URL for the same page. Again, just include the part after the domain name, like
/my-new-page.
Make sure the ‘301 – Moved Permanently’ option is selected for the ‘Match’ type (it’s usually the default). This tells search engines that the page has permanently moved to a new location, which is important for SEO.
Finally, click the ‘Add Redirect’ button to save the redirect.
Now, you’ll need to go through your list of old Drupal URLs and repeat these steps for each URL you want to redirect. It can be a bit repetitive if you have a lot of pages, but it’s worth the effort to avoid broken links and keep your SEO intact.
For detailed instructions, see my guide on how to set up redirects in WordPress.
Alternative: Using AIOSEO for Redirects
If you’re already using the All in One SEO (AIOSEO) plugin, or if you’re planning to use it to improve your website’s SEO, then it also has a redirection manager built in.
It’s a powerful WordPress SEO plugin that lets you easily set up full site redirects, plus it offers many other features to help your website rank higher in search results.
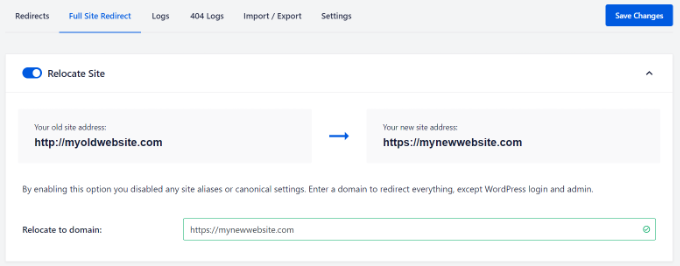

For example, its 404 error tracking can easily catch broken links, and you can add schema markup, custom breadcrumbs, local SEO modules, and much more.
Step 6. Setting Up Your WordPress Theme
To make your WordPress website look amazing, you need to choose and install a theme. These are ready-made design templates for your site that control its appearance, including the colors, fonts, layout of your pages, and how your blog posts are displayed.
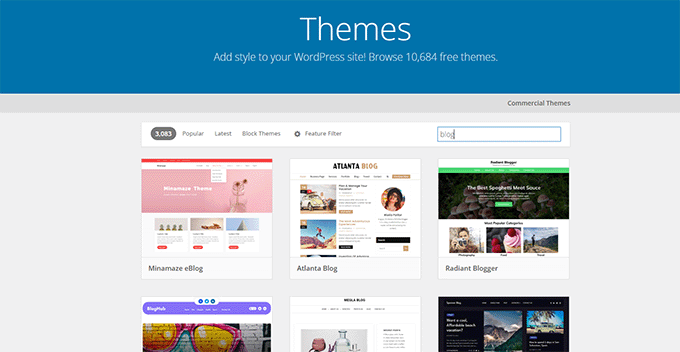

There are plenty of free themes and premium themes available for every possible niche and industry you can imagine.
In my experience, clean and simple designs tend to work best for most websites. They look more professional, they’re easier for visitors to navigate, and most importantly, they put the focus where it should be: on your content.
To help you narrow things down, I put together a guide on selecting the perfect WordPress theme. It walks you through the key things to consider and helps you avoid some common traps.
Then, you can follow my step-by-step guide on how to install a WordPress theme.
Alternatively, you can easily create a custom WordPress theme using drag-and-drop with the SeedProd website builder plugin. This is a great option if you want to perfectly match your old site’s look without writing code, giving you full control over the design.
Of course, if you prefer, you can always hire professionals to design and code a completely custom WordPress website for you.
Step 7. Install Essential WordPress Plugins
WordPress plugins are easier to install than Drupal modules. Thousands are available, both free and paid. So, I created a guide on how to pick the best plugins for your website.
But first, let me introduce you to some must-have plugins that I recommend for pretty much every new WordPress site:
- WPForms lets you create all sorts of WordPress forms – contact forms, surveys, order forms, and more. I use it on my own websites to allow readers to contact me and gather their feedback.
- SeedProd is a powerful drag-and-drop website builder. It lets you easily customize your WordPress design, create unique page layouts, or even build a complete custom theme.
- AIOSEO (All in One SEO) helps you optimize your blog for better search engine rankings. It’s the most powerful SEO plugin for WordPress.
- MonsterInsights connects to Google Analytics and makes it easy to understand your traffic and visitor behavior right inside your WordPress dashboard.
- OptinMonster helps you create popups, slide-in forms, and other opt-in forms to grow your email list and boost conversions.
You’ll find more ideas in my list of essential WordPress plugins. It’s packed with plugins I use and trust.
Alternative: Get Professional Help to Migrate Your Drupal Website


While many of you will be able to follow this guide to migrate from Drupal to WordPress, it’s still a pretty technical project. Maybe you’re not very techy or are simply too busy to do it yourself.
If that sounds like you, then our WPBeginner professional services team can lend a hand. We’ve helped tons of people with their WordPress websites, and we can help you too.
Here are a couple of ways we can make your Drupal to WordPress migration easier:
- Premium WordPress Support Services: Reach out to our team anytime you get stuck, have questions, or just want some personalized help with your migration. We can guide you through specific steps, troubleshoot issues, or even take over certain tasks for you.
- Quick Site Launch Service: Want a completely fresh start with a brand new, custom WordPress website? Our Quick Site Launch service team can design and build a website from the ground up. And we can handle the whole content migration from Drupal.
If you’re curious to learn more about these services or if you just have some questions about migration in general, then we’re here to chat! You can easily get in touch with our support team on our Website Design Services page.
Bonus: Learning WordPress
Now that you have a new WordPress website, you’ll want to learn more. Luckily, we have lots of free resources to help you quickly become a WordPress pro:
- The WPBeginner Blog is the heart of WPBeginner. It’s a WordPress learning library packed with thousands of easy-to-follow tutorials, guides, and how-to articles.
- The WPBeginner Dictionary helps you understand all the WordPress terms and jargon, like a WordPress translator.
- WPBeginner Videos walk you through common WordPress tasks step-by-step, visually, from basic to more advanced techniques.
- Our WPBeginner YouTube Channel is packed with WordPress tips, tutorials, and how-tos to help you stay up-to-date with the latest WordPress goodness.
- The WPBeginner Blueprint gives you a peek behind the scenes and shows you our recommended WordPress setup.
- WPBeginner Deals offer exclusive discounts and coupons on WordPress themes, plugins, hosting, and more.
I hope this tutorial helped you move your site from Drupal to WordPress. You may also want to see our ultimate WordPress SEO migration checklist for beginners or our expert pick of the best WordPress migration services.
If you liked this article, then please subscribe to our YouTube Channel for WordPress video tutorials. You can also find us on Twitter and Facebook.

