
What is LinkedIn Sales Navigator?
LinkedIn Sales Navigator is a tool that helps salespeople find potential customers on LinkedIn. It lets you search for people using filters like seniority level, company size, and job title, making it easier to find the right leads.
Sales Navigator allows you to save your searches so you don’t have to redo them, and it gives you recommendations for people who might be a good fit for your product or service. You can also send messages (called InMail) to people even if you’re not connected with them on LinkedIn.
It integrates with Customer Relationship Management tools to help businesses keep track of interactions, so they stay organized and follow up with people at the right time.
Why do you need Sales Navigator?
You need LinkedIn Sales Navigator if you’re looking to find new customers quicker (by using search filters for job title, company size, and more), track your contacts, message people outside your network, and get lead suggestions.
LinkedIn Sales Navigator offers the following three advantages:
- It allows you to send more personalized connection requests compared to the free version.
- You get 50 extra inMail messages per month, making it easier to connect with prospects.
- Find the most relevant leads with filters like job title, location, or seniority level. This helps you personalize your LinkedIn outreach and improve your acceptance rate.
Free LinkedIn accounts also have limits on how many search results they can get, which is 1000 profiles. Sales Navigator removes this cap, giving you unlimited results and advanced tools like job change alerts and keyword tracking.
How to use LinkedIn Sales Navigator to generate leads
LinkedIn Sales Navigator is as amazing as it is complex. Because it comes with so many advanced features, it can seem difficult to understand what each one does and how it can help you find prospects. This is where we come in with the important explanations.
Here is how you can use LinkedIn Sales Navigator effectively to generate leads:
- Use its advanced search capabilities
- Take advantage of Boolean search
- Use saved searches to automate lead generation
- Craft lead lists
- Send InMails to connections
- Set follow-up alerts
- Make sure search results don’t include clients and competitors
1. Use its advanced search capabilities
With a free LinkedIn account, you get a limited amount of filters that you can use when searching. The number rises with Sales Navigator, which makes it simpler to refine results and locate relevant prospects.
Source
Here is a simple step-by-step view of how you can use Sales Navigator search filters to your best advantage:
- Log in to LinkedIn Sales Navigator.
- Select “Advanced Search” in the search bar. You can search for Leads or Accounts depending on your goal.
- Use filters to search more specifically. Key filters include:
- Keywords: Enter specific terms related to your ideal leads (e.g., “marketing manager”).
- Geography: Select a location, such as a city, region, or country.
- Job title: Target decision-makers or specific roles like “CEO” or “Product Manager.”
- Company size: Focus on businesses of a particular size (small, medium, or large).
- Seniority level: Filter by roles like entry-level, manager, or executive.
- Combine multiple filters for precision. For example, search for “Marketing Directors” in “Tech Companies” within “San Francisco.”
- Once you find relevant profiles, save them as leads for tracking updates and outreach.
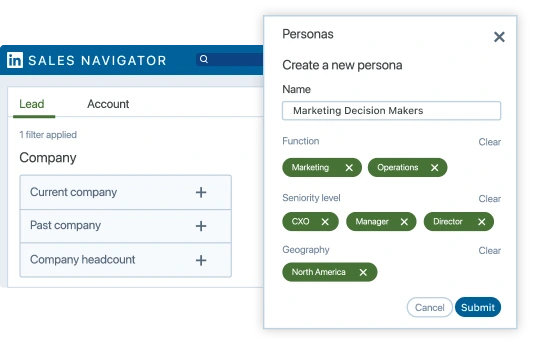
To make the most of the filters above, you can create Personas in Sales Navigator. Personas let you group leads based on key characteristics, so you can quickly apply filters for common buyer types, like “Marketing Executives in Tech.”
To create a Persona in Sales Navigator:
- Sign in to Sales Navigator.
- Click Personas below the Help icon or Show all personas on the homepage.
- Click Create new persona +.
- Name your Persona (max 35 characters).
- Use filters like:
- Functions
- Seniority level
- Job titles
- Geography
- Click Save.
2. Take advantage of Boolean search
Boolean search is a way to narrow down your results using special words, called operators, like AND, OR, and NOT to include or exclude certain terms.
Here’s how Boolean search works:
- Use quotation marks for exact phrases, like “project manager”, to find specific titles or phrases. Stick to straight quotation marks (“) since curly ones (“) aren’t supported.
- Exclude terms by typing NOT before them, e.g., engineer NOT software, to filter out unwanted results.
- Include multiple options by using OR, like designer OR illustrator OR animator, to broaden your results.
- Use AND to ensure all terms appear, e.g., marketer AND content AND strategist. You don’t need to type AND; it’s implied if you list multiple terms.
LinkedIn prioritizes quotes, then parentheses, followed by NOT, AND, and OR.
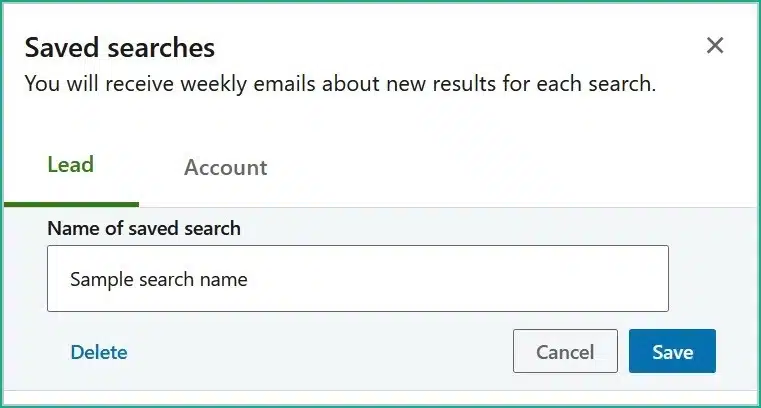
3. Use saved searches to automate lead generation
You’ve found the perfect combination of keywords and filters for your search and want to take advantage of it long term? Don’t worry, you won’t have to keep repeating the steps over and over again. Sales Navigator automates the process with the press of one button.
Source
By clicking the Save Search button, you notify Sales Navigator that you would like to be updated whenever new people match your particular interests. Sales Navigator will send out weekly emails letting you know if there are any new results to check out.
You can save up to 50 lead searches and 50 account searches and revisit them on the Saved Searches page.
4. Craft lead lists
Now that you’ve used all the search features Sales Navigator has to offer to target accounts, it’s time to save the ones you want to keep in a lead list. Thankfully, you can do that directly from the platform.
Once you’ve found your leads, click on the checkbox on the left to select them. Tap “Save to list” and click the “+” sign to create a new one. Give it a relevant title based on what you plan to do with it later.
When you visit Sales Navigator you will easily see all your lists on the Lead lists page.
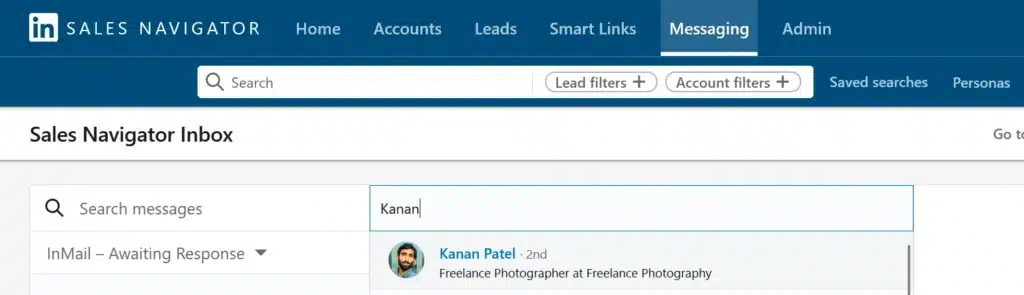
5. Send messages and inMails
One advantage of lists is that you can later send connection requests and message leads directly from them. You can also do it from your Sales Navigator inbox.
Source
You can send normal messages only to your connections. InMails are a form of message that can be sent out to anyone on LinkedIn, regardless of whether you are connected or not. However, the latter comes with limits, as you can only send 50 a month.
As a best practice, try connecting first. If they don’t accept your connection request, then use InMail to reach out, so you don’t waste your InMail credits.
6. Set follow-up alerts
Not everyone will get back to you from the beginning. It’s part of the sales process to be persuasive beyond the first outreach. That’s why once you’ve added leads to a list, Sales Navigator will allow you to turn on alerts for them. However, make sure that you don’t confuse persuasion with spamming.
You can be notified about things like job changes, new content, account growth, buyer intent, and more. This is valuable information you can use to reach out with a follow-up, either in a message or by leaving a comment or like.
7. Make sure search results don’t include clients and competitors
When sales professionals are looking for prospective clients, accidentally adding old or existing clients and competitors to their lead lists is redundant. You can make sure this doesn’t happen by finding and blacklisting those accounts.
Start by identifying the companies you want to exclude. Add these organizations to an Account List in Sales Navigator.
When running a lead search:
- Navigate to the Workflow section.
- Choose your Blacklist option.
- Click Exclude to filter out leads associated with the companies in your account list.
By doing this, Sales Navigator will automatically exclude anyone working at the companies you’ve blacklisted. This way, your search results stay focused on the right prospects while avoiding overlap with existing clients or competitors.
7 best practices when using LinkedIn Sales Navigator
LinkedIn Sales Navigator gives sales professionals access to features that can make their lead generation efforts more efficient and fruitful. By using it to its full potential, Sales Navigator users can make sure they don’t let any warm leads slip through their fingers.
Here are seven best practices when using LinkedIn Sales Navigator:
- Be careful with keywords
- Keep in mind many forget to update their job experience
- Avoid the Industry filter
- Be mindful of results when using the Function and Seniority filters
- Use tags and notes to keep track of prospects
- Use the “Share experiences with you” filter
- Optimize your profile
1. Be careful with keywords
If you want to make sure the filters on LinkedIn Sales Navigator work in your favor, then use them mindfully. One feature that can trip up sales teams just as much as it can help them is the keywords filter.
When you search by keyword, it will give you all the profiles that have that particular phrase anywhere on their profile. If you’re searching for something like “advertising”, for example, you might get people who studied advertising but whose job titles have nothing to do with it.
It’s best to keep the keywords filter for when you have very specific things you want to search for that you wouldn’t find in job titles, but rather summaries and descriptions.
2. Keep in mind many forget to update their job experience
Not everyone is as accustomed to the platform as others, and if they recently changed jobs they might forget to mark that they left the previous one.
This leads to one person appearing to have multiple jobs at present despite that not being true.
To avoid confusion from outdated LinkedIn profiles, here are some solutions:
- If someone appears to have multiple current roles, review the dates and descriptions in their “experience” section to identify their actual status.
- On Sales Navigator, refine your search using filters like “current company” to focus on up-to-date information.
- If you’re unsure about someone’s current role, send a polite message to clarify. A friendly question can quickly clear up any uncertainty.
- Look at their recent posts or activity, as this can offer clues about their most recent position or employer.
3. Avoid the Industry filter
This filter should help you find people working at companies in your industry, but it doesn’t take into account a common mistake people make when filling out their LinkedIn profiles. You are asked to add your Industry in your account details, not when you add your experience.
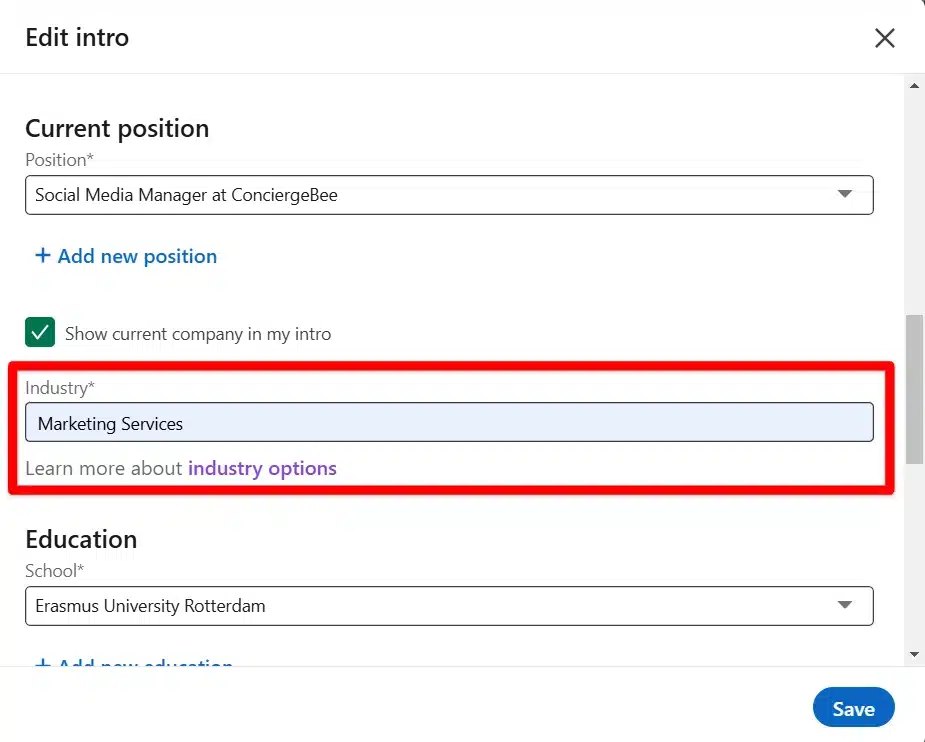
Despite the Industry field referring to the company you work for, many people confuse it to mean what role they have in the company. If, for example, someone works as a marketer in a construction firm, they’re very likely to set their industry as “Marketing” despite that being untrue for the business.
4. Be mindful of results when using the Function and Seniority filters
These filters rely on LinkedIn’s algorithms, which make guesses based on job titles and hierarchy.
For example, a CEO might get categorized as an owner, which isn’t always accurate, or a Marketing Manager could be grouped under the wrong function, like “Operations,” depending on how their role is described.
This guesswork means you might miss relevant leads or include people who don’t fit your criteria. If you already know the specific job titles you’re targeting, skip these filters and search by title instead.
The Function filter can help when you’re exploring unfamiliar roles, but for precise targeting, focusing on exact job titles is more reliable.
5. Use tags and notes to keep track of prospects
Saw something worth keeping in mind for later on a lead’s account? Or have you made progress and want to plan out the next steps? You can store information about your prospects easily with Sales Navigator’s notes and tags.
For example, tag a lead as “Needs follow-up”, and add a note with some valuable personal information of theirs that you can use in your next message.
These bits of text are only visible to you or others on your LinkedIn Sales Navigator account. Save time by adding them straight to the platform; then, you won’t need to go to another app to review or act upon your notes.
Here is how to add a note on Sales Navigator:
- Find the saved accounts or leads where you want to add a note.
- Click on View/add notes.
- Type your note in the provided field.
- Choose whether to save it as a Private note (visible only to you) or a Public note (visible to others on your account).
- If your account is CRM-synced, you can also opt to copy the note to your CRM.
- Click Save to finalize.
Here is how to add tags on Sales Navigator:
- Locate the saved lead or account you want to tag.
- Click on the View/Add Tags button, usually located near the lead or account details.
- Enter the name of the tag you want to use.
- If the tag already exists, select it from the list; if not, create a new one by typing it and hitting Enter or selecting the add option.
- Click Save to apply the tag to the lead or account.
6. Use the “Share experiences with you” filter
The Sales Navigator search features a number of useful filters, and “Share experiences with you” stands out as particularly helpful. By applying this filter, you can discover which leads you have common ground with.
Finding users who have similar experiences can help you connect with them on a deeper level. Sharing these interests makes it easy to start a conversation and establish rapport, both of which are crucial to closing the deal.
7. Optimize your profile
Using Sales Navigator isn’t only about other accounts, it’s about yours too. It increases your visibility, which means you should have a profile that captures attention and keeps it.
Make sure you tick the following boxes:
- Good profile and cover pictures
- Keyword-rich summary
- Relevant and concise headline
- Current job title
- Clear breakdown of experience
- Up-to-date contact information
- Posts that show your expertise and advertise your services/products


