The scariest thing about laptop theft isn’t losing the hardware—it’s that your unencrypted drive can be read on any computer. Windows has built-in protection for this. You just have to know where to find it.
Why Do People Avoid Encryption?
For years, I avoided BitLocker like the plague. The fear of accidentally locking myself out of my own files kept me from enabling what’s arguably Windows’ most important security feature. And I wasn’t alone in this thinking.
The horror stories I’d heard from people who lost all their data only made this fear worse. A BIOS update from your manufacturer can trigger BitLocker to demand a recovery key at boot. The TPM (Trusted Platform Module) chip that stores your encryption configuration sees the BIOS change as a potential security threat. Without that recovery key, your data is as good as gone.
Many people also believe they don’t have anything worth protecting. But think about what’s actually on your laptop—synced text messages from your phone, that random note with your financial information, family photos and videos, saved passwords in your browser, and countless personal documents. If your laptop gets stolen, you’ll likely lose more than just a computer.
Performance Impact Is Real
The other genuine concern with encryption is performance impact. In my testing, the Samsung 970 EVO Plus 256GB showed about a 25% drop in sequential read speeds when encrypted (2747 MB/s vs. 3450 MB/s unencrypted), while sequential writes stayed nearly the same, closer to 2300 MB/s.
Random read performance also improved without encryption, which does translate into slightly quicker app launches and file loading. That said, the difference in everyday use is more subtle than the benchmarks suggest—snappier here and there, but not a night-and-day change.

Why You Should Enable Device Encryption
Modern iPhone and Android phones automatically encrypt your data when you enable lock screen protection. Similarly, all Apple computers with T2 chips also offer automatic data encryption out of the box. The encryption on these devices feels so seamless that you probably never even noticed it was there. That’s exactly how it should work—protecting your data silently in the background while you go about your day.
If someone steals your unencrypted laptop, they can pop out the hard drive, connect it to another computer, and browse through your files as if they belonged to them. With encryption enabled, no one can use the drive without formatting it first, which would remove any and all data from it.

Similarly, selling or donating old computers becomes less risky when you know the data was encrypted. Even if you forgot to properly wipe the drive, the new owner can’t access your old files without the encryption keys.
It’s even more critical for businesses to encrypt devices that store sensitive information. A stolen laptop with unencrypted customer data can lead to massive lawsuits and destroyed reputations. But even for personal use, the peace of mind alone makes it worthwhile.
If you don’t want to use Microsoft’s built-in encryption or need more flexibility, there are excellent third-party encryption apps for Windows, like VeraCrypt, Boxcryptor, or Cryptomator. These work independently of your Windows account and can be accessed by mounting on any computer with just a passphrase.
How to Enable Device Encryption
Microsoft has been quietly enabling device encryption by default on new Windows 11 installations, regardless of how you set up your computer. Whether you sign in with a Microsoft account or create a local account using workarounds to bypass the internet requirement, encryption is turned on automatically.
The important difference lies in where your recovery key gets stored. With a Microsoft account, your recovery key is automatically saved to the cloud. But with a local account, the encryption remains in a suspended state, with the key stored only on your local drive. This way you’re neither fully protected nor do you have a proper backup of your recovery key.

To complete the encryption process, you’ll need to sign in with a Microsoft account, which then uploads the recovery key to the cloud.
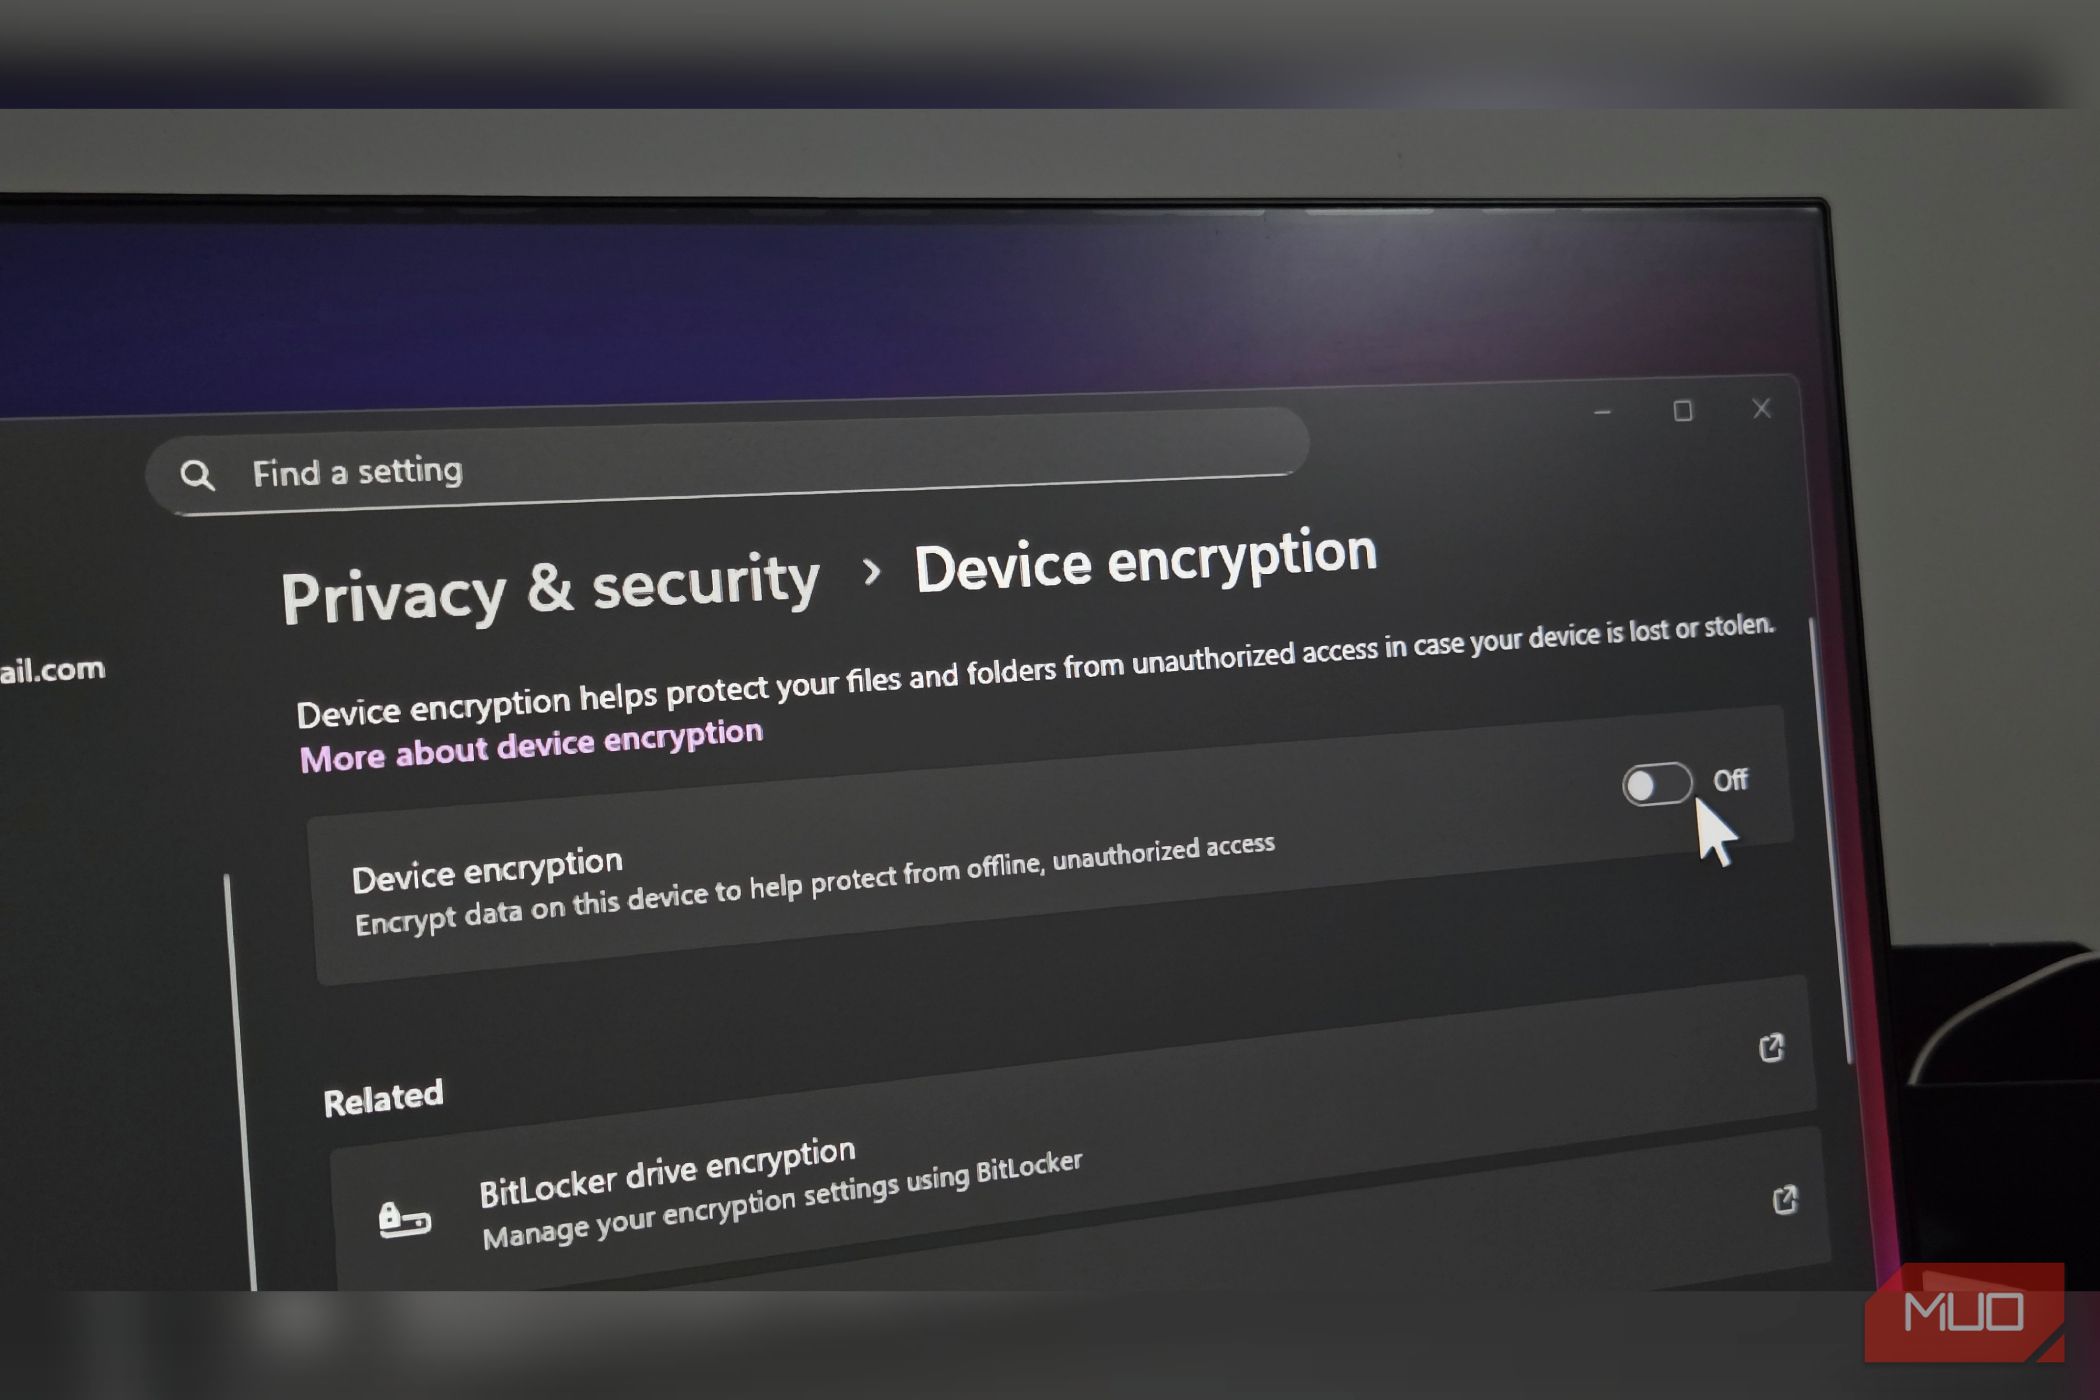
If you recently bought a new computer or performed a clean Windows 11 installation, check your encryption status immediately. Open Settings > Privacy & security, then click Device encryption. If you see Device encryption is on, you’re already protected.
If you see a yellow warning stating Sign in with your Microsoft account to finish encrypting the device, your encryption is incomplete. Click Sign in and log in to your Microsoft account to properly secure your system and backup your recovery key.

The encryption options available depend on your Windows edition and hardware. Windows 11 Home includes a lighter version of BitLocker known as Device Encryption, while Pro and Education editions offer full BitLocker with comprehensive management features and more control over your security settings.
Device Encryption on Windows 11 Home
Windows 11 Home keeps things simple. If your computer supports it (most modern machines do), device encryption turns on automatically when you sign in with a Microsoft account on a new installation.
If you upgraded to Windows 11, you’ll need to manually enable it in the Settings. Go to Settings > Privacy & security > Device encryption and toggle it on. That’s it. Windows handles the rest automatically, including saving your recovery key to your Microsoft account.
For most people, this simplicity works quite well as long as you have access to your Microsoft account.
BitLocker Encryption on Windows 11 Pro and Education
BitLocker offers everything device encryption does, plus extensive management features. You can encrypt specific drives, use different authentication methods, and most importantly, choose multiple backup locations for your recovery keys from the start.
To enable BitLocker, click Start, type Manage BitLocker, and open it from the search result. Select your drive, click Turn on BitLocker, and enter a password when prompted. Windows will guide you through the setup, including the steps of backing up your recovery key.

BitLocker also lets you encrypt external drives, which device encryption can’t do. This is useful if you back up or save sensitive data to USB drives or external SSDs.
How to Save the Recovery Keys
Now, the most crucial part of device encryption is safely backing up the recovery key. Your recovery key is the master key to your encrypted data; without it, you can’t access your data if you cannot log in to your user account.
Windows, by default, doesn’t allow you to store your copy on the encrypted drive itself, which is good. Instead, save it to your Microsoft account.
You can locate your recovery key from your Microsoft account. Go to BitLocker recovery keys, and sign in to your Microsoft account. Now you can see all the recovery keys associated with your laptop.

Additionally, save a backup of the recovery key to your OneDrive personal vault if you have Microsoft 365, and a digital copy to a USB drive that you keep separate from your computer. Uploading a copy to your password manager will give you quick access to your recovery key on your phone when you need it.
For extra safety, include notes about which key belongs to which device. After a few years and multiple computers, those 48-digit recovery keys all start looking the same. Save each key by the device name you generated it on and the date. And don’t forget that encrypting your backup data is just as important as encrypting your main drive.
Remember to update your backed-up keys if you ever decrypt and re-encrypt your drive. The old keys won’t work anymore, and you don’t want to discover this during an emergency.
Device Encryption Protects Your Data, Even If Performance Takes a Hit
Yes, you need to be responsible about backing up your recovery keys. And there’s a small chance you could lock yourself out if you’re careless. But the consequences of not doing it can be far worse. Every other device you own already encrypts your data by default, so why leave your Windows PC to chance?
If you’re worried about the performance impact, then test it yourself. Turn on device encryption if it’s not already on and check the impact on your system performance. You can always decrypt from Settings > Privacy & security and toggle the switch to turn Device encryption off.


