Why Performance Matters in Web3
IN 2025, Web3 applications must compete with Web2’s seamless experience. Slow transactions, laggy interfaces, and unreliable data plague many dApps, often owing to poorly optimized Remote Procedure Call (RPC) usage.
Here, I tested GetBlock’s free tier (5K daily requests, 5 RPS, and multi-chain support). Their paid plans have incredible features; however, for testing, the free tier still offers a decent opportunity to build production-ready dApps at zero cost—if you know how to optimize it.
I tested GetBlock’s incredible capabilities and attempted to organize the guide into easy-to-understand language. Essentially, this guide will walk you through building a cross-chain token bridge with real-time updates while maximizing GetBlock’s free limits.
📥 GetBlock RPC: Free Tier Capabilities & Strategic Advantages
A. Free Plan Technical Specifications (2025 Update)
- Throughput: 5 requests per second (RPS)
- Daily Limit: 5,000 requests
- Protocol Support: REST, JSON-RPC, WebSocket, gRPC, GraphQL
- Networks: 55+ blockchains (Ethereum, Solana, Polygon, BSC, etc.)
This is a table with a more detailed description.
|
Feature |
Free Tier Limit |
Ideal Use Case |
|---|---|---|
|
Requests/Day |
5,000 |
Prototypes, MVP dApps |
|
Requests/Second |
5 RPS |
Wallet integrations |
|
Chains Supported |
55+ (EVM, Solana, etc.) |
Cross-chain bridges |
|
WebSocket Access |
✅ Yes |
Real-time event tracking |
📥Hidden Advantages for Performance Optimization
- Multi-Chain Single API Key – Reduces complexity by managing Ethereum, Polygon, and Solana via one endpoint.
- Testnet Faucets – Free MATIC for rapid iteration.
- WebSocket for Real-Time Data: Avoid polling and saving requests.
What We’re Building
We are building a cross-chain token bridge that allows users to transfer tokens between Polygon and Binance Smart Chain using a multichain wallet dashboard. The solution will include efficient RPC usage, real-time balance updates, and many more.
It is gonna be interesting, stay tuned😊.
Tech Stack
|
Component |
Technology |
Purpose |
|---|---|---|
|
Frontend |
React + Vite |
Fast UI rendering and state management |
|
Blockchain |
Ethers.js |
RPC interactions, smart contract calls |
|
Backend |
Node.js (optional) |
Caching and fallback layer for efficient use |
|
RPC Provider |
GetBlock Free Tier |
BSC and Polygon RPC data |
Great — let us build the complete, in-depth Web3 dApp project using GetBlock’s free RPC tier in 2025.
📁 Final Project Directory
Make sure that your final project’s directory looks like this. You can update your directory according to the following diagram stepwise.


💻 Project Setup
👉Initialize the Project
mkdir polygon-bsc-bridge && cd polygon-bsc-bridge
npm init -y
npm install --save-dev hardhat
npx hardhat
Subsequently, the following dependencies should be installed:
npm install dotenv ethers
npm install --save-dev @nomicfoundation/hardhat-toolbox
👉Get Your GetBlock API Key
- Sign up at GetBlock.io
- Grab your free API key from the dashboard
- Note your endpoints:
⚛️Configure .env File
Create .env in root:
MNEMONIC="your_12 words mnemonic phrase"
BSC_RPC_URL="https://bsc-testnet.getblock.io/YOUR_API_KEY/jsonrpc"
POLYGON_RPC_URL="https://polygon-testnet.getblock.io/YOUR_API_KEY/jsonrpc"
⚠️ Always use TEST ACCOUNTS for development.
⚠️ Keep mnemonic safe — don’t share it publicly.
⚡Update hardhat.config.js
👉Please update pre-created hardhat.config.js in the root directory.
require("@nomicfoundation/hardhat-toolbox");
require("dotenv").config();

const { MNEMONIC, BSC_RPC_URL, POLYGON_RPC_URL } = process.env;

function getAccounts() {
    if (!MNEMONIC || MNEMONIC.split(" ").length !== 12) {
        console.warn("⚠️ Invalid MNEMONIC, no accounts loaded.");
        return [];
    }
    return { mnemonic: MNEMONIC };
}

module.exports = {
    solidity: "0.8.20",
    networks: {
        bscTestnet: {
            url: BSC_RPC_URL,
            accounts: getAccounts(),
            gasPrice: 25000000000, // Set minimum gas price to 25 Gwei
        },
        polygonAmoy: {
            url: POLYGON_RPC_URL,
            accounts: getAccounts(),
            gasPrice: 25000000000, // Avoid "gas price below minimum" error
            timeout: 60000, // Increase timeout for better deployment reliability
        },
    },
};
💡Smart Contracts – Lock & Mint
We’ll create three essential contracts here:
- ✅ Token.sol — ERC20 token deployed on both BSC & Polygon
- ✅ BSCBridge.sol — Lock tokens & emit event on BSC
- ✅ PolygonBridge.sol — Mint tokens on Polygon (only by admin/relayer)
📁 Location
All smart contracts go into:/contracts/
Please re-check the directory structure in the Figure 1.
1️⃣ Token.sol – Shared Token Contract
Basic ERC20 token.
📄 contracts/Token.sol
// SPDX-License-Identifier: MIT
pragma solidity ^0.8.20;

import "@openzeppelin/contracts/token/ERC20/ERC20.sol";
import "@openzeppelin/contracts/access/Ownable.sol";

contract BridgeToken is ERC20, Ownable {
    constructor(address initialOwner) ERC20("BridgeToken", "BRG") {
        _mint(initialOwner, 1_000_000 * 10 ** decimals());
        transferOwnership(initialOwner); // Explicitly assigning ownership
    }

    function mint(address to, uint256 amount) external onlyOwner {
        _mint(to, amount);
    }
}
2️⃣ BSCBridge.sol – Lock Contract on BSC
This locks tokens and emits TokenLocked event.
📄 contracts/BSCBridge.sol
// SPDX-License-Identifier: MIT
pragma solidity ^0.8.20;

import "./Token.sol";

contract BSCBridge {
    BridgeToken public token;
    address public admin;

    event TokenLocked(address indexed user, uint256 amount, string targetChainAddress);

    constructor(address tokenAddress) {
        token = BridgeToken(tokenAddress);
        admin = msg.sender;
    }

    function lockTokens(uint256 amount, string memory targetChainAddress) external {
        require(amount > 0, "Amount must be > 0");
        token.transferFrom(msg.sender, address(this), amount);
        emit TokenLocked(msg.sender, amount, targetChainAddress);
    }

    function withdraw(address to, uint256 amount) external {
        require(msg.sender == admin, "Not admin");
        token.transfer(to, amount);
    }
}
🧠 How it works:
- Users approve and call
lockTokens - Contract emits
TokenLocked - Backend listens and triggers mint on Polygon
3️⃣ PolygonBridge.sol – Mint Contract on POLYGON
Only a trusted relayer (admin) can mint tokens.
📄 contracts/PolygonBridge.sol
// SPDX-License-Identifier: MIT
pragma solidity ^0.8.20;

import "./Token.sol";

contract PolygonBridge {
    BridgeToken public token;
    address public admin;

    event TokenMinted(address indexed user, uint256 amount);

    constructor(address tokenAddress) {
        token = BridgeToken(tokenAddress);
        admin = msg.sender;
    }

    function mintTokens(address to, uint256 amount) external {
        require(msg.sender == admin, "Only admin can mint");
        token.mint(to, amount);
        emit TokenMinted(to, amount);
    }
}
🧠 How it works:
- Backend (trusted relayer) listens to BSC events
- Calls
mintTokenson Polygon Amoy via private key - Tokens minted for user
4️⃣ Deploy Scripts
Wait, don’t forget to install dependency for Contracts:
npm install @openzeppelin/contracts
👉Create scripts/deployBSC.js:
const hre = require("hardhat");

async function main() {
    const [deployer] = await hre.ethers.getSigners();
    console.log("Deploying contracts with account:", deployer.address);

    // Deploy Token
    const BridgeToken = await hre.ethers.getContractFactory("BridgeToken");
    const token = await BridgeToken.deploy(deployer.address);
    await token.waitForDeployment();
    const tokenAddress = await token.getAddress();
    console.log("BridgeToken deployed to:", tokenAddress);

    // Deploy BSCBridge
    const BSCBridge = await hre.ethers.getContractFactory("BSCBridge");
    const bridge = await BSCBridge.deploy(tokenAddress);
    await bridge.waitForDeployment();
    const bridgeAddress = await bridge.getAddress();
    console.log("BSCBridge deployed to:", bridgeAddress);
}

main().catch((error) => {
    console.error(error);
    process.exitCode = 1;
});
👉Create scripts/deployPolygon.js:
const hre = require("hardhat");

async function main() {
    const [deployer] = await hre.ethers.getSigners();
    console.log("Deploying contracts with account:", deployer.address);

    // Fetch native token balance (POL)
    const balanceBigInt = await hre.ethers.provider.getBalance(deployer.address);
    const balance = hre.ethers.formatEther(balanceBigInt);
    console.log(`Account balance: ${balance} POL`);

    if (parseFloat(balance) < 0.01) { // Ensure at least 0.01 POL is available
        console.error("⚠️ Warning: Your deployer account has insufficient POL balance. You need funds to deploy.");
        process.exit(1);
    }

    // Explicit Gas Configuration
    const gasLimit = 5_000_000;
    const gasPrice = hre.ethers.parseUnits("25", "gwei"); // Ensure minimum gas price is met

    // Deploy BridgeToken
    const BridgeToken = await hre.ethers.getContractFactory("BridgeToken");
    console.log("Deploying BridgeToken...");
    const token = await BridgeToken.deploy(deployer.address, { gasLimit, gasPrice });
    await token.deploymentTransaction().wait(1); // Wait for confirmations
    const tokenAddress = await token.getAddress();
    console.log("✅ BridgeToken deployed to:", tokenAddress);

    // Deploy PolygonBridge
    const PolygonBridge = await hre.ethers.getContractFactory("PolygonBridge");
    console.log("Deploying PolygonBridge...");
    const bridge = await PolygonBridge.deploy(tokenAddress, { gasLimit, gasPrice });
    await bridge.deploymentTransaction().wait(1); // Wait for confirmations
    const bridgeAddress = await bridge.getAddress();
    console.log("✅ PolygonBridge deployed to:", bridgeAddress);
}

main().catch((error) => {
    console.error("🚨 Deployment failed:", error);
    process.exitCode = 1;
});
5️⃣ Deploy the Contracts
This time, we deploy our contracts to the blockchain. Before this, make sure to have testnet tokens for the BSC and Polygon testnets in your MetaMask wallet. They can be obtained from free faucet sites such as the GetBlock, and BNB faucet.
First, let us try to deploy a contract to the BSC test; the run command npx hardhat compiles to compile, and then run the following command at the terminal:
npx hardhat run scripts/deployBSC.js --network bscTestnet
Once you deploy the contract to the testnet, you will see the following output in the terminal:


Second, the contract was deployed to the Polygon testnet. Run the following command at the terminal:
npx hardhat run scripts/deployPolygon.js --network polygonAmoy
The output of the terminal should be similar if everything is correct.
Note: Please keep both the contract addresses from the BSC and Polygon deployment to update.env files for the next step. The tokens deployed here are BRG and they can be tracked on BSC testnet and Polygon Amoy testnet explorers.
⚙️Backend Listener — Token Bridge Relayer
The relayer service listens to events from the BSC Bridge and calls the mintTokens() function of the Polygon Bridge.
📁 Directory Structure Update
Create the backend/ directory in your root folder:
mkdir backend && cd backend
npm init -y
npm install ethers dotenv
🔐 .env (Root-level)
Now, we update with the following details .env file.
BSC_BRIDGE="0x...your deployed BSCBridge address"
POLYGON_RPC_URL="0x...your deployed PolygonBridge address"
POLYGON_TOKEN="0x...your POLYGON token address"
🧠 You must replace the above values with real deployed addresses.
📄 backend/index.js — Main Relayer Logic
require("dotenv").config();
const { ethers } = require("ethers");

// Load env vars
const {
  MNEMONIC,
  BSC_RPC_URL,
  POLYGON_RPC_URL,
  BSC_BRIDGE,
  POLYGON_BRIDGE,
} = process.env;

// ABIs
const BSC_BRIDGE_ABI = [
  "event TokenLocked(address indexed user, uint256 amount, string targetChainAddress)"
];
const POLYGON_BRIDGE_ABI = [
  "function mintTokens(address to, uint256 amount) external"
];

// Setup Providers
const bscProvider = new ethers.JsonRpcProvider(BSC_RPC_URL);
const polygonProvider = new ethers.JsonRpcProvider(POLYGON_RPC_URL);

// Setup Wallets (derived from same mnemonic)
const walletMnemonic = ethers.Wallet.fromPhrase(MNEMONIC);
const polygonSigner = walletMnemonic.connect(polygonProvider);

// Setup Contracts
const bscBridge = new ethers.Contract(BSC_BRIDGE, BSC_BRIDGE_ABI, bscProvider);
const polygonBridge = new ethers.Contract(POLYGON_BRIDGE, POLYGON_BRIDGE_ABI, polygonSigner);

// Deduplication protection
const processedTxs = new Set();

const startRelayer = async () => {
  console.log("🚀 Relayer started. Listening for BSC lock events...");

  bscBridge.on("TokenLocked", async (user, amount, targetAddress, event) => {
    const txHash = event.transactionHash;

    if (processedTxs.has(txHash)) {
      console.log("⚠️ Duplicate event skipped:", txHash);
      return;
    }
    processedTxs.add(txHash);

    try {
      console.log(`🔒 ${user} locked ${ethers.formatEther(amount)} BRG → ${targetAddress}`);

      const tx = await polygonBridge.mintTokens(targetAddress, amount);
      await tx.wait();

      console.log(`✅ Minted ${ethers.formatEther(amount)} BRG on Polygon for ${targetAddress}`);
    } catch (err) {
      console.error("❌ Minting failed:", err);
    }
  });
};

startRelayer();
Start Relayer
From backend/ directory:
node index.js
If everything is set correctly, you should see:
🚀 Relayer started. Listening for BSC lock events...
Now your relayer listens 24/7 to BSC Testnet, and triggers minting on Polygon when locking happens.
🌐 Now, we are focused to build the Frontend Bridge dApp with React + MetaMask + Ethers.js
📁 Project Directory Update
npm create vite@latest frontend
cd frontend
npm install
npm install -D tailwindcss postcss autoprefixer
npx tailwindcss init -p
Create another .env to /frontend/.env :
VITE_BSC_BRIDGE=0xYourBSCBridge
VITE_BSC_TOKEN=0xYourBSCToken

VITE_POLYGON_BRIDGE=0xYourPolygonBridge
VITE_POLYGON_TOKEN=0xYourPolygonToken
Note: You would have already created the Polygon test net token just include the contract address in the .env file. The BSC testnet-based token can be created easily from here without any difficulties if you wish further testings. Therefore, creating tokens in the blockchain is simple and does not require extra stress-coding expertise.
1️⃣ frontend/src/bridge.js – Contract Logic
// src/bridge.js

export const BSC_BRIDGE_ADDRESS = import.meta.env.VITE_BSC_BRIDGE;
export const BSC_TOKEN_ADDRESS = import.meta.env.VITE_BSC_TOKEN;

export const BSC_BRIDGE_ABI = [
  {
    "inputs": [
      { "internalType": "uint256", "name": "amount", "type": "uint256" },
      { "internalType": "string", "name": "targetChainAddress", "type": "string" }
    ],
    "name": "lockTokens",
    "outputs": [],
    "stateMutability": "nonpayable",
    "type": "function"
  }
];

export const ERC20_ABI = [
  "function approve(address spender, uint256 amount) public returns (bool)",
  "function balanceOf(address account) public view returns (uint256)",
  "function decimals() view returns (uint8)"
];
2️⃣ frontend/src/App.jsx – React UI
import React, { useEffect, useState } from "react";
import Web3 from "web3";
import detectEthereumProvider from "@metamask/detect-provider";
import {
BSC_BRIDGE_ABI,
TOKEN_ABI,
BSC_BRIDGE_ADDRESS,
TOKEN_ADDRESS,
} from "./bridge";
function App() {
const [web3, setWeb3] = useState(null);
const [account, setAccount] = useState("");
const [tokenBalance, setTokenBalance] = useState("0");
const [amount, setAmount] = useState("");
const [targetAddress, setTargetAddress] = useState(""); // Polygon address input
const [status, setStatus] = useState("");
// 🔗 Connect MetaMask Wallet
const connectWallet = async () => {
const provider = await detectEthereumProvider();
if (provider) {
try {
await provider.request({ method: "eth_requestAccounts" });
const web3Instance = new Web3(provider);
setWeb3(web3Instance);
const accounts = await web3Instance.eth.getAccounts();
setAccount(accounts[0]);
const networkId = await web3Instance.eth.net.getId();
console.log("Connected to network ID:", networkId);
if (networkId !== 97) {
setStatus("❌ Please switch to BSC Testnet in MetaMask.");
} else {
setStatus("✅ Connected to BSC Testnet.");
}
} catch (err) {
console.error("MetaMask connection failed:", err);
setStatus("❌ Failed to connect MetaMask.");
}
} else {
setStatus("❌ MetaMask not detected.");
}
};
// 💰 Load user's BRG token balance
const loadBalance = async () => {
if (web3 && account) {
try {
const token = new web3.eth.Contract(TOKEN_ABI, TOKEN_ADDRESS);
const rawBalance = await token.methods.balanceOf(account).call();
const formatted = web3.utils.fromWei(rawBalance, "ether");
setTokenBalance(formatted);
} catch (err) {
console.error("Balance fetch error:", err);
setStatus("❌ Failed to fetch BRG balance.");
}
}
};
// 🔐 Bridge Handler: Approve & Lock tokens
const handleBridge = async () => {
if (!amount || isNaN(amount) || parseFloat(amount) <= 0) {
setStatus("❗ Please enter a valid amount.");
return;
}
if (!web3.utils.isAddress(targetAddress)) {
setStatus("❗ Enter a valid Polygon address.");
return;
}
try {
const weiAmount = web3.utils.toWei(amount, "ether");
const token = new web3.eth.Contract(TOKEN_ABI, TOKEN_ADDRESS);
const bridge = new web3.eth.Contract(BSC_BRIDGE_ABI, BSC_BRIDGE_ADDRESS);
// Approve Bridge contract
setStatus("🔃 Approving tokens...");
await token.methods.approve(BSC_BRIDGE_ADDRESS, weiAmount).send({ from: account });
// Lock tokens on BSC
setStatus("🔐 Locking tokens...");
await bridge.methods.lockTokens(weiAmount, targetAddress).send({ from: account });
setStatus("✅ Tokens locked. Wait for minting on Polygon.");
setAmount("");
loadBalance();
} catch (err) {
console.error("Bridge error:", err);
setStatus("❌ Transaction failed: " + (err.message || "Unknown error"));
}
};
// 🔁 Effects: Connect wallet + load balance
useEffect(() => {
connectWallet();
}, []);
useEffect(() => {
if (web3 && account) {
loadBalance();
}
}, [web3, account]);
return (
<div className="min-h-screen bg-gray-900 text-white flex items-center justify-center px-4">
<div className="bg-gray-800 max-w-md w-full p-6 rounded-2xl shadow-2xl">
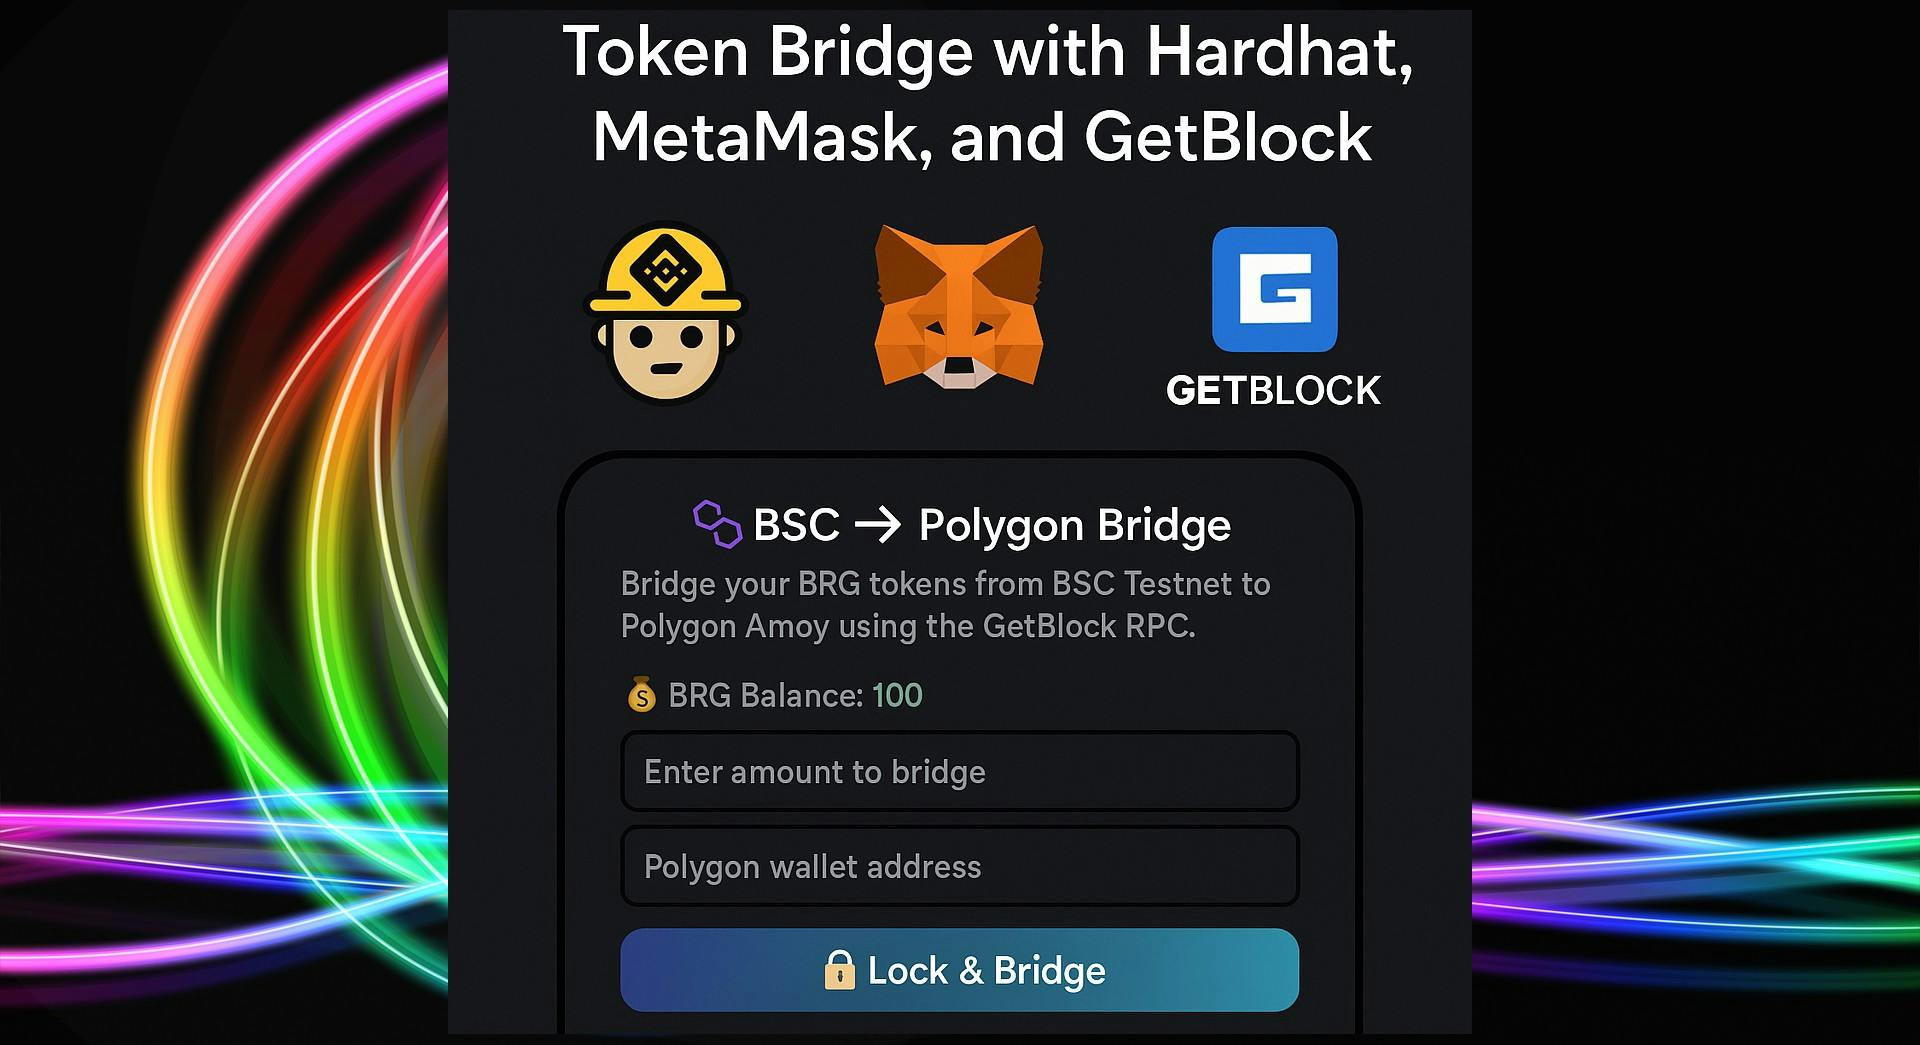
<h1 className="text-2xl font-bold text-center mb-4">🌉 BSC ➡ Polygon Bridge</h1>
<p className="text-sm text-center text-gray-300 mb-4">
Bridge your <strong>BRG</strong> tokens from <span className="text-yellow-400">BSC Testnet</span> to <span className="text-green-400">Polygon Amoy</span> using the GetBlock RPC.
</p>
<div className="text-center text-green-300 mb-4">
💰 BRG Balance: {tokenBalance}
</div>
<input
type="number"
className="w-full p-3 mb-3 rounded-lg bg-gray-700 text-white placeholder-gray-400 focus:outline-none"
placeholder="Enter amount to bridge"
value={amount}
onChange={(e) => setAmount(e.target.value)}
/>
<input
type="text"
className="w-full p-3 mb-4 rounded-lg bg-gray-700 text-white placeholder-gray-400 focus:outline-none"
placeholder="Polygon wallet address"
value={targetAddress}
onChange={(e) => setTargetAddress(e.target.value)}
/>
<button
className="w-full py-3 bg-gradient-to-r from-green-400 to-blue-500 hover:from-green-500 hover:to-blue-600 font-semibold rounded-xl shadow-md transition"
onClick={handleBridge}
>
🔐 Lock & Bridge
</button>
{status && (
<div className="mt-4 text-sm text-yellow-300 text-center font-mono">
{status}
</div>
)}
</div>
</div>
);
}
export default App;
3️⃣Create/Check index.html in frontend directory.
Make sure your index.html looks like this:
<!DOCTYPE html>
<html lang="en">
  <head>
    <meta charset="UTF-8" />
    <meta name="viewport" content="width=device-width, initial-scale=1.0" />
    <title>BSC → Polygon Bridge</title>
  </head>
  <body>
    <div id="root"></div>
    <script type="module" src="/src/main.jsx"></script>
  </body>
</html>
4️⃣Create main.jsx (or main.js) if using React in frontend/src directory:
import React from 'react';
import ReactDOM from 'react-dom/client';
import App from './App.jsx';
import './index.css';

ReactDOM.createRoot(document.getElementById('root')).render(
  <React.StrictMode>
    <App />
  </React.StrictMode>
);
Then edit Edit tailwind.config.js in the frontend directory:
/** @type {import('tailwindcss').Config} */
export default {
  content: [
    "./index.html",
    "./src/**/*.{js,ts,jsx,tsx}",
  ],
  theme: {
    extend: {},
  },
  plugins: [],
}
5️⃣Install dependencies
Install React, ReactDOM and @metamask/detect-provider in the frontend directory by running the following commands in the terminal:
npm install react react-dom
npm install @metamask/detect-provider
After that, start the dev server:
npm run dev
You will see your server starting at http://localhost:5173/. Once you visit the URL, dApp automatically ask you to connect MetaMask wallet by triggering a pop-up window.


Once you connect wallet, you see the frontend of dApp as follows:


Once your transactions get confirmed, you will see notification from MetMask as follows:


🧪Final Testing, Deployment Guide & Advanced Enhancements
✅ End-to-End Token Bridge Flow
|
Step |
Action |
Chain |
Actor |
|---|---|---|---|
|
1 |
User connects MetaMask |
BSC |
dApp |
|
2 |
Approves + locks tokens |
BSC |
dApp (user signs) |
|
3 |
TokenLocked emitted |
BSC |
Smart contract |
|
4 |
Relayer catches event |
Node.js |
Backend |
|
5 |
Relayer mints tokens |
Polygon |
Calls smart contract |
|
6 |
User sees tokens |
Polygon |
On-chain |
During the test, make sure to have a look at the following checklist.
✅Manual Test Checklist
👉Preparation:
- Deploy both tokens and bridge contracts, as discussed above.
- Fund your wallet on:
- BSC testnet faucet
- Polygon testnet faucet
- Configure .env in both root and
/frontend
✅ Test Steps:
|
# |
Test |
What to Expect |
|
|---|---|---|---|
|
1 |
Launch dApp |
MetaMask connects |
|
|
2 |
Approve & Lock 0.1 BRG (This is our test token) |
Tx completes, event logged |
|
|
3 |
Backend prints log |
TokenLocked event |
|
|
4 |
Tokens minted on Polygon |
TokenMinted event |
|
|
5 |
Check Polygon token balance |
Matches bridged amount |
✅ You can check Polygon balances using a custom block explorer by inputting your address.
🧠 3. Advanced Features & Security Improvements
Well, the demonstration so far in this tutorial was to safe to test the dApp in the testnet environment of the blockchain. If you are serious and want to go further, here are a few tips for you.
1️⃣ Nonce & Replay Protection
Add a mapping of processed tx hashes in the backend to prevent the reprocessing of the same event:
const processedTxs = new Set(); // Use DB in production

if (processedTxs.has(event.transactionHash)) return;
processedTxs.add(event.transactionHash);
2️⃣ Event Indexing with GraphQL (Optional)
You can use The Graph (when BSC indexing is needed) or integrate GetBlock’s webhooks for efficient event catching instead of polling.
3️⃣ Signature Verification for Minting (zkBridge-style)
During production, the PolygonBridge should not trust the relayer blindly. Instead:
- Lock emits a message hash
- User signs that message off-chain
- Submit signature to mint (optional layer)
4️⃣ Support Multiple Chains
You can make this bridge multichain using
- Chain IDs for tracking bridge source/destination
- Adding multiple token contracts
- Abstracting the relayer to handle many chains (Polygon, ETH Sepolia, etc.)
🚀 Deployment to Production (Optional)
If you are able to test the dApp in the testnet it is not hard for you to go mainnet-based dApp which you can deploy for the production. Here are some cool deployment options for you.
|
Component |
Deployment Option |
|---|---|
|
Frontend UI |
Vercel / Netlify / Cloudflare Pages |
|
Backend |
Railway / Render / VPS |
|
Smart Contracts |
Deployed already via Hardhat on GetBlock RPC |
|
RPC Gateways |
GetBlock Dashboard |
GitHub actions are used to automatically trigger deployments from commits.
📥Conclusion: Summary of Completed Bridge dApp Using APIs
GetBlocks offers battle-tested blockchain APIs. We have also attempted to prove this to some extent in this tutorial. To create new Web3 applications that are scalable and user-friendly, there is a need to overcome the constraints of public infrastructure. The block chain API layer is not plumbing; it is the spinal cord of the dApp. It is essential to understand the engineering complexities that lie behind quick and dependable APIs, including node optimization and worldwide distribution, intelligent load balancing, and persistent caching. Putting their faith in a provider such as GetBlock, who has made investments at all these infrastructure levels and provides dedicated nodes, multi-chain support, and the reliability expected of multinational enterprises, is no longer a luxury but a strategic move on the part of dApps serious about performance, scalability, and customer retention. By paying appropriate attention to these strata, developers will be able to ensure that innovative applications are developed on a bulletproof infrastructure, which will meet the needs of the second surge of Web3 adoption. Its future is rapid, consistent, and established on elegant infrastructure, and it is important to select its API partner. We believe that you have successfully performed the following checklist:
✅ ERC-20 Tokendeployed on BSC + Ploygon
✅Bridge contractsfor locking and minting
✅Node.js backend relayerto bridge assets
✅React frontend dAppwith wallet integration
✅GetBlock RPC endpointsused for seamless public testnet connection
✅Production-ready architecture with upgrade paths for security & scaling
If you have any question while testing this dApp, comment below. Thank You 🙏 !


