For many small business owners, translating a website feels like a luxury they simply can’t afford.
I know that feeling all too well. Here at WPBeginner, we’ve translated our site into multiple languages, including Spanish, Portuguese, and Japanese. And in the early days, we learned a tough lesson: traditional translation methods are incredibly time-consuming and expensive.
For a small business owner, that kind of investment often isn’t practical. But what if you could get all the benefits of a multilingual site without the high price tag?
That’s exactly what AI-powered tools offer. Instead of hiring a translator or digging into code, you can use artificial intelligence to quickly translate your entire WordPress site.
In this guide, I’ll show you how to translate your content step-by-step, even if you’ve never used artificial intelligence before.
Why Do You Need AI Translation for Your Website?
Translating your WordPress site into multiple languages can get complicated quickly.
Manual translation takes a lot of time, especially if you’re regularly updating your content. On the other hand, hiring professional translators can help with quality, but it’s often expensive and hard to manage.
That’s why many website owners use WordPress translation plugins. But not all of them deliver the same results.
Some tools have trouble matching your brand voice or handling industry-specific language. This can stop your content from connecting with your target audience.
This is where AI-powered translation stands out.
With the right settings, AI tools can follow your brand guidelines and use your custom glossary to produce more natural, consistent translations. They even learn from your edits, so translations improve over time.
Best of all, it’s fast. What used to take hours or days can now be done in just minutes, without sacrificing quality or consistency.
In this guide, I’ll show you how to use AI to translate your WordPress site. Here are the tools and methods I’ll cover:
Method 1: Using Weglot’s AI Language Model (For Your Entire Website)
Weglot is the best website translation tool, and their AI Language Model feature is a game-changer for translating your entire website.
Unlike basic translation tools that swap words from one language to another, Weglot’s AI actually learns your brand’s personality and creates translations that sound like you wrote them originally.
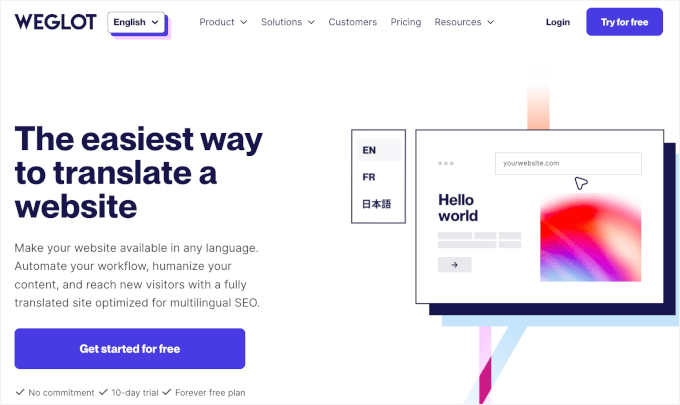

What’s great about this feature is that it actually learns from you. If you make any manual changes or add specific words to your glossary, then the AI will learn from them.
Over time, the more you use it, the better it gets at sounding just right for your business in every language. It continues to improve, so your translations become even more accurate and true to your brand.
For more insights into the tool, you can see our detailed Weglot review.
✋ Heads up: Weglot uses a two-step process. First, it instantly translates your entire website using high-quality machine translation. Then, you use its AI Language Model to review and improve those translations. I’ll walk you through both parts of the process!
Step 1: Get a Weglot Account
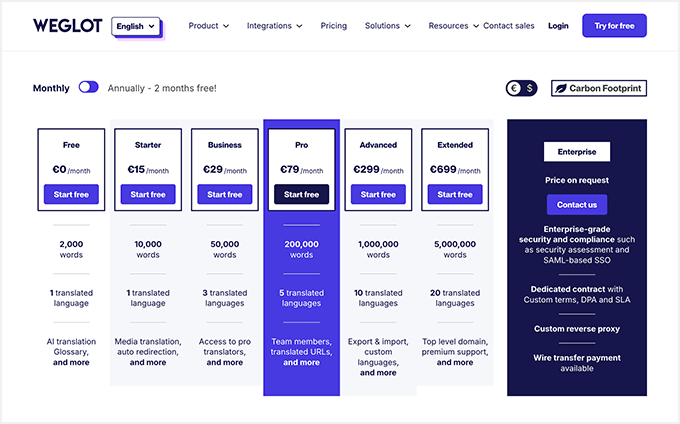
You’ll need a Weglot account to start translating your content. The free plan includes 2,000 translated words, but the AI Language Model is available in the Pro plan or higher.
Keep in mind that all plans come with a 14-day free trial, so you can try out the features and see if they fit your needs.
Go ahead and choose a plan from the Weglot website by clicking ‘Start free’ beneath the one you want to use.

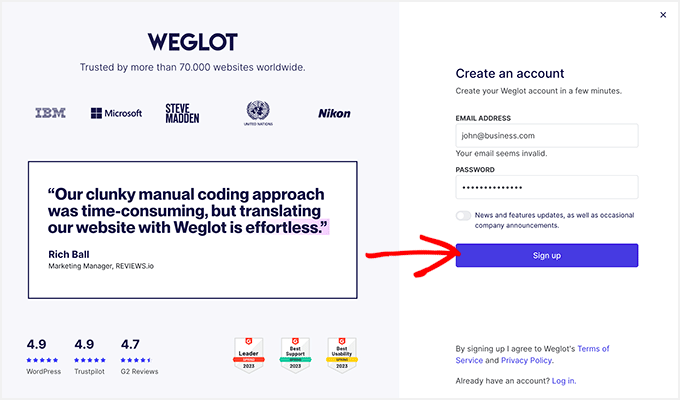
This will take you to the signup page.
You need to enter your email address, create a strong password, and click the ‘Sign up’ button.

Upon registration, Weglot will take you to the dashboard.
From here, you can go ahead and click the ‘Create project’ button.


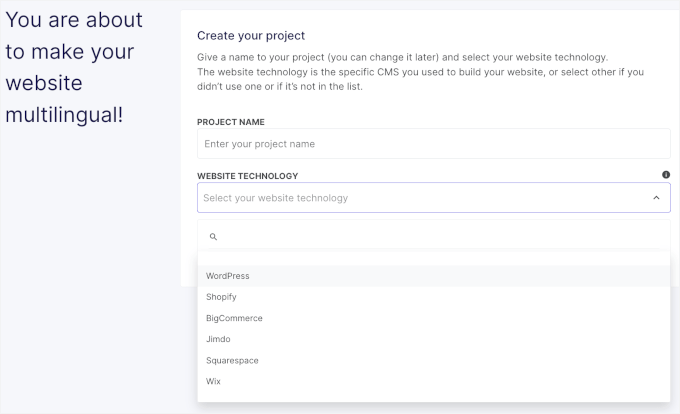
On the next screen, you need to enter a name for your new project. This is for your reference only, but we recommend using a clear name for easier organization.
After that, you’ll choose the website technology in the dropdown field. In this case, you can click ‘WordPress.’
With that done, go ahead and click ‘Next.’

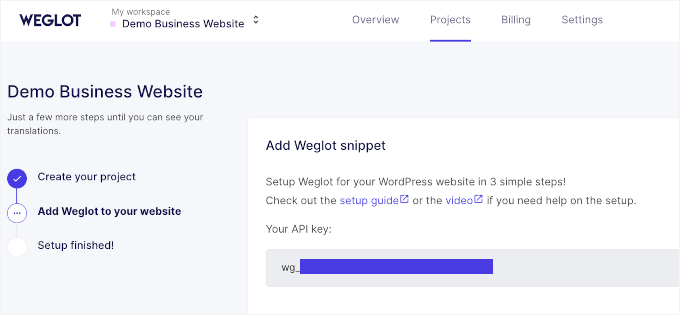
On the next screen, Weglot will show you its API Key.
Keep this tab open, as you’ll need it to connect your Weglot account and your WordPress website.

Step 2: Install and Activate the Weglot Plugin
Now, you can install the Weglot plugin on your WordPress site by going to Plugins » Add New and searching for ‘Weglot.’
Click the ‘Install Now’ button, then activate the plugin after the installation is complete.
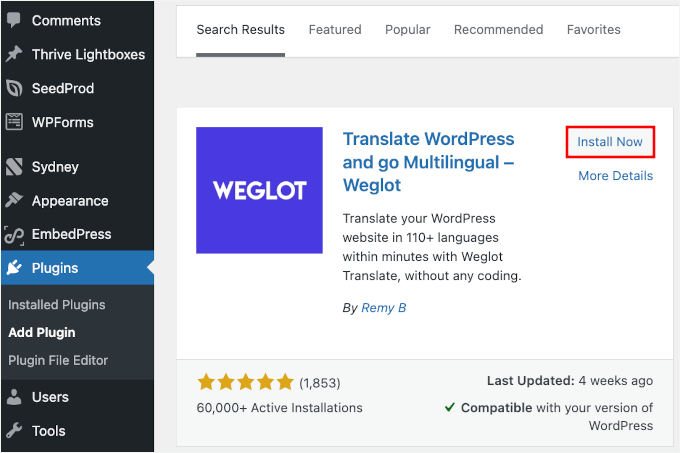

Upon activation, you’ll see a new ‘Weglot’ menu item appear in your WordPress admin sidebar.
For more information, check our guide on how to install a WordPress plugin.
Step 3: Set Up Your Weglot Account and Basic Translation
After activating the plugin, click on ‘Weglot’ in your WordPress admin area.
This will open the ‘Main configuration’ panel, where you’ll connect your WordPress site to your Weglot account.
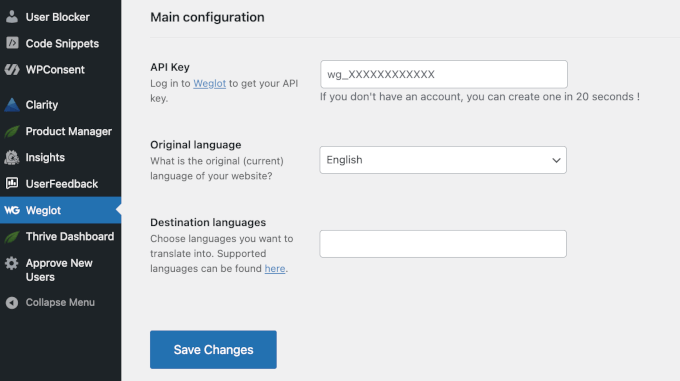

Simply copy the API key from your Weglot dashboard and paste it into the ‘API Key’ field.
Weglot will then verify your account.


Once verified, you’ll see a checkmark.
Next, you can then select your original language (the language your website is currently written in) and choose which languages you want to translate to.
🧑💻 Pro Tip: I recommend starting with just one or two target languages initially. This way, you can easily test the AI translation quality and fine-tune your settings before translating more content.
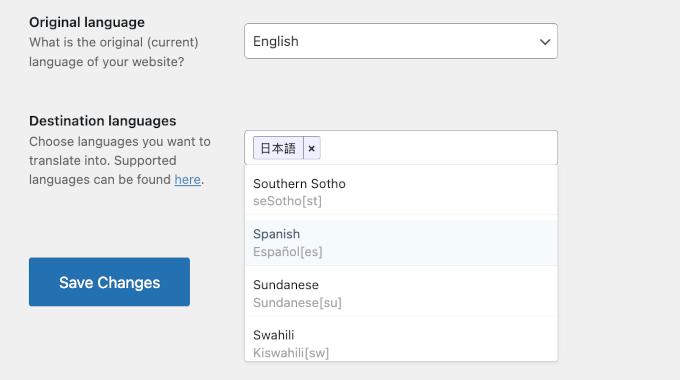

With that done, don’t forget to click the ‘Save Changes’ button.
And after a few seconds, you’ll see a success message.


If you close the notification, you might notice that Weglot unlocks more customization options.
On the same page, you can customize your language switcher design, configure the widget style, and choose where the language switcher appears on your site.
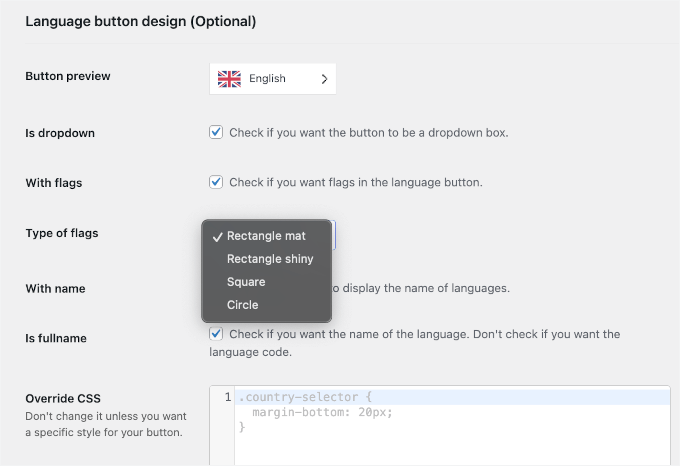

At this point, Weglot has applied a first layer of standard machine translation across your entire site. This provides you with a complete, translated version to get started.
If you visit your website, you’ll see the language switcher.


In the next steps, I’ll show you how to use the AI Language Model to refine and improve these translations to match your brand voice.
Step 4: Build Glossary Rules for Your Translations
To start improving your translations, it’s a good idea to build your glossary rules first.
A glossary is like a rulebook for the AI. It lists words that should never be translated (like your brand name, product names, or industry terminology) or that must always be translated a certain way.
Without a glossary, AI tools might translate these terms incorrectly or inconsistently. This can confuse your readers, which can harm the user experience or even damage your brand identity.
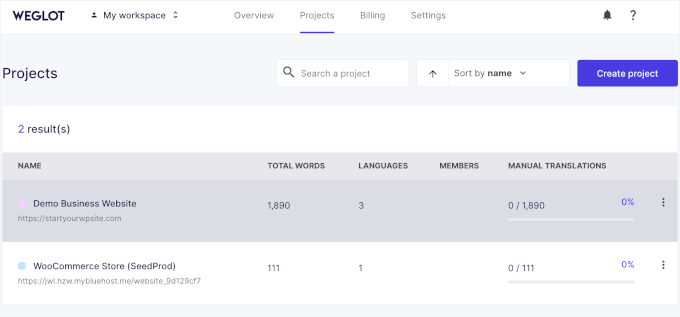
To start, let’s navigate to the ‘Project’ page and click the one you just created from the Weglot dashboard. This will open the project’s configuration panel.

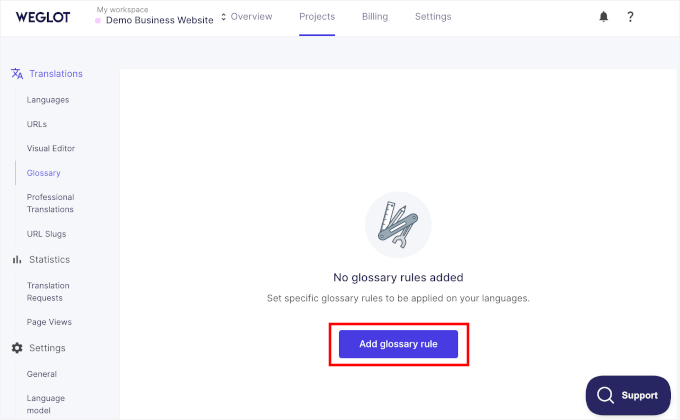
To build glossary rules, you can switch to the ‘Glossary’ tab.
Then, click the ‘Add glossary rule’ button

In the popup that appears, you will need to:
- Set up your rule, whether it’s to ‘Never translate’ or ‘Always translate.’
- Type in the word you want to set the rule for in the ‘Enter word’ field.
- Choose a target language or leave the ‘Language’ field empty to apply for all languages you have on your site.
- Make it case-sensitive (or not).
For example, my first rule is “Never translate ‘Example Website’ to Indonesian.”
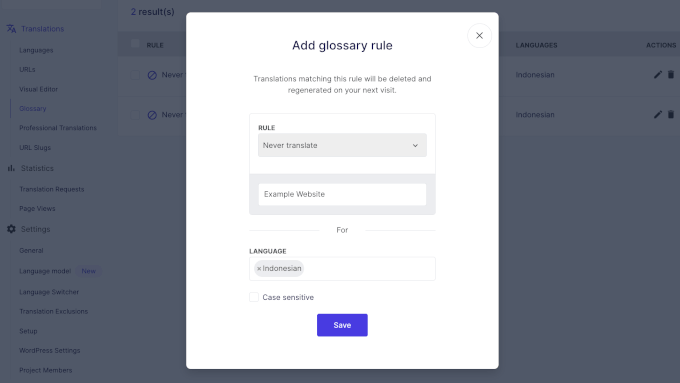

Once you’ve set up the rule, you can click the ‘Save’ button.
Weglot will then redirect you to the ‘Glossary’ tab, where you’ll see all the rules you created in a table.
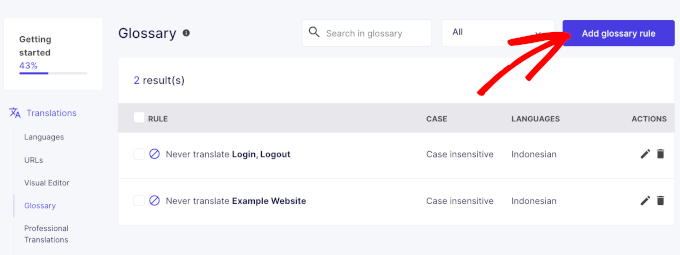

You can continue adding rules by clicking the ‘Add glossary rule’ button and repeating the same process.
Step 5: Configure Your Custom AI Language Model Settings
Now it’s time to set up Weglot’s AI Language Model.
In your project’s configuration panel, navigate to the Settings » Language Model.
From here, click on the ‘Configure’ button to start building a more personalized translation system.
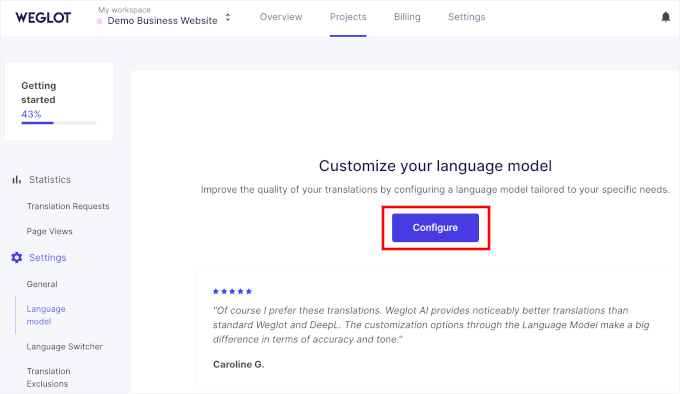

The setup process walks you through several key areas that help the AI understand your brand.
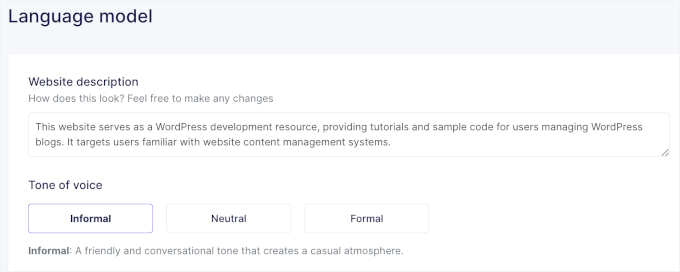
You can start with your website description, where you’ll write 2-3 sentences explaining what your small business does and what makes it unique.
The most important thing is to be specific about your brand right from the beginning. Context makes a big difference, so be sure to provide as much background as possible.
For instance, you could let the AI know: “Our audience includes DIY enthusiasts.”
If you want to explain your tone, don’t just say it’s “friendly.” Instead, you can try to be more specific with phrases like “warm and encouraging” or “practical with a can-do attitude.”
For example, if your WordPress blog is for sharing DIY projects, you could say:
“This website is a go-to resource for DIY lovers who enjoy gardening, cooking, home improvement, and other hands-on projects. We share helpful how-tos, step-by-step guides, and creative ideas to inspire and support your next project. Our tone is warm, practical, and encouraging, like chatting with a knowledgeable friend who’s tried it themselves and wants to help you succeed.“


Next, you’ll define your tone of voice.
Weglot has 3 options for this – Informal, Neutral, and Formal. If you’re not sure what to pick, you can click on each one, and Weglot will show you an explanation:
- Informal: A friendly and conversational tone that creates a casual atmosphere.
- Neutral: A balanced and professional tone suitable for most business contexts.
- Formal: A professional and authoritative tone ideal for official communications.

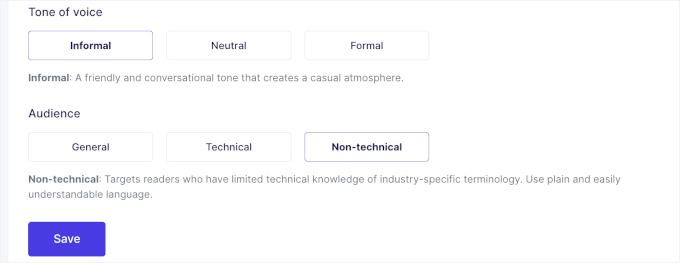
After that, you’ll define your target audience by choosing from the 3 available groups: General, Technical, and Non-Technical.
Here’s what each group means:
- General: Targets a general audience. Use standard terminology to address the broadest possible audience.
- Technical: You are targeting users with technical knowledge and expertise. Use industry-specific terminology when needed.
- Non-technical: Targets readers who have limited technical knowledge of industry-specific terminology. Use plain and easily understandable language.
Don’t forget to click ‘Save Changes’ when you’re done.

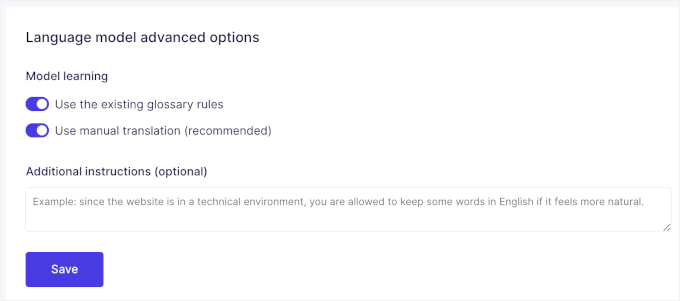
Near the end of the page, you’ll see advanced settings for your language model. These let you fine-tune how Weglot handles translations on your site.
Here, you can choose to:
- Use the existing glossary rules – This tells Weglot to follow the glossary you’ve set up, so your preferred terms and brand-specific wording stay consistent across all translations.
- Use manual translation – If you’ve made manual edits to your translations, enabling this allows Weglot’s AI to learn from them and improve future suggestions. It helps the AI better match your tone and writing style over time.
Just toggle on the options you want to use and then click ‘Save’ to keep your changes.

Step 6: Apply AI Translations to Your Content
After configuring your AI Language Model, you can apply it to your existing translations.
Simply navigate to Translations » Languages and then click on the language pair you want to edit. This will take you to the translations list.
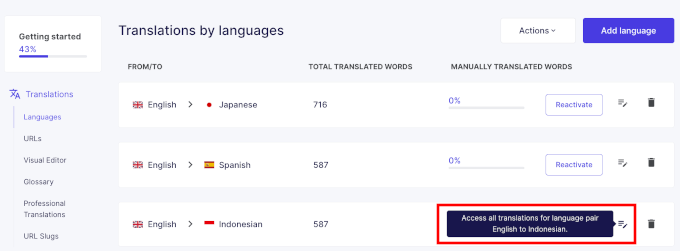

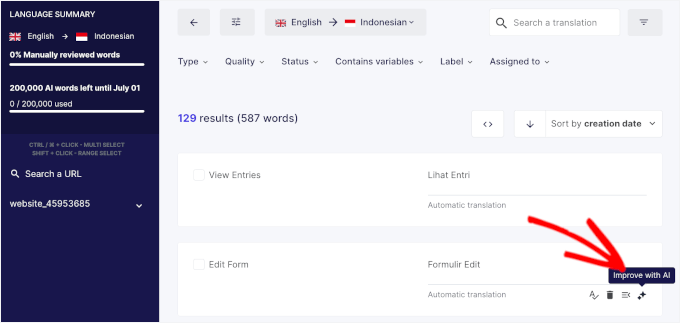
You’ll see that your content has already been translated using a standard engine. To improve it with your custom AI settings, you have full control over which translations get the AI treatment.
Simply hover over a section and click the ‘Improve with AI’ button.
The AI Language Model system will then process your content using all the brand guidelines and terminology you’ve set up.

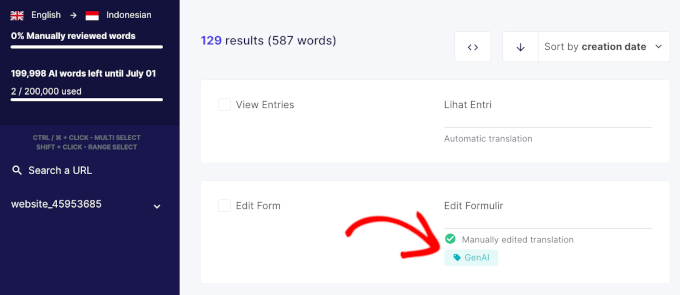
Each translation that gets processed with your AI Language Model will show a ‘GenAI’ tag.
This makes it easy to track which content has been improved with your custom AI settings versus standard translations.

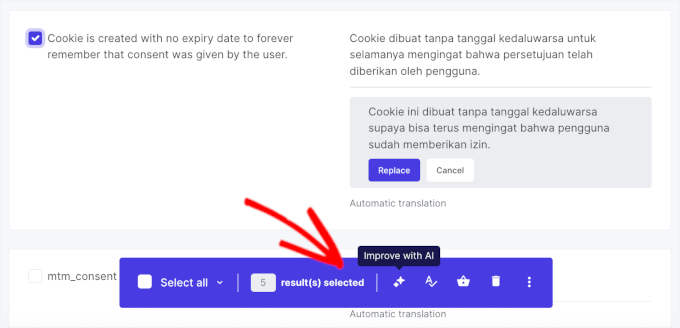
You can apply your AI Language Model to individual translations one by one.
Alternatively, you can select up to 25 translations at a time for bulk processing.

🧑💻 Pro Tip: Since most AI translation tools charge based on usage, it’s smart to start with your high-priority pages – like your homepage, key product pages, and main calls-to-action.
Also, don’t forget to keep an eye on your credit usage, especially during the first month when it’s easy to get caught up in the excitement.
Step 7: Monitor and Refine Your AI Translations
After applying AI translations to your content, it’s important to review the results and make adjustments. The AI does excellent work, but it’s not perfect, especially when it first learns your brand voice.
Here are some tips:
- Check a few translated pages on your live website to see how the AI-generated content flows and sounds to real visitors.
- Pay attention to how well it maintains your brand personality and whether technical terms are handled correctly.
When you find translations that need tweaking, you can make those edits manually in the Weglot dashboard. Just go to the section and edit it right in the translation field.
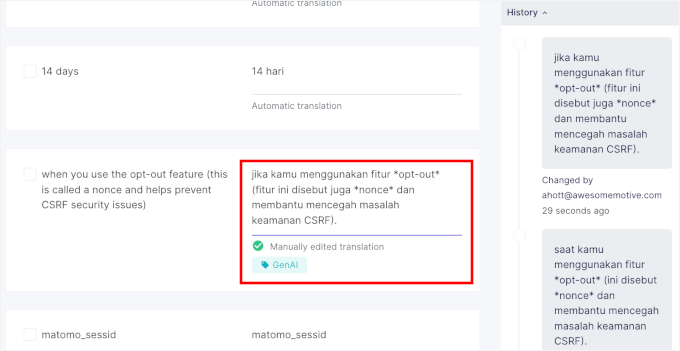

Weglot will then update the status to ‘Manually edited translation.’
Here’s the smart part: The AI learns from your manual corrections and applies those lessons to future translations automatically.
This creates a feedback loop where your AI language model improves over time. The more you use it and refine it, the more accurately it captures your unique brand voice across all languages.
That’s it! You’ve successfully used Weglot’s AI Language Model to create high-quality, on-brand translations for your website.
Method 2: Using SeedProd’s AI Translation (For Page Content)
Weglot is designed for translating your entire website automatically. On the other hand, SeedProd, which is the best drag-and-drop page builder, is perfect for translating content across your WordPress pages.
This method is perfect if you don’t need to translate your whole site but want to quickly create a specific landing page for a campaign in another language.
For example, you could launch a sales page in Spanish for a special promotion without changing anything else on your English website.
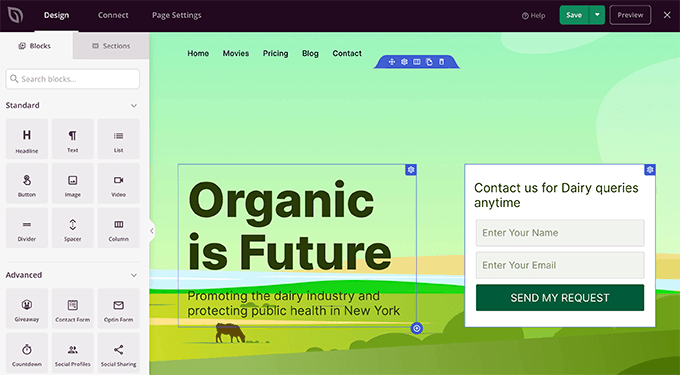

✋ Heads Up: It’s important to know that SeedProd translates content on a page-by-page basis within its editor and does not create a sitewide language switcher.
For more information about the plugin, check out our detailed SeedProd review.
Step 1: Install and Set Up SeedProd
First, you’ll need to sign up for an account on the SeedProd website.
Just click on the ‘Get SeedProd Now’ button and follow the registration process.

Once you have signed up for an account, you will be taken to your SeedProd dashboard, where you need to download the zip file for the plugin.
Then, it’s time to install it on your WordPress website.
Go to Plugins » Add New Plugin then click on the ‘Upload Plugin’ button.
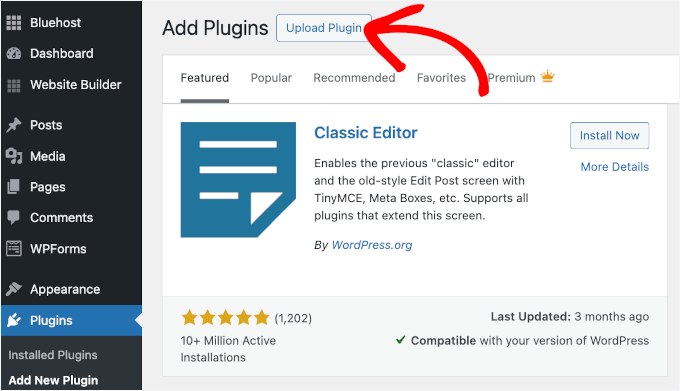

This will open the file uploader.
Click on the ‘Choose File’ and upload the SeedProd zip file from your computer.
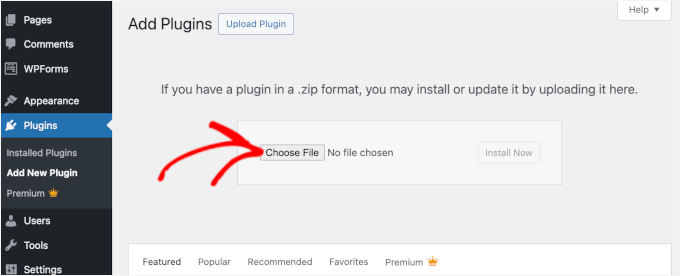

Once uploaded, you can click the ‘Install Now’ button and then ‘Activate’ when it appears.
For more information, see our guide on how to install a WordPress plugin.
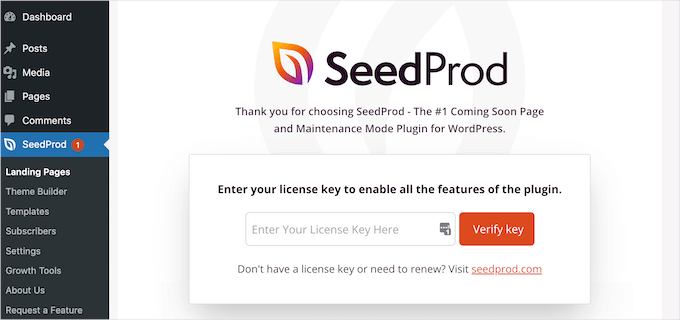
You will then be redirected to a page where you need to enter your SeedProd license key. You can find this in your SeedProd account.

Step 2: Create a Page with SeedProd
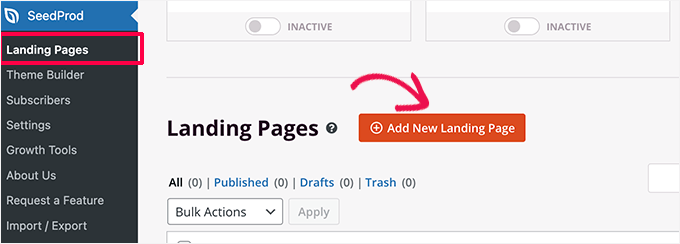
Next, you can navigate to SeedProd » Landing Pages in your WordPress admin area to create a new page.
Simply click ‘Add New Landing Page’.

After that, you’ll need to choose a template.
SeedProd has lots of template options, which are organized into different campaign categories, including coming soon, thank you, and 404 pages. You can click on the tabs at the top of the screen to filter templates based on campaign type.
Since we are creating a landing page, you may want to take a look at the Sales, Webinar, or Lead Squeeze tabs.
SeedProd lets you preview each template. Simply hover your mouse over it and then click on the magnifying glass.
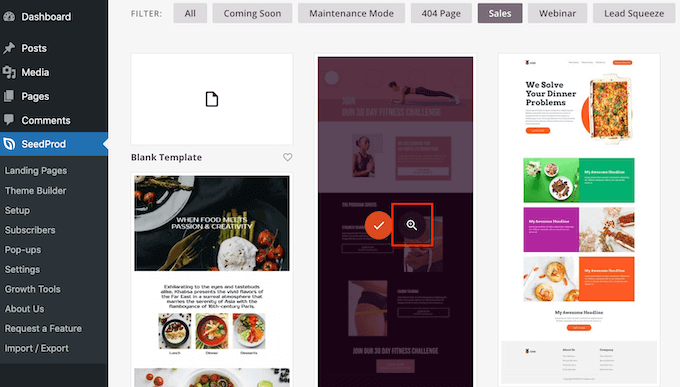

Once you have found the perfect template, click the checkmark button.
This will open a popup where you can name your landing page.
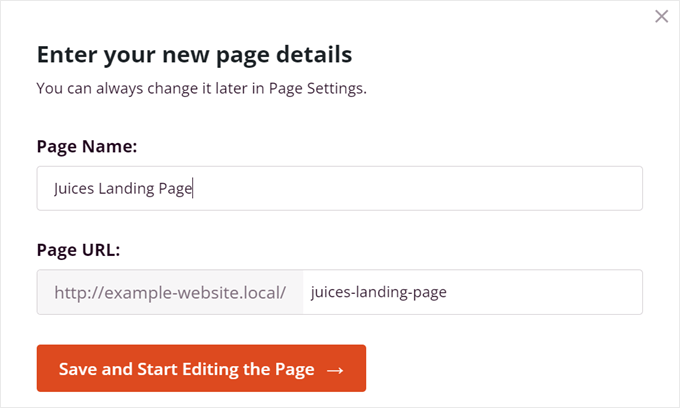

When the page builder opens, you’ll see your content layout on the right side and the building tools on the left.
This is also where you’ll find the AI translation features for individual page elements.
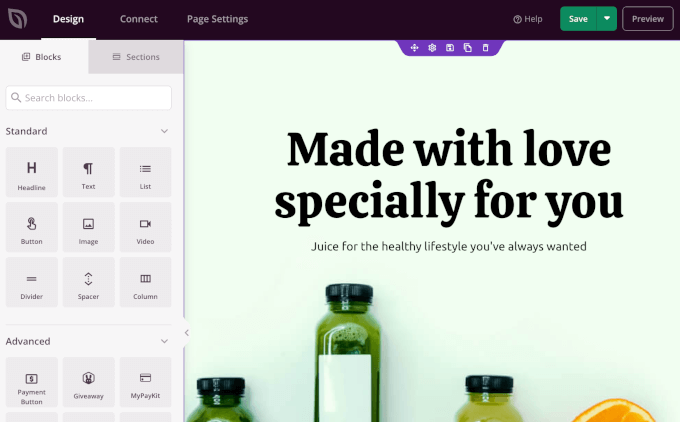

You can now start building and customizing your landing page by dragging and dropping blocks from the panel on the left onto the page on the right.
For details, see our guide on how to create landing pages in WordPress.
Step 3: Translate Page Elements with AI
The AI translation option appears when you select text blocks, like headlines, paragraphs, or button text. You won’t see translation options for images or structural blocks, since those don’t contain translatable text content.
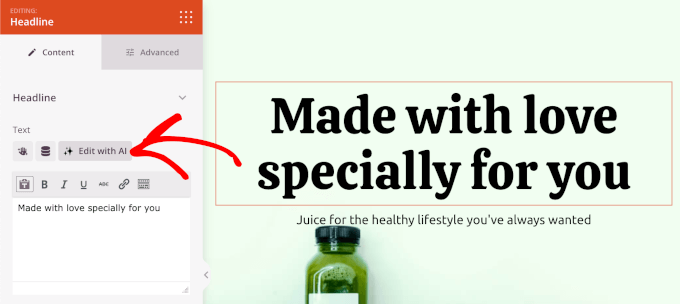
To translate any text block, simply click on it to select it within the page builder. You’ll see the block’s settings panel open on the left side of your screen.
From here, let’s click ‘Edit with AI.’

On the popup that appears, go ahead and expand the ‘Translate text to’ dropdown. SeedProd will then present you with more than 50 language choices.
Select the target language you want to translate your content into from the dropdown menu.
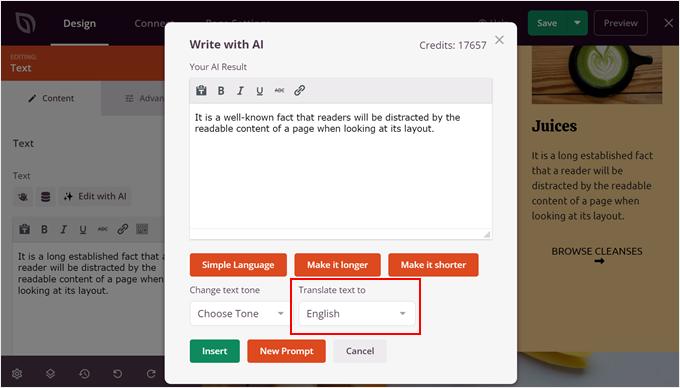

Once you pick your target language, SeedProd’s AI will quickly translate your text in just a few seconds.
You’ll see a preview of the translation, allowing you to check the tone and meaning. If it looks good, just click ‘Insert’ to replace the original text.
What if it doesn’t sound quite right? You can tweak it or generate a new version.
Just repeat this for each text block you want to translate.
Step 4: Review and Publish Translated Content
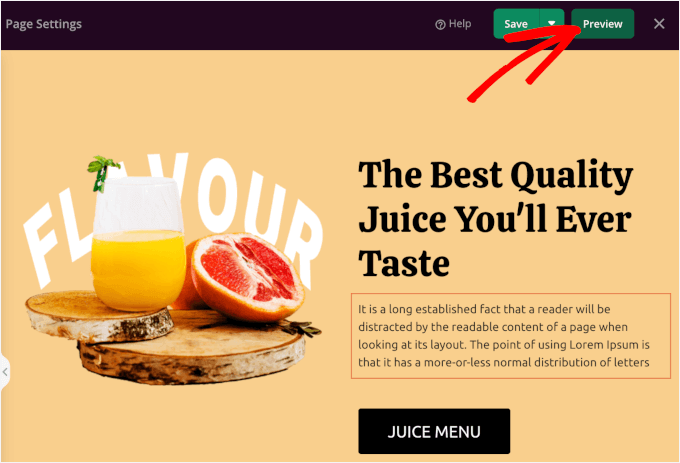
Before publishing your translated page, I recommend using SeedProd’s preview feature to see how everything looks together.
Click the ‘Preview’ button to view your page as visitors will see it, checking that all translated elements work well together.

Pay special attention to button text, headlines, and calls-to-action to make sure they’re compelling in the target language. Sometimes, direct translations don’t have the same impact as the original, so you might need to adjust phrasing for maximum effectiveness.
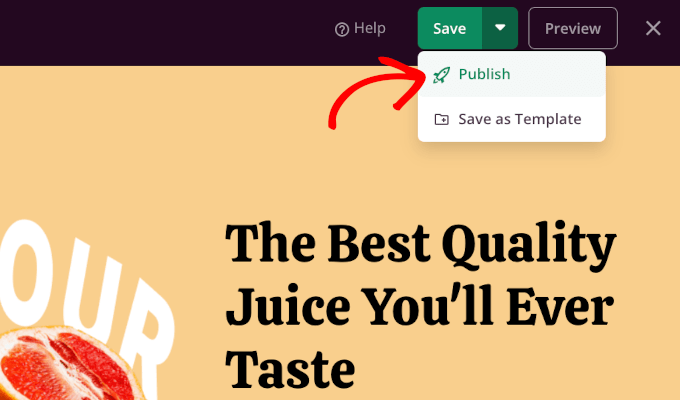
Once you’re satisfied with all the translations, you can make the page live by clicking on the ‘Save’ button and then ‘Publish.’

FAQs About Using AI to Translate Your Website
Still have a few questions about AI translations? Below, I’ve answered some of the most common ones to help you make a more informed decision.
How accurate is AI translation compared to human translation?
AI translation has come a long way from the clunky Google Translate days, but it’s not quite at human-level accuracy yet. In my experience, modern AI tools like Weglot‘s AI Language Model get most of the translations right on the first try.
The biggest difference is context understanding. Human translators excel at picking up subtle meanings and cultural references that AI might miss. However, AI wins on consistency because it won’t translate the same term differently across your site like human translators sometimes do.
For most business websites, AI translation provides excellent results that you can fine-tune as needed. The key is treating it as a smart starting point.
Can AI understand regional language differences?
Current AI translation tools handle regional differences better than you might expect, but they’re not perfect.
For example, let’s say you tested translations for Spanish markets. In this case, you may notice that the AI can distinguish between Mexican Spanish and Argentinian Spanish when you specify the target region.
The challenge comes with cultural context and local business practices. AI might translate your content accurately, but it might miss that certain phrases sound too formal or casual for specific regions.
Are there limitations to the current AI capabilities?
Yes, AI translation still has some blind spots. Humor, wordplay, and highly creative content often fail to translate well because they rely on cultural knowledge that AI hasn’t yet fully mastered.
Technical jargon can be tricky, too. While AI handles common business terms well, specialized industry language sometimes gets lost in translation. That’s why building a comprehensive glossary is so important.
I also noticed that AI can struggle with context that spans multiple sentences. It may translate each sentence accurately on its own, but miss how they work together to convey the full meaning.
What are some common challenges in AI translation, and how can they be overcome?
The biggest challenge I see is users expecting AI to work perfectly right out of the box. You need to invest time in training the system with your brand voice and terminology.
Another common issue is inconsistent quality across different content types. Blog posts might translate beautifully, while product descriptions sound awkward. The solution is to create specific guidelines for each type of content you’re translating.
Credit management can also be challenging for beginners. Start small, test thoroughly, and scale up gradually. It’s better to translate 10 important pages perfectly than to translate 100 pages poorly all at once.
More AI Guides to Help Streamline Your WordPress Tasks
I hope this guide helped you learn how to use AI to translate your website. If you found this helpful, you may also want to check out our other guides for growing your business with AI:
If you liked this article, then please subscribe to our YouTube Channel for WordPress video tutorials. You can also find us on Twitter and Facebook.

