
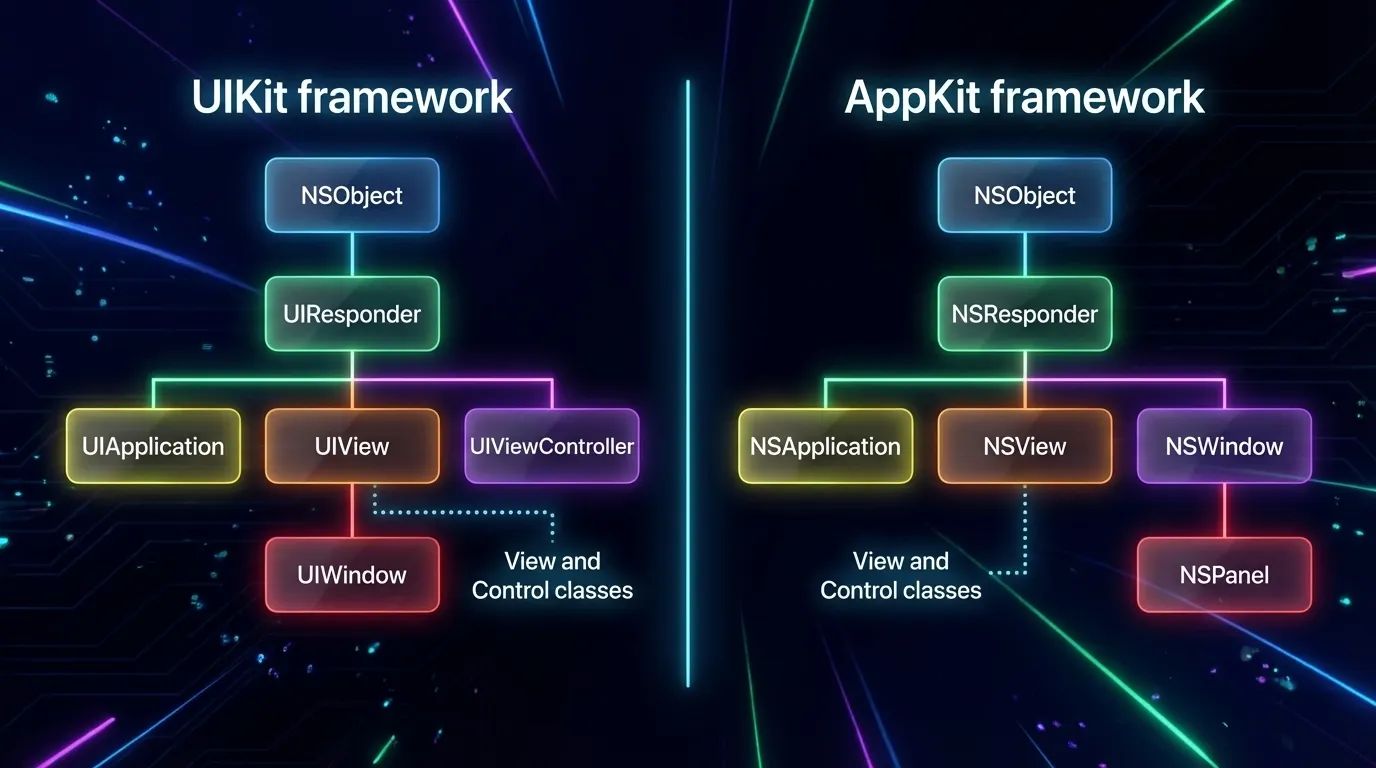
UIKit
Let’s start with the basics. What exactly is UIKit? If we look at the official documentation, we find the following definition:
“The UIKit framework provides the required infrastructure for your iOS or tvOS apps. It provides the window and view architecture for implementing your interface, the event handling infrastructure for delivering Multi-Touch and other types of input to your app, and the main run loop needed to manage interactions among the user, the system, and your app.”
From this, we learn that the framework provides the architecture for windows and views, the infrastructure for event handling, and the main run loop. Let’s break this down step by step.
UIApplication, UIWindow, and UIView: Who, Why, and What For?
Our application starts by instantiating the UIApplication class. Every iOS app has exactly one UIApplication instance. It routes user events and, in conjunction with the UIApplicationDelegate, informs us about critical system events (such as app launch, memory warnings, and app termination).
Let’s see how this looks in code. If we were using Storyboards, this process would happen automatically. The UIApplicationMain function checks if your app uses storyboards. It determines whether you are using a main storyboard and what its name is by inspecting the Info.plist key: “Main storyboard file base name” (UIMainStoryboardFile).
However, we will set this up entirely programmatically:
// Using the @main attribute to designate the primary entry point for the application
@main
class MainAppDelegate: UIResponder, UIApplicationDelegate {

          // Defining the main window of the application var window: UIWindow?
          // UIApplicationDelegate method. Called when the application has finished launching

          func application( _ application: UIApplication, didFinishLaunchingWithOptions launchOptions: [UIApplication.LaunchOptionsKey: Any]? ) -> Bool {

                  let window = UIWindow(frame: UIScreen.main.bounds) window.rootViewController = ViewController()

                  // Initialize the root view controller
                  window.makeKeyAndVisible()
                  // Make this the key window and make it visible
                  self.window = window return true
          }
}
UIApplicationMain creates an instance of UIApplication and retains it. This instance can later be accessed anywhere via UIApplication.shared. Next, it instantiates the app delegate class. The system knows which class to use because we marked it with the @main attribute (or @UIApplicationMain in earlier versions).
UIApplicationMain then calls the application(_:didFinishLaunchingWithOptions:) method on the app delegate. However, the app’s interface won’t appear on screen until its containing window becomes the key window. This is where the makeKeyAndVisible() method comes to the rescue.
But starting with iOS 13, the responsibilities of the AppDelegate were split between the AppDelegate and the SceneDelegate. This was a result of the new multi-window support introduced in iPadOS, which essentially divided the app delegate’s workload into two distinct parts:
UIApplicationMaincalls theapplication(_:didFinishLaunchingWithOptions:)method on the app delegate.- It also creates a
UISceneSession, aUIWindowScene, and an instance that will serve as the window scene delegate. - You need to specify (as a string) which class will act as the scene delegate inside the
Info.plistfile. UIApplicationMainchecks if your initial scene uses Storyboards (the storyboard name must also be specified in theInfo.plist).- If the scene is storyboard-based,
UIApplicationMaincreates aUIWindowinstance and assigns it to the scene delegate. - It then triggers the interface display by calling the
makeKeyAndVisible()method on theUIWindowinstance. - Finally, the
scene(_:willConnectTo:options:)method is called on the scene delegate.
Keep in mind that you shouldn’t expect there to be only one window in your app. The system also utilizes private windows like UITextEffectsWindow and UIRemoteKeyboardWindow under the hood.
Okay, so we’ve figured out how the main event router is created. But what exactly are these events, and what do they look like?
Meet UIEvent. This is the core object containing a wealth of information necessary for event handling. When a system event is detected—such as a touch on the screen—UIKit internally creates UIEvent instances and dispatches them to the system event queue (the main event loop) by calling UIApplication.shared.sendEvent(_:).
UITouch
Every UIEvent instance contains one or more UITouch objects. For any given UITouch object, only four things can happen. These are called touch phases and are described by the var phase: UITouch.Phase property:
.began— A finger has just touched the screen; thisUITouchinstance was just created. This is always the initial phase, and it occurs only once per touch..moved— A finger is moving across the screen..stationary— A finger is resting on the screen without moving. Why is this necessary? Once aUITouchinstance is created, it must be present every time aUIEventarrives for that specific multi-touch sequence. Therefore, if aUIEventis triggered by something else (for example, a new finger touching the screen), the event needs to report the state of all active touches, even the ones doing absolutely nothing..ended— A finger was lifted from the screen. Like.began, this phase happens only once. TheUITouchinstance will now be destroyed and will no longer appear in subsequentUIEventsfor this multi-touch sequence.
Essentially, these four phases are enough to describe all finger interactions. However, there is one more possible phase:
.cancelled— The system aborted the multi-touch sequence because of an interruption. This could happen if the user presses the Home button or locks the screen mid-gesture, or perhaps a system alert or local notification pops up.
A UITouch also has several important properties:
location(in:),previousLocation(in:)— The current and previous locations of the touch, relative to the coordinate system of a specific view.timestamp— The time when the touch last changed. A touch receives a timestamp upon creation (.began) and updates it every time it moves (.moved).tapCount— If two touches occur in roughly the same location in quick succession, and the first one is brief, the second can be classified as a repetition of the first. These are distinct touch objects under the hood, but the second one will be assigned atapCountvalue one greater than the preceding touch.view— The view to which the touch is attached.
When a UITouch first appears (.began), your app determines which UIView it interacts with (we’ll dive into how this happens later during Hit Testing). That specific UIView is then assigned to the touch’s view property and locked in. From that moment on, the UITouch remains associated with that view for its entire lifecycle, until the finger leaves the screen.
The Main Event Loop
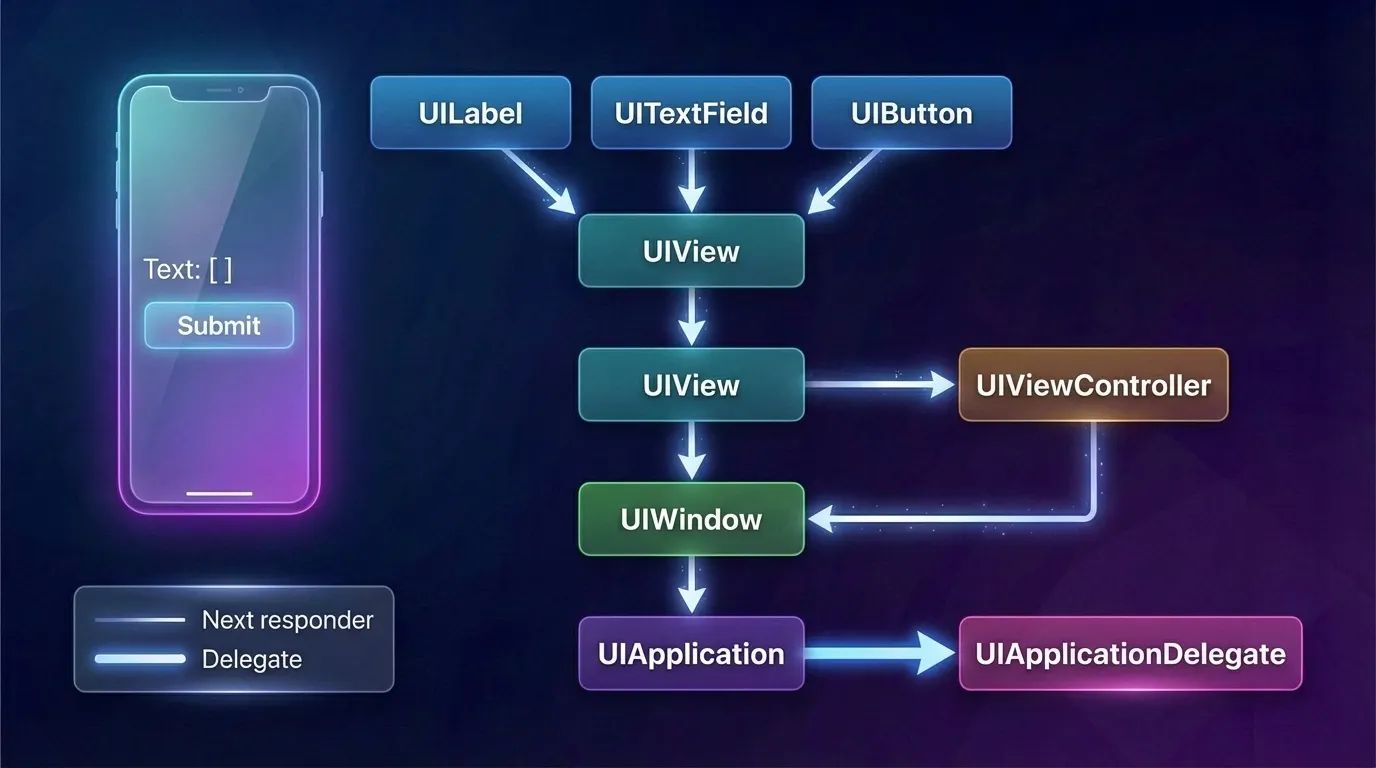
When the application object retrieves an event from the event queue, it dispatches it to the window where the user interaction occurred. The window then forwards the event to the view that is the most appropriate handler for it. Right after launch, the app sets up the infrastructure for the main event loop.

When an app launches, it also sets up a core group of objects responsible for rendering the UI and handling events. These core objects include the window and various types of views.
When the application object receives an event from the event queue, it dispatches it to the window where the user interaction occurred. The window, in turn, forwards the event to the view that is the most appropriate handler for it.
Okay, everything seems clear so far. We’ve learned about the main event router and explored the events themselves. But how exactly do these events reach their execution point?
The Responder Chain
UIResponder instances are the primary event handlers in an iOS application. In fact, almost all key objects in the UIKit hierarchy are responders (including UIApplication, UIWindow, UIViewController, and UIView).
To receive events, a responder must implement the appropriate event-handling methods and, in some cases, notify the app that it can become the first responder.
Responders receive raw event data and must either handle the event themselves or forward it to another responder object. This forwarding happens along a linked list, passing the event from one responder to the next.
If the first responder cannot handle an event or action message, it forwards it to the “next responder”. As long as an object in the responder chain cannot process the event, it continues to pass the message to the next responder in the chain. The message propagates up the hierarchy to higher-level objects until it is handled. If it reaches the end of the chain and remains unhandled, the application simply discards it.

A responder has several methods for handling touch events:
touchesBegan(_:with:)— Tells the responder when one or more new touches occur in a view or a window.touchesMoved(_:with:)— Tells the responder when the position or force of one or more touches associated with an event changes.touchesEnded(_:with:)— Tells the responder when one or more fingers are lifted from a view or a window.touchesCancelled(_:with:)— Tells the responder when a system event (such as a system alert popping up) cancels a touch sequence.
The arguments for these methods are:
touches: Set<UITouch>— A collection of touches. If there is only one touch in the set, we can easily retrieve it. If there are multiple touches, calling.firstwill return one of them (since sets are unordered collections, the system arbitrarily determines which element is returned first).event: UIEvent?— TheUIEventobject itself containing the event data.
Gesture Recognizers
The process of recognizing gestures is a rather complex mechanism. It gets even trickier when we want to handle multiple, distinct types of gestures simultaneously. The elegant solution to this is Gesture Recognizers (subclasses of UIGestureRecognizer). They standardize common gestures and allow us to separate and encapsulate the handling logic for different gestures into distinct objects. Thanks to gesture recognizers, there is no longer a need to subclass a UIView purely to implement custom touch interpretation.
A Gesture Recognizer is an object whose sole job is to detect whether a specific multi-touch sequence matches one particular type of gesture. It is attached to a UIView. We can add or remove recognizers using the view’s methods:
addGestureRecognizer(_:)removeGestureRecognizer(_:)
While UIGestureRecognizer implements the four basic touch methods, it is not a responder itself. Therefore, it does not participate in the responder chain.
Essentially, a view maintains an array under the hood that stores all of its attached gesture recognizers.
In the use case below, we will use a gesture recognizer to implement a view that allows itself to be dragged in any direction with a single finger.
func viewDidLoad {
      super.viewDidLoad()
      let p = UIPanGestureRecognizer(target:self, action:#selector(dragging))
      self.v.addGestureRecognizer(p)
}

@objc func dragging(_ p : UIPanGestureRecognizer) {
    let v = p.view!
    switch p.state {
          case .began, .changed:
               let delta = p.translation(in:v.superview)
               var c = v.center
               c.x += delta.x;
               c.y += delta.y
               v.center = c
               p.setTranslation(.zero, in: v.superview) default: break
  }
}
The window delivers touch events to the gesture recognizers before it delivers them to the hit-test view.
Summary of Event Delivery
So, let’s summarize the journey of a touch, from the initial point of contact to the point where the event is handled:
- When a new touch occurs, the application performs hit-testing to determine which view was actually touched. This specific view becomes permanently associated with the touch for its entire lifecycle and is referred to as the hit-test view.
- When a touch event is processed, the application calls its own
sendEvent(_:)method, which in turn calls the window’ssendEvent(_:)method. The window then routes the touch to its proper destination.
But how exactly is this route determined?
Hit-Testing
Hit-Testing is a recursive search through the entire view hierarchy to pinpoint exactly which view the user interacted with. iOS attempts to determine which UIView is the absolute frontmost view under the user’s finger that is eligible to receive the touch event.
Press enter or click to view image in full size
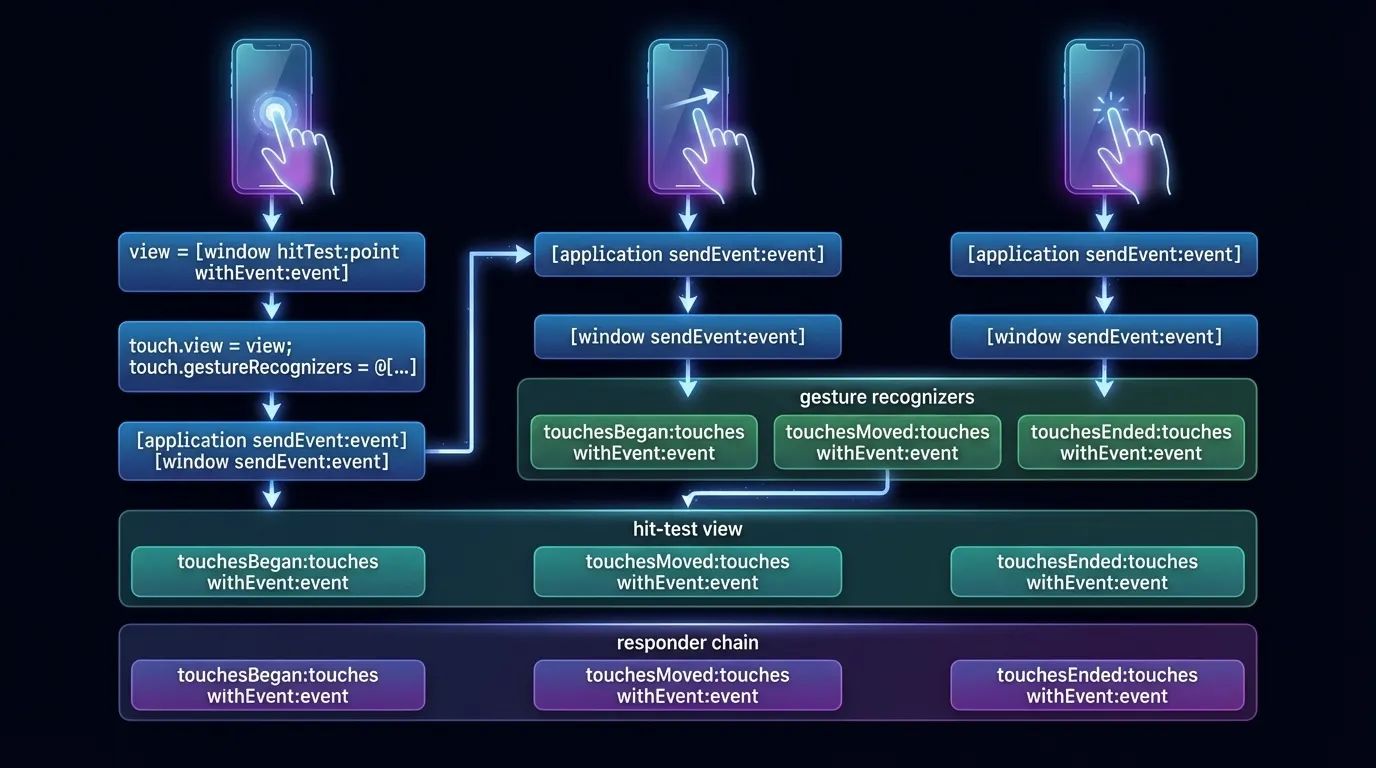
In the diagram above, hit-testing occurs the moment a finger touches the screen — and crucially, this happens before any view or gesture recognizer receives the UIEvent object that encapsulates the touch. The resulting UIView becomes the first responder.
The hitTest(_:with:) method implements the hit-testing logic specific to a given view. If a view’s isUserInteractionEnabled property is false, its isHidden property is true, or its alpha level is close to 0.0, hitTest(_:with:) immediately returns nil. This indicates that neither this view nor any of its subviews are eligible to be the successful hit-test view.
The routing algorithm kicks off by dispatching a message to the UIApplication instance via the sendEvent(_:) method. The UIApplication, in turn, forwards the event to the UIWindow by calling its own sendEvent(_:) method. From there, the UIWindow performs the intricate hit-testing logic for each touch across its entire view hierarchy.
Let’s take a look at the code:
class CustomWindow: UIWindow {

    var childSubviews = [UIView]()

    override func sendEvent(_ event: UIEvent) {
          // Safely unwrap the touches and get the primary touch
    guard let allTouches = event.allTouches,
          let primaryTouch = allTouches.first else {
              return
    }

    // Find the appropriate responder via hit-testing, falling back to the window itself

    let targetResponder: UIResponder = childHitTest(point: primaryTouch.location(in: self), with: event) ?? self
    // Dispatch the touch event to the target responder based on its current phase

    switch primaryTouch.phase {
            case .began:
                  targetResponder.touchesBegan(allTouches, with: event)
            case .moved:
                  targetResponder.touchesMoved(allTouches, with: event)
            case .ended:
                  targetResponder.touchesEnded(allTouches, with: event)
            case .cancelled, .stationary, .regionEntered, .regionMoved, .regionExited:
                  // Explicitly ignoring other phases for this custom implementation
                  break
            @unknown default:
                  break
        }
    }

   private func childHitTest(point: CGPoint, with event: UIEvent?) -> UIView? {

          // A view cannot receive touches if it's hidden, ignoring interaction, or transparent

          guard isUserInteractionEnabled, !isHidden, alpha > 0.01 else { return nil }

          // Iterate in reverse order: the visually frontmost subviews are at the end of the array

          for subview in childSubviews.reversed() {

          // Check if the touch point falls within the subview's bounds
            guard subview.frame.contains(point) else { continue }

          // Convert the point to the subview's coordinate system

          let convertedPoint = subview.layer.convert(point, to: layer)
          // Recursively hit-test the subview

          if let hitView = subview.hitTest(convertedPoint, with: event) {
                  return hitView
              }
           }
            // No suitable subview was found
         return nil
      }
}
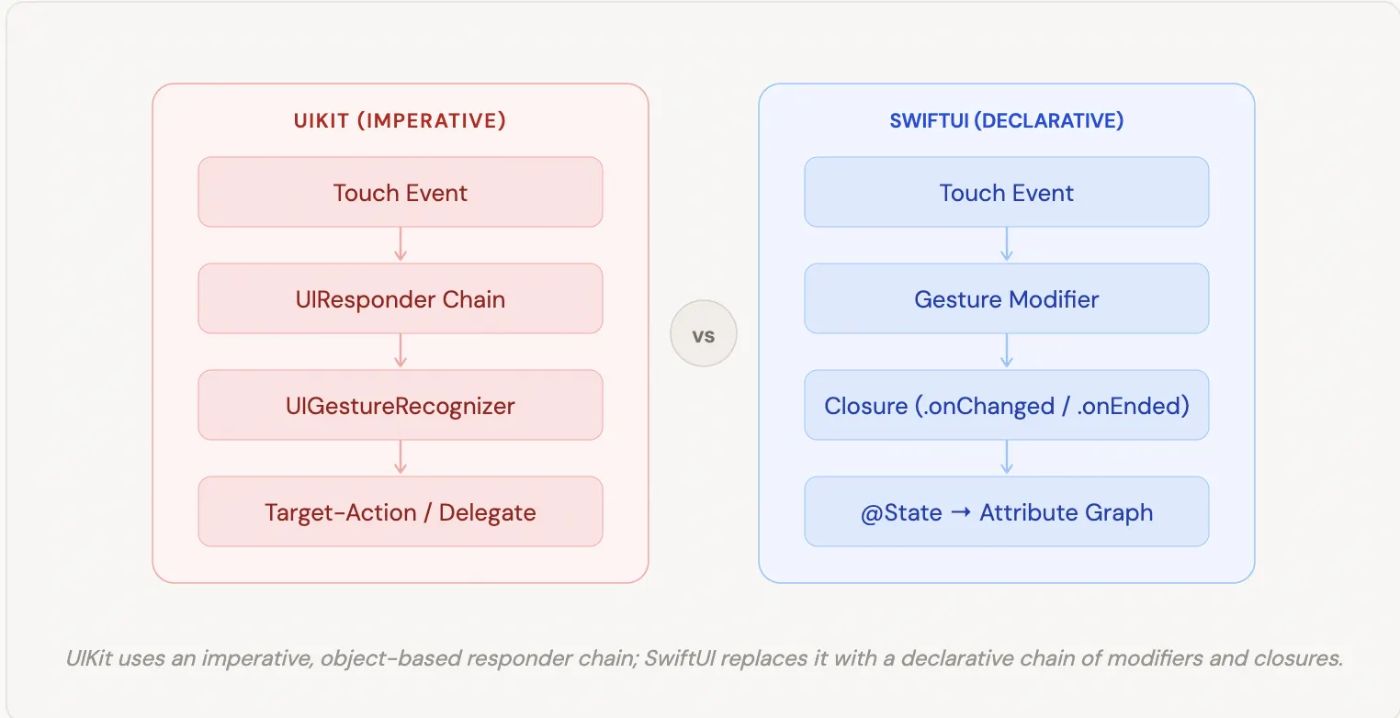
SwiftUI: A Declarative Approach to Event Handling
Now that we’ve taken a deep dive into the imperative world of UIKit, let’s shift our paradigm. If you go looking for UIResponder or the nextResponder property in SwiftUI, you won’t find them.
In SwiftUI, views are lightweight, ephemeral structs (value types) rather than heavy objects inheriting from a base class. Because of this, the traditional Responder Chain simply does not exist. Instead, SwiftUI handles events and gestures through a declarative system of modifiers and state bindings, powered under the hood by the Attribute Graph.
Let’s break down how the concepts we discussed in UIKit translate to SwiftUI.
Hit-Testing the SwiftUI Way
Just like in UIKit, when a user touches the screen, the system still needs to figure out which view is being interacted with. SwiftUI performs hit-testing, but the rules have changed slightly.
By default, SwiftUI hit-tests the rendered bounds of a view. However, it only registers touches on areas that actually contain content. If you have a ZStack or a VStack with empty, transparent space, touches will pass right through it to the views behind it.
To control this behavior, SwiftUI gives us two powerful modifiers:
-
.contentShape(Rectangle())— This forces hit-testing to recognize the entire bounding box of the view, even the transparent parts. It’s incredibly useful when making custom buttons or entire rows tappable. -
.allowsHitTesting(false)— The declarative equivalent ofisUserInteractionEnabled = false. It completely removes the view (and its children) from the hit-testing process, allowing touches to pass through.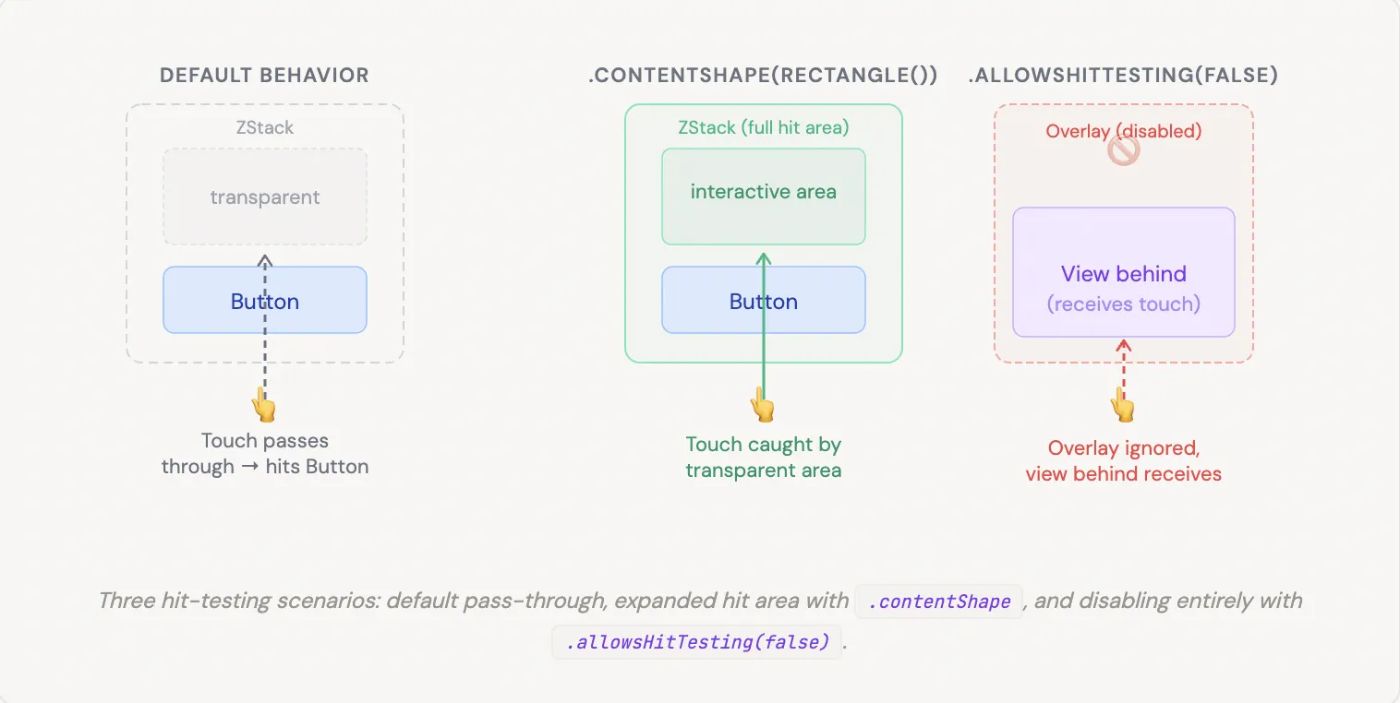
// Make an entire row tappable — including padding/transparent gaps

struct TappableRow: View {

    var body: some View {
            HStack {
                Image(systemName: "star")
                Text("Favorite item")
                Spacer()
                // ← transparent, normally passes touches through
              }
            .padding()
        .contentShape(Rectangle())
 // ← now the whole row is a hit target
  .onTapGesture { print("Row tapped!")
    }
  }
}

// Disable interaction on an overlay without removing it from the hierarchy

struct DisabledOverlay: View {
      var body: some View {
            ZStack {
                InteractiveContent()
                // receives touches
                LoadingSpinner()
                // purely visual
                .allowsHitTesting(false)
              // touches fall through to layer below
            }
        }
}
Gesture Modifiers instead of Recognizers
In UIKit, we instantiated a UIGestureRecognizer object, configured it, and attached it to a view. In SwiftUI, gestures are applied directly to the view hierarchy using view modifiers.
SwiftUI provides built-in modifiers for simple interactions, like .onTapGesture { ... } or .onLongPressGesture { ... }. For more complex interactions, we construct a Gesture instance (like DragGesture, MagnificationGesture, or RotationGesture) and apply it using the .gesture() modifier.
Instead of relying on delegate methods or target-action, SwiftUI gestures use functional closures like .onChanged and .onEnded to report their continuous phases.
The “Responder Chain” Equivalent: Gesture Hierarchy and Priority
So, if there is no responder chain, what happens when a child view and its parent both have gestures attached? How does the event bubble up?
In SwiftUI, the child view has priority by default. If a parent has a tap gesture and a child button has its own tap action, tapping the child will only trigger the child’s action. The event does not automatically “bubble up” to the parent once handled.
If we want to change this behavior, SwiftUI provides specific modifiers to resolve gesture conflicts, effectively giving us explicit control over the event-routing hierarchy:
-
.highPriorityGesture(_:)— Placed on the parent, this forces the parent’s gesture to be recognized before the child’s gesture. If the parent’s gesture fails, the child gets a chance. -
.simultaneousGesture(_:)— Allows both the parent and the child (or multiple gestures on the same view) to recognize their touches and fire their actions at the exact same time, without blocking one another. -
.exclusiveGesture(_:)— Used to compose multiple gestures where only one can succeed (e.g., a single tap vs. a double tap).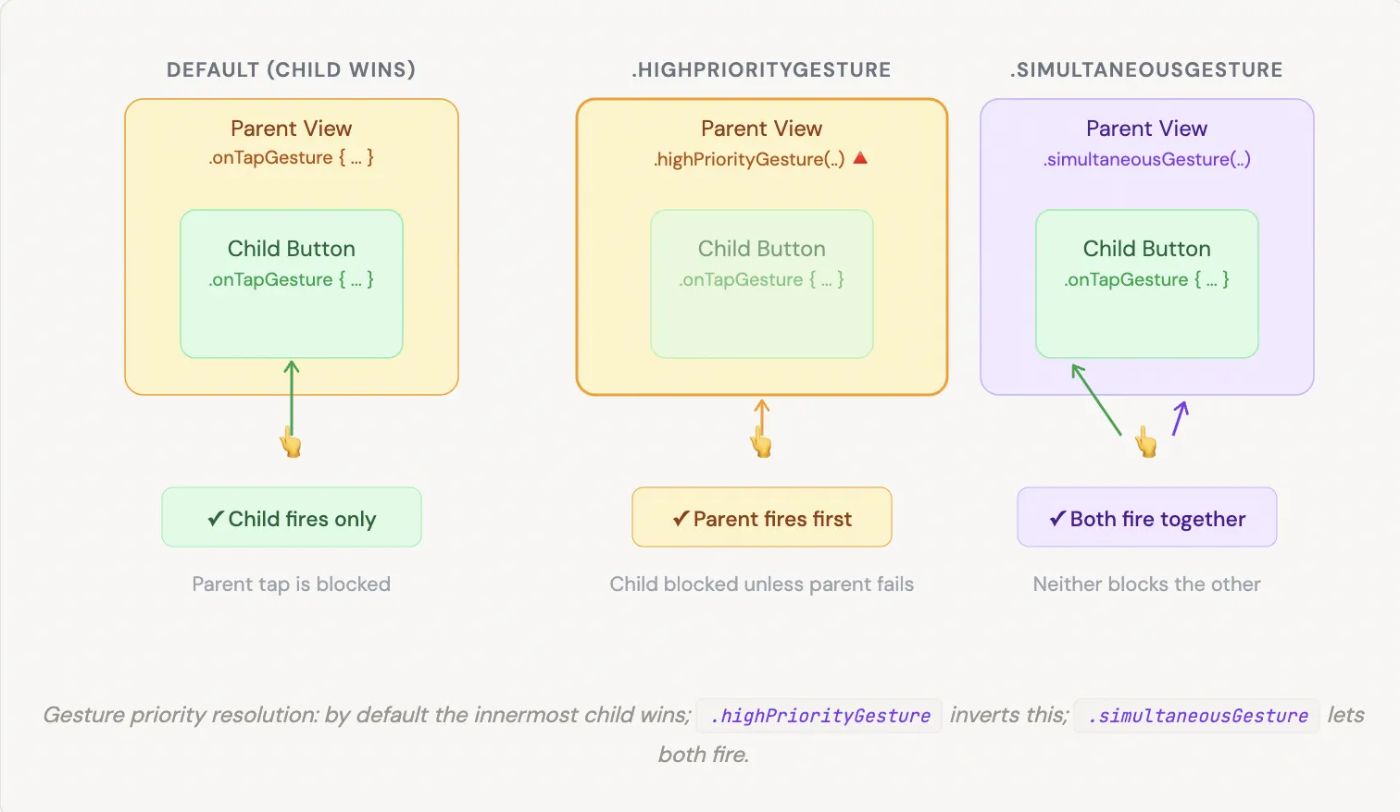
// Default: child button consumes the tap, parent never fires

VStack {
      Button("Tap me") {
           print("Button tapped")
          }
}
.onTapGesture { print("Parent tapped")
}

// ← never fires when button is hit// .highPriorityGesture: parent fires first; child only fires if parent fails

VStack {
    Button("Tap me") {
          print("Button tapped")
    }
}.highPriorityGesture(
      TapGesture()
         .onEnded { print("Parent always wins")}
)

// .simultaneousGesture: both parent and child receive the touch

ScrollView { List(items) {
      item in ItemRow(item: item)
        .onTapGesture { select(item) }
    }
}.simultaneousGesture(
      DragGesture() .onChanged { _ in dismissKeyboard() }

// fires alongside row taps)// .exclusiveGesture: single vs double tap — only one can win

Circle()
  .gesture(
      ExclusiveGesture(
        TapGesture(count: 2)
      .onEnded {
          print("Double tap") },
        TapGesture().onEnded {
          print("Single tap")
          }
      )
)
Closing the Loop: State and the Attribute Graph
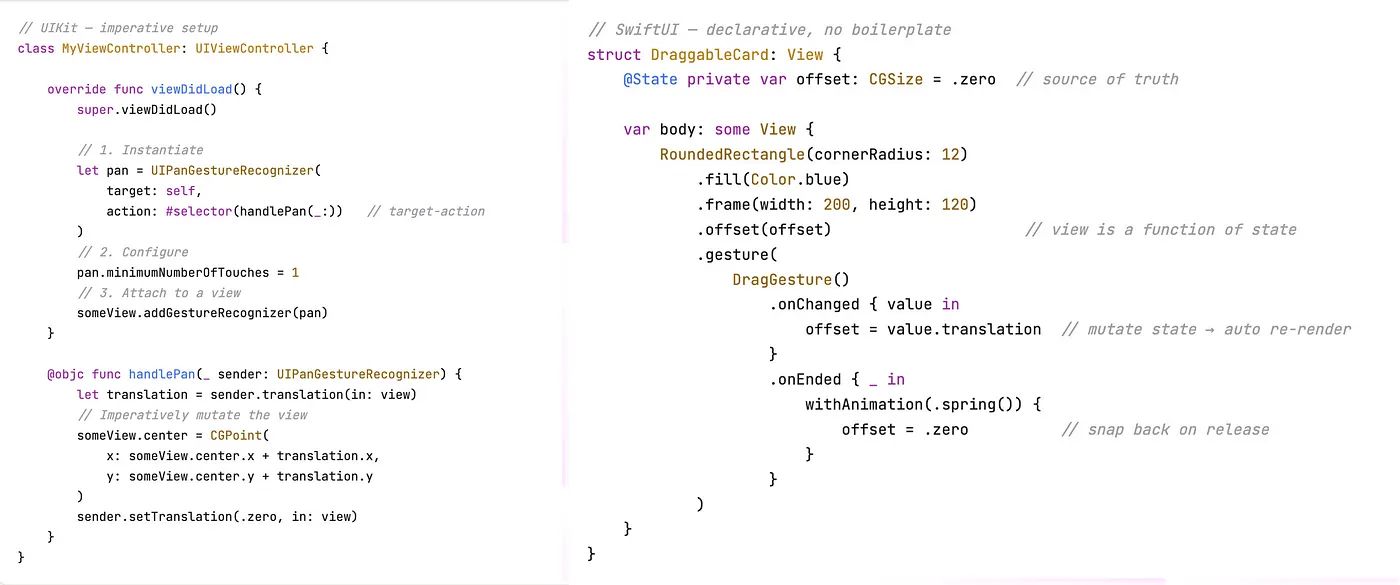
In UIKit, a gesture recognizer typically calls a method that imperatively updates the UI (e.g., myView.center = newPoint).
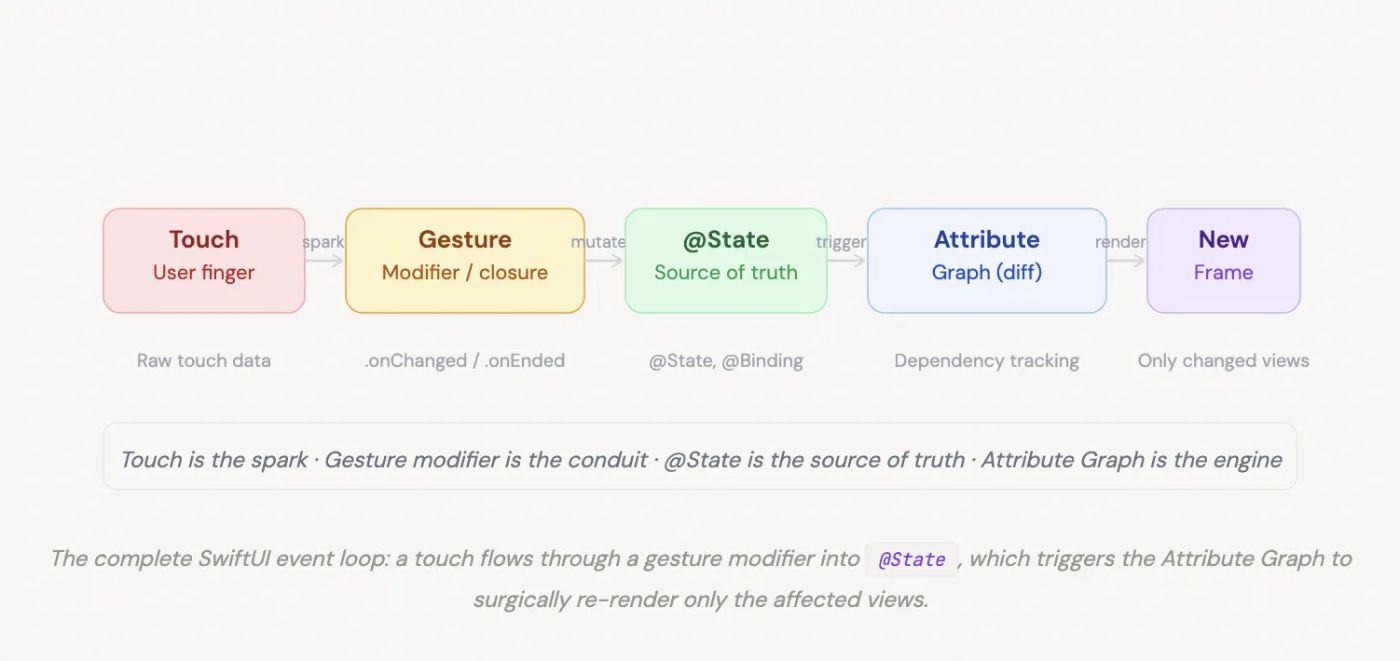
In SwiftUI, an event handling loop looks entirely different. A gesture modifier captures the raw touch data (like translation in a DragGesture) and updates a @State property. Because SwiftUI views are a function of their state, mutating this property triggers the Attribute Graph—SwiftUI’s internal dependency tracking engine. The engine calculates the diff and re-evaluates only the views that depend on that specific state, rendering the new frame.
The touch is the spark, the gesture modifier is the conduit, the state is the source of truth, and the Attribute Graph is the engine that actually redraws the screen.
struct AttributeGraphDemo: View {

      // 1. @State is the single source of truth.
      // Mutating it is the ONLY way to update the UI.
      @State private var cardOffset: CGSize = .zero
      @State private var isDragging: Bool = false

      var body: some View {
          // 2. The view body is a PURE FUNCTION of state.
          // SwiftUI re-evaluates this whenever state changes.
          RoundedRectangle(cornerRadius: 16)
              .fill(isDragging ? Color.blue.opacity(0.9) : Color.blue)
              .frame(width: 200, height: 120)

        // View position is derived from state — not set imperatively
            .offset(cardOffset)
            .scaleEffect(isDragging ? 1.05 : 1.0)
            .shadow(radius: isDragging ? 18 : 6)
            .animation(.spring(response: 0.35), value: isDragging)
            .gesture( DragGesture()
        // 3. Gesture modifier captures raw data…
            .onChanged { value in
              // 4. …and mutates @State.
              // The Attribute Graph sees this change,
              // diffs the view tree, and schedules a re-render
              // for ONLY the views that depend on these properties.
              cardOffset = value.translation isDragging = true
              } .onEnded { _ in

              // Animate back to origin on release
              withAnimation(.spring(response: 0.5, dampingFraction: 0.6)) {
                  cardOffset = .zero isDragging = false
                }
              }
            )
        }
   }

  // Key insight: there is no  myView.center = newPoint anywhere.
  // The Attribute Graph knows cardOffset feeds into  .offset(),
  // so only that transform is recalculated — nothing else in the
  // view hierarchy is touched.
Conclusion: From Imperative Chains to Declarative State
Understanding how iOS handles touches under the hood is a superpower for any developer. We’ve traced the journey of a UITouch from the hardware level, through the Main Event Loop, down the Hit-Testing path, and back up the Responder Chain in UIKit. It is a robust, imperative system where objects actively hand off events to one another.
When we shift to SwiftUI, the paradigm flips. The heavy lifting of UIResponder and UIGestureRecognizer is replaced by lightweight modifiers and a priority-based gesture hierarchy. But the most profound difference lies in the outcome of an event.
In UIKit, a gesture directly manipulates a view. In SwiftUI, a gesture simply mutates @State.
The touch is just the spark. The state is the source of truth.
But what happens the exact millisecond that state changes? How does the system know precisely which parts of the UI to redraw without traversing a massive object tree? That brings us to SwiftUI’s secret weapon: the Attribute Graph.
I’ll be diving deep into exactly how this under-the-hood engine works — and how you can optimize it — in my next article, SwiftUI Attribute Graph: How the Update Engine Works and How to Optimize It.
Stay tuned, and happy coding!


