
In past episodes of
This approach has limitations. The context window size (the amount of information we can include in the prompt) is limited, so the answers were not always great.
Since the AI landscape will change in a few months, it seems that using RAG and Pinecone is old school. Today, the new buzzword is
What is a Model Context Protocol?
The Model Context Protocol (MCP) is an open standard, initially developed by Anthropic, that enables large language models (LLMs) to interact with external tools and data through a standardized interface. In essence, MCP provides a universal connector between AI models and the systems where data lives. Instead of building custom integrations for every data source or scraping tool, developers can expose their data or functionality via an MCP server. AI assistants (the MCP clients) can consistently request those resources, and this standardized, two-way connection enriches raw content with metadata, context, and instructions so that AI models can more effectively interpret information.
But how does it work?
The MCP follows a client-server architecture: The host application (e.g., an IDE or AI assistant) runs an MCP client (Claude, Cursor, etc.) that connects via the MCP protocol to one or more MCP servers. Each server interfaces with a specific data source or tool (e.g., a database, file system, or web scraper) on your local machine or network, providing structured context or actions to the LLM.
An MCP server can expose resources (read-only context data analogous to GET endpoints) and tools (actions or functions the model can invoke analogous to POST endpoints) to the LLM.
Anthropic open-sourced MCP in early 2024 to encourage industry-wide adoption. The goal was to establish a common framework for AI-to-tool communication, reducing reliance on proprietary APIs and making AI integrations more modular and interoperable.
This structured context handling improves on plain prompts. The model no longer just receives a blob of text; instead, it can load data via resources and call tools with well-defined inputs/outputs. In summary, MCP provides a standardized, secure way to feed context into AI models and receive actions/results, which is especially powerful in complex tasks like web scraping.
Why Use MCP?
As we’ve seen in previous posts using RAG, one challenge was adding the downloaded article to the prompt since the context size is limited. We tried different solutions, like splitting the articles into chunks on Pinecone and then saving only a summary made with OpenAI to reduce its length.
Using MCP, especially in this case, where we’re using it inside Cursor IDE, we can create a tool that extracts the HTML and saves it to a file that can be read and chunked by Cursor and used to generate the XPaths.
Another interesting aspect of using MCP is that we mix programming and prompt engineering. In fact, creating an MCP tool is like creating a function in our code: once we crafted the prompt in the IDE, this is evaluated and calls our tools with the needed argument (like the URL to fetch) guessed from our prompt. The tool itself, instead, is a programmed function, so there’s not the fuzziness of a prompt, but given an input, we know the output we can expect. This is great because it reduces the uncertainty of the whole process and, at the same time, opens up a myriad of use cases for enriching the context of your chat with the LLM.
Last but not least, MCP is a standard, and theoretically, once we have a server up and running, we could plug it into any model and tool that supports it. However, the fact that OpenAI does not currently support it is not a good sign for the protocol’s diffusion.
What we’re going to use MCP
We’ll use two key technologies to implement our solution: the MCP Python SDK and Camoufox.
MCP Python SDK. The MCP Python SDK is the official library for building MCP servers (and clients) in Python. It implements the full MCP specification, handling all the underlying protocol messaging so you can focus on defining the resources and tools you need.
With this SDK, you can create an MCP server in just a few lines of code. It provides a high-level FastMCP server class that manages connections and lets you register functions as tools or resources via decorators. For example, you can annotate a function @mcp.tool() to expose it to the model as an actionable tool.
The SDK packages the function’s result and sends it back to the AI client in a consistent format. In summary, setting up an MCP server that can feed context to LLMs or perform tasks on their behalf is straightforward.
Camoufox for HTML retrieval. In web scraping, getting the raw HTML from target pages (especially those with anti-scraping measures or heavy JavaScript) is half the battle. I decided to use Camoufox, which is an open-source stealth browsing tool designed for such scenarios, to be almost sure to be able to get the HTML from every page. This is especially true because the MCP runs locally on my machine, so I won’t need any proxy. On top of its stealth capabilities, I wanted to use Camoufox to build an MCP logic from 0. If you want to save time, you can use
Technical Implementation of an MCP Server for writing a Camoufox scraper
Now, we’ll build the MCP server that helps us write a Camoufox scraper in three steps. Each of the steps of the process has its own tool:
-
fetch_page_content will be a tool that opens Camoufox and stores the HTML of the target page on a file.
-
generate_xpaths will be a tool that reads the HTML file and, given a template of output data, creates the selectors, again saving them to a file. That’s why we want it flexible enough to handle different page types (for example, a product listing page vs. a product detail page in e-commerce).
-
write_camoufox_scraper will be a tool that reads the selectors and a template of Camoufox spider (Camoufox_template.py) and creates a new one based on that and the selectors just created.
The server code (xpath_server.py) will be saved in the repository under folder 79.MCP/MCPFiles.
Step 1: Set Up the Environment
First, make sure you have Python 3.10+ installed and install the necessary packages. We’ll need the MCP SDK and Camouf, which you can install via pip.
pip install mcp camoufox
The mcp package includes the MCP Python SDK and CLI tool. Camoufox may require an additional step to fetch its browser binary (for example, running python -m camoufox fetch to download the stealth Firefox – refer to Camoufox docs for details). Once these are installed, you’re ready to write the server code.
Step 2: Initialize the MCP Server
Create a new Python script (in the repository, it will be xpath_server.py). In this script, we’ll initialize an MCP server and define our tools. Using the MCP SDK is straightforward:
from mcp.server.fastmcp import FastMCP
import asyncio
from camoufox.async_api import AsyncCamoufox
import time
import os

mcp = FastMCP("Scrapy XPath Generator")


.....
coded tools
....

if __name__ == "__main__":
	# Initialize and run the server
	mcp.run(transport='stdio')
That’s enough for setting up an empty MCP server.
Step 3: Implement HTML Retrieval via Camoufox
We want a tool that, given a URL, fetches the page’s HTML content. We’ll use Camoufox to do this in a stealthy way. Let’s define an MCP tool called fetch_page_content:
HTML_FILE_PATH = "/Users/pierluigivinciguerra/TWSC/Code/TheWebScrapingClub/79.MCP/downloaded_page.html"  # File to store the downloaded HTML
CAMOUFOX_FILE_PATH = "/Users/pierluigivinciguerra/TWSC/Code/TheWebScrapingClub/79.MCP/camoufox_template.py"

@mcp.tool()
async def fetch_page_content(url: str) -> str:
	global latest_html

	"""Fetch page HTML using Camoufox stealth browser."""
	print(f"[DEBUG] Fetching URL: {url}")
	try:
		async with AsyncCamoufox(humanize=True) as browser:
			page = await browser.new_page()
			await page.goto(url)
			time.sleep(10)
			latest_html = await page.content()
			with open(HTML_FILE_PATH, "w", encoding="utf-8") as f:
				f.write(latest_html)
			print("[DEBUG] HTML stored for later use")
			return "HTML fetched and stored successfully."
	except Exception as e:
		print(f"[ERROR] {e}")
		return f"Error fetching page: {str(e)}"
Except for the decorator, it’s a simple Camoufox scraper that opens the URL we’ll pass in the prompt inside Cursor and stores the HTML code in a file.
Step 4: Generate XPath Selectors Based on the template
The second tool we need analyzes the HTML and produces XPath selectors for the data we want to scrape. We’ll create a tool, generate_xpaths, that takes a template identifier (to indicate what kind of page or extraction pattern to use) as an argument.
Based on the template, this function will output the appropriate XPath expressions. For example, we might have one template for a Product Listing Page (PLP, a page with multiple products listed) and another for a Product Detail Page (PDP, a page with a single product’s details).
@mcp.tool()
def generate_xpaths(template: str) -> dict:
	"""Write XPATH selectors for the requested fields using the downloaded HTML file."""

	if not os.path.exists(HTML_FILE_PATH):
		return {"error": f"No HTML file found. Run fetch_page_content() first."}

	if template.lower() == "plp":
		fields = "product title, product link, product price, product image, product code"
	elif template.lower() == "pdp":
		fields = "product title, product price, product description, product image, product color, product size, product code"
	else:
		return {"error": "Unknown template type"}

	# Return the HTML and requested fields so Cursor can analyze them
	return {
		"message": "Print the XPath expressions for the requested fields using the variable latest_html.",
		"requested_fields": fields
	}
In this case, we’re simply defining the desired output structure and the fields for which we want to create the selectors.
Step 5: Generate the new Camoufox scraper
Now that we have the selectors, we want to combine a Camoufox Scraper template (Camoufox_template.py) with the selectors to write a scraper with the desired output structure. I learned that using a Camoufox Scraper template is necessary because, without it, the code generated is usually a hallucination and does not work.
@mcp.tool()
def write_camoufox_scraper(template: str, url: str) -> dict:
	print(f"[DEBUG] Writing scraper for template: {template} and URL: {url}")
	"""Reads file Camoufox_template.py and uses it to write a new Camoufox scraper with the requested fields and starting from the url"""
	with open(CAMOUFOX_FILE_PATH, "r", encoding="utf-8") as f:
		latest_html = f.read()
	return{"message": "Using this template, write a working scraper with the requested fields and starting URL"}
That’s it; now we just need to configure Cursor to run this MCP server and write a prompt that uses its tools.
Step 6. Using the MCP Server in Cursor
One of the great things about Cursor (an AI-powered IDE) is its built-in support for MCP servers as extensions of the AI’s capabilities. We will integrate our newly created MCP server into Cursor so that the AI assistant can use it to automate web scraping tasks (like generating XPath selectors for us).
To connect the server in Cursor, follow these steps:
-
Open Cursor Settings – In Cursor IDE, go to the settings menu.
-
Navigate to MCP Servers – Under the Features section, find MCP Servers. (This requires Cursor v0.45.6+ or later, which supports custom MCP server integration.)
-
Add a New MCP Server – Click the “+ Add New MCP Server” button. This will prompt you to enter details for the server.
-
Configure the server – Give it a name like “Scrapy XPath Server” (any friendly name). For Type, select
"command"(since we will run a local command to start the server). For Command, enter the command to launch your server. For example, if your script is saved at /path/to/xpath_server.py, you might put it in the box. -
Save and verify – After entering the details, save the configuration. You should see your MCP server listed in Cursor’s MCP Servers section. Cursor will now launch this server (via the given command) and maintain a connection to it. You might see a green light next to the MCP server’s name.

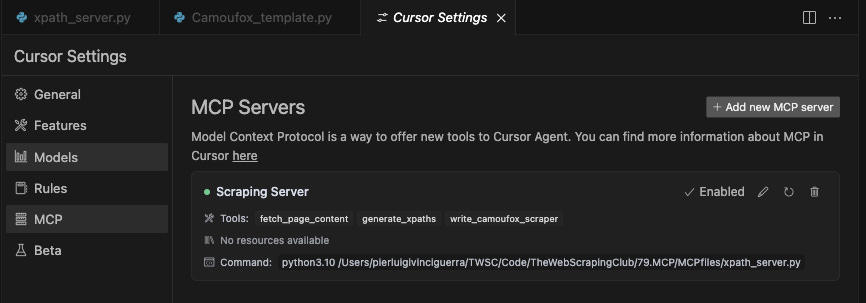
Once the server is added, Cursor’s AI assistant (the “Composer” agent) can use the new tools automatically when appropriate.
In practice, when you ask in the composer, “Get the HTML from this URL and then write the XPath selectors using the template PLP”, the assistant will ask you for confirmation to run the fetch_page_content tool and then the generate_xpath one.


Our tests
After a few hours of interactions with the prompt to understand how to get the data needed in a reliable way, I’ve found that this one does most of the tasks I asked for when used with Cloud 3.7 Sonnet (confirming that is one of the best LLMs for coding
“Fetch the URL @https://www.gucci.com/it/it/ca/women/shoes-for-women-c-women-shoes
Then, write the XPath selectors using the template PLP. Use the downloaded HTML (downloaded_page.html file) to write working XPATH selectors.
Write the selectors in a file called selectors.txt.
Then, given the selectors previously created, Write a Camoufox scraper using the template PLP and the initial URL. If in doubt, read the selectors.txt file to understand how many fields and which selectors you have to use. Use the file Camoufox_template.py for building the scraper and customize it with the fields in output read by the PLP template.”
Cursor opens a Camoufox tab, browses to the URL I passed, saves the HTML in a file, reads it, and then generates XPATH selectors and saves them in another file. I opted to save the results of each step inside a file so that the following steps could read them and eventually chunk them automatically rather than passing their content in the context window, which could be too small.
The scraper created is executable the first time, so it’s technically correct, and the results are quite good.

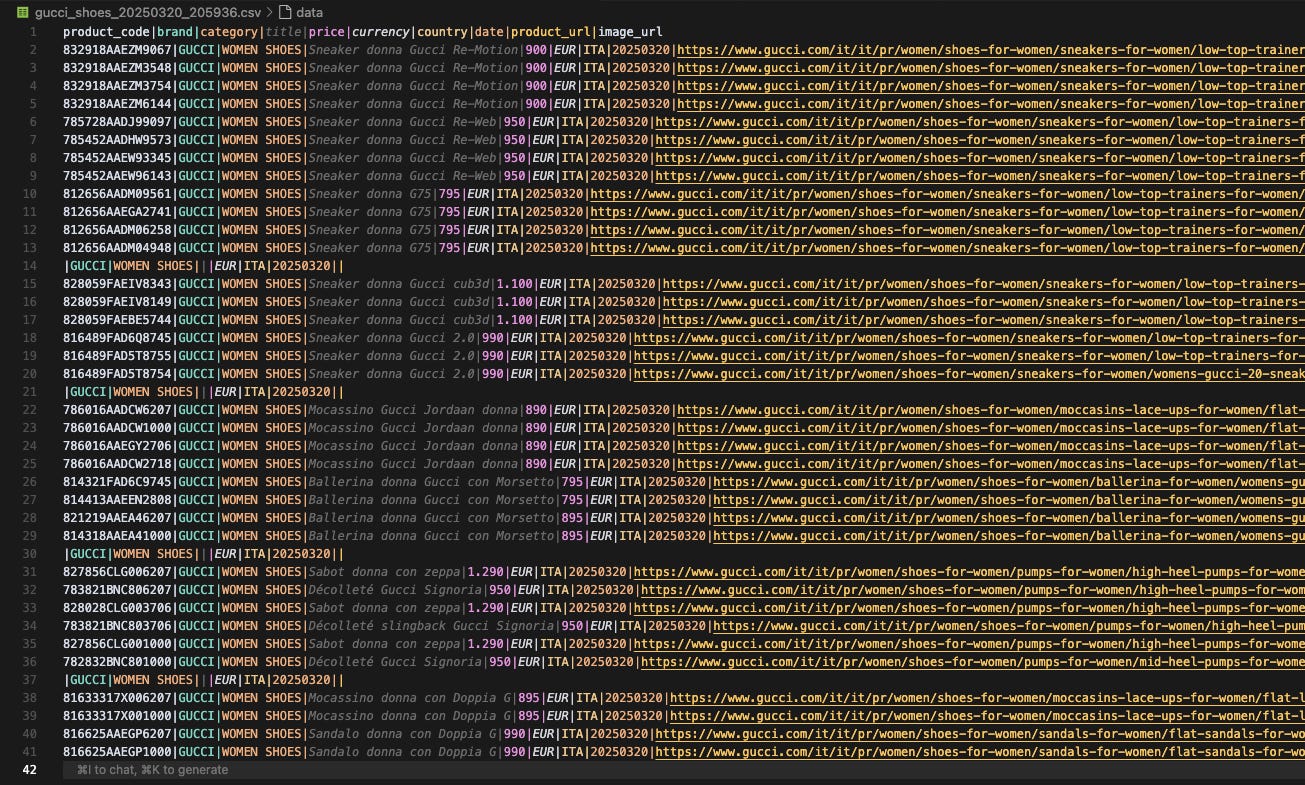
The scraper, without saying anything about the website, correctly populated all the fields, which is excellent and more than I expected from this test.
I still have some concerns about the solution’s reliability. I don’t get the same results every time I run the same prompt, which can be frustrating because you don’t know how to fix the process if you don’t know what to expect from it.
The second issue is probably more of a prompt engineering one. The output data structure is not the one I expected, but the one that the assistant found on the Camoufox scraper template. I still haven’t figured out how to solve this, but I’m sure, in some way, it can be done.
I think we’re done for today. In the next episode, we’ll continue on our journey to make Cursor our web-scraping AI assistant.


